Js' Technical Bloghttp://blog.jsl.im/files/img/logo.pngThis is my technical blog about programming, server setup & configuration, technical learning experience.2024-02-21T10:41:37.621Zhttp://jslim.net/Js LimHexoManipulate tmux with shell scripthttp://jslim.net/blog/2024/01/12/manipulate-tmux-with-shell-script/2024-01-12T09:02:53.000Z2024-02-21T10:41:37.621ZI used to open a few windows in terminal with tmux session, and I did the same thing everyday when I start to to work.
Recently, I find a way to start up the tmux with standard working windows.
# start new detached tmux session, open up vim-dadbod-ui tmux new-session -d -s my-session-name 'vim +DBUI';
# open a new window tmux new-window;
# split the 2nd window tmux split-window -v; # split - 1 top & 1 bottom tmux select-pane -U; # move the cursor to upper window tmux send 'htop' ENTER; # run htop
# open another new window (3rd window) tmux new-window; tmux send 'run some command' ENTER;
# attach the session tmux a;
]]><p>I used to open a few windows in terminal with tmux session,<br>and I did the same thing everyday when I start to toAWS Cognito User Pool custom domain errorhttp://jslim.net/blog/2023/10/17/aws-cognito-user-pool-custom-domain-error/2023-10-17T23:02:53.000Z2024-02-21T10:41:37.621ZOne or more aliases specified for the distribution includes an incorrectly configured DNS record that points to another CloudFront distribution.
I was deleting the user pool, and try to recreating a new one with Terraform, then encounter this error:
1
2
3
4
5
Error: creating Cognito User Pool Domain (xxx.example.com): InvalidParameterException: One or more aliases specified
for the distribution includes an inc orrectly configured DNS record that points to another CloudFront distribution.
You must update the DNS record to correct the problem. For more information, see
https://docs.aws.amazon.com/AmazonCloudFront/latest/DeveloperGuide/CNAMEs.html#alternate-domain-names-restrictions
(Service: AmazonCloudFront; Status Code: 409; Error Code: CNAMEAlreadyExists; Request ID: 11111111-2222-3333-4444-555555555555; Proxy: null)
But I don’t see any CloudFront distribution in my AWS console. It took me hours of troubleshooting…
1
2
$ dig A xxx.example.com +short
xxxxxxxxxxxxxx.cloudfront.net.
Eventually, I noticed the my domain is still pointing to a CNAME record. I deleted that record, and re-run the terraform command, and it works well.
]]><h2Vim DB client: vim-dadbod-ui connection via SSH tunnelhttp://jslim.net/blog/2022/06/17/Vim-DB-client-vim-dadbod-ui-connection-via-SSH-tunnel/2022-06-17T10:39:53.000Z2024-02-21T10:41:37.621ZI’m using vim-dadbod-ui as my MySQL client.
I was trying to connect to RDS via SSH tunnel, finally figure out how to do that.
The first connection is my local DB, and I use port 3306. Since the port 3306 already in used, I map 3307 to the SSH tunnel in step 1, in the second connection I just refer to 127.0.0.1, but with port 3307.
The command is equivalent to
1
mysql -h 127.0.0.1 --port 3307 -u someuser -p --ssl-mode=DISABLED
(Some how I need the --ssl-mode=DISABLED, otherwise it throws error)
In case if you need to add more remote connection, you can use the port 3308 or any other unused port.
]]><p>I’m using <a href="https://github.com/kristijanhusak/vim-dadbod-ui">vim-dadbod-ui</a> as my MySQL client.</p>
<p>I was trying to connectPHP7 Callable Exampleshttp://jslim.net/blog/2022/01/12/PHP7-Callable-Examples/2022-01-12T07:08:04.000Z2024-02-21T10:41:37.621ZA callable as class property
]]><h3 id="A-callable-as-class-property"><a href="#A-callable-as-class-property" class="headerlink" title="A callable as class property"></a>ASetup postgres in Ubuntu serverhttp://jslim.net/blog/2021/07/04/Setup-postgres-in-Ubuntu-server/2021-07-04T08:31:23.000Z2024-02-21T10:41:37.621ZTo install PostgreSQL in Ubuntu (tested in 20.04)
For the first time, we need to create a new user & a new database
Switch to postgres user
1 2 3 4
root@host:/root# su postgres
# connect to postgres server postgres@host:/root$ psql
Then
1 2 3 4 5 6 7 8
postgres=# CREATEROLE my_user LOGINPASSWORD'secret'; CREATEROLE postgres=# CREATEDATABASE my_database; CREATEDATABASE postgres=# GRANTCONNECTONDATABASE my_database TO my_user; GRANT postgres=# GRANTUSAGEONSCHEMApublicTO my_user; GRANT
Import data if necessary
Then run
1 2 3 4 5 6
postgres=# \c my_database You are now connected todatabase "my_database" asuser "postgres". my_database=# GRANTALLPRIVILEGESONALLTABLESINSCHEMApublicTO my_user; GRANT my_database=# GRANTALLPRIVILEGESONALLSEQUENCESINSCHEMApublicTO my_user; GRANT
Then back to root user. To enable public remote access
1 2
postgres@host:/root$ exit root@host:/root# vim /etc/postgresql/13/main/postgresql.conf
Change listen_addresses value to *
1
listen_addresses = '*'
Then edit pg_hba.conf
1
root@host:/root# vim /etc/postgresql/13/main/pg_hba.conf
]]><p>A sample file <strong>demo.txt</strong> contains the following content</p>
<figure class="highlight basic"><table><tr><tdEnable AWS SES in Laravel web apphttp://jslim.net/blog/2021/05/09/Enable-AWS-SES-in-Laravel-web-app/2021-05-09T10:21:10.000Z2024-02-21T10:41:37.621ZI believe most of AWS users will use Amazon Simple Email Service (SES) for system email sending.
Before you can use in production, by default it’s in sandbox mode, which you are required to pre-configure a few email addresses to receive email.
You’re required to describe your use case, what you will use for, how you will handle bounce back email, etc. in details.
E.g. You will be rejected if not provide enough information
Let’s get started
1. Configure in AWS console
Make sure you verify your domain.
In order to verify, you need to add a TXT record to your DNS management.
After domain, then add an email address (the from email)
Once added, make sure verify DKIM & MAIL FROM Domain, just add a few records to DNS management
When using SES, must have this mechanism to handle bounced email. Let say a spammer trick your system to keep blasting email to addresses that doesn’t exist, SES may block the service.
1.1. Create SNS topic
It’s something like a event listener, when some events happen, the listener will perform certain actions.
The action here means subscription, let’s create one
And here, I’m using webhook with HTTPS endpoint
Make sure the endpoint is available, SNS will ping it for confirmation
1.2. Configure SES to link with SNS
Go to Notifications, and edit
Set the topic to what you created just now
2. Email Response Handler
Remember, we’ve specified an endpoint to the topic subscription?
Let’s create the endpoint in routes/web.php. This will only be used by AWS
publicfunctionsesNotification(Request $request) { if ($request->method() !== 'POST') { returnresponse('405 (Accept POST Only)', 405)->header('Content-Type', 'text/plain'); }
try { // only process valid message from aws $messageRaw = Message::fromRawPostData(); $validator = newMessageValidator();
// Note : Please Uncheck for Enable raw message delivery to comply with AWS SNS Validator format if (!$validator->isValid($messageRaw)) { \Log::info('Invalid AWS Message');
/** * Helper method to extract email * e.g. John Smith <john@smith.com> * @param string $recipient * @return string */ privatefunctionextractEmail($recipient) { if (filter_var($recipient, FILTER_VALIDATE_EMAIL)) { return$recipient; } $pattern = '/[a-z0-9_\-\+\.]+@[a-z0-9\-]+\.([a-z]{2,4})(?:\.[a-z]{2})?/i'; if (preg_match($pattern, $recipient, $matches)) { return$matches[0]; } returnnull; } }
Here’s the sample output of $messageRaw
1 2 3 4 5 6 7 8 9 10 11 12
Array ( [Type] => Notification [MessageId] => 11111111-2222-3333-4444-555555555555 [TopicArn] => arn:aws:sns:ap-southeast-1:999999999999:ses-notification [Message] => {"notificationType":"Bounce","bounce":{"feedbackId":"aaaaaaaaaaaaaaaa-bbbbbbbb-cccc-dddd-eeee-ffffffffffff-000000","bounceType":"Permanent","bounceSubType":"OnAccountSuppressionList","bouncedRecipients":[{"emailAddress":"John <test123123123123123@gmail.com>","action":"failed","status":"5.1.1","diagnosticCode":"Amazon SES did not send the message to this address because it is on the suppression list for your account. For more information about removing addresses from the suppression list, see the Amazon SES Developer Guide at https://docs.aws.amazon.com/ses/latest/DeveloperGuide/sending-email-suppression-list.html"}],"timestamp":"2021-05-08T14:35:45.000Z","reportingMTA":"dns; amazonses.com"},"mail":{"timestamp":"2021-05-08T14:35:45.469Z","source":"noreply@yoursite.com","sourceArn":"arn:aws:ses:ap-southeast-1:999999999999:identity/noreply@yoursite.com","sourceIp":"202.202.202.202","sendingAccountId":"999999999999","messageId":"1111111111111111-22222222-3333-4444-5555-666666666666-000000","destination":["John <test123123123123123@gmail.com>"],"headersTruncated":false,"headers":[{"name":"Message-ID","value":"<99999999999999999999999999999999@swift.generated>"},{"name":"Date","value":"Sat, 08 May 2021 22:35:44 +0800"},{"name":"Subject","value":"YourSite: Test send mail"},{"name":"From","value":"YourSite <noreply@yoursite.com>"},{"name":"To","value":"John <test123123123123123@gmail.com>"},{"name":"MIME-Version","value":"1.0"},{"name":"Content-Type","value":"multipart/mixed; boundary=\"_=_swift_5555555555_77777777777777777777777777777777_=_\""}],"commonHeaders":{"from":["YourSite <noreply@yoursite.com>"],"date":"Sat, 08 May 2021 22:35:44 +0800","to":["John <test123123123123123@gmail.com>"],"messageId":"<99999999999999999999999999999999@swift.generated>","subject":"YourSite: Test send mail"}}} [Timestamp] => 2021-05-08T14:35:45.908Z [SignatureVersion] => 1 [Signature] => UUUUUUUUUUUUUUUUUUUUUUUUUUUUU+kkkkkkkkkkk/AAAAAAAAAAAAAAAAAAAAAAAAAAAAAAAAAAAAAAAAAAAAA/CCCCCCCCCCCCCCCCCCCCCCCCCCCCCCCCCCCCCCCCCCCCCCCC/zzzzzzzzzzzzzzzzzzzzzzzzzzzzzzzzzzzzzzzzzzzzzzzzzzzzzzzzzzzzzzzzzzzzz/eeeee/qqqqqqqq+BBB+nnnnnnnnnnnnnnnnnnnnnnnnnn/e/yyyyyyyyyyy+dddd+XXXXXXXXXXXXXXXXXXXXXXXXX/ww/rr+HHHHHHHHHHHHHHHHHHHHHHHHHHHHHHHHHHHH+g== [SigningCertURL] => https://sns.ap-southeast-1.amazonaws.com/SimpleNotificationService-99999999999999999999999999999999.pem [UnsubscribeURL] => https://sns.ap-southeast-1.amazonaws.com/?Action=Unsubscribe&SubscriptionArn=arn:aws:sns:ap-southeast-1:999999999999:ses-notification:11111111-2222-3333-4444-555555555555 )
<?php publicfunctionvia($notifiable) { $channels = []; $bounced = BouncedEmail::find($notifiable->routeNotificationForMail()); if (empty($bounced)) { // only send if it's not in the bounced list $channels[] = 'mail'; }
return$channels; }
]]><p>I believe most of AWS users will use Amazon Simple Email Service <strong>(SES)</strong><br>for system email sending.</p>
<p>Before youAWS EC2 instance used up CPU 100% - Malware kdevtmpfsihttp://jslim.net/blog/2021/02/25/AWS-EC2-instance-used-up-CPU-100-Malware-kdevtmpfsi/2021-02-25T14:53:05.000Z2024-02-21T10:41:37.621ZI was wondering what’s wrong with my server (host Laravel web app), it’s fine after reboot the instance, but after a while it become very slow, and CPU 100%
]]><p>I was wondering what’s wrong with my server <em>(host Laravel web app)</em>,<br>it’s fine after reboot the instance, but after a whileReal world practice on Docker in Laravel web apphttp://jslim.net/blog/2021/02/08/Real-world-practice-on-Docker-in-Laravel-web-app/2021-02-08T00:29:31.000Z2024-02-21T10:41:37.621ZI heard about Docker few years ago, but wasn’t know about best practice how to use that. I’ve tried Laradock, it’s way too many stuff in the config, should I use 1 docker for multiple projects? Or better single project?
Create docker-compose.yml in root
Here’s the basic docker-compose file to run php web app
Run it (. src/.env is read .env file’s as env variables)
1
$ . src/.env && docker-compose up -d
Add extra php packages
In order to run Laravel web app, there are some php extensions required. Thus, we need to create a Dockerfile to customize from the base image (php:8.0-fpm)
Basically the idea is, if we have 2nd or 3rd Laravel project, can just use the base image, and duplicate the required extensions for all projects. It also take quite a few minutes to install everything when we run docker-compose up. Base image is like a template, everything is ready, can use in all Laravel projects. Just extends the pre-built custom base image (i.e. jslim/php8-laravel-base in my example here)
Update Dockerfile, change
1
FROM php:8.0-fpm
to
1
FROM jslim/php8-laravel-base:latest
and remove those apt install commands
In production
In production we usually don’t use database in same instance with web app, we can create another docker-compose-production.yml
Remove mysql, and perhaps need to have custom php.ini config, and may be have custom nginx config, SSL cert, etc
$ docker-compose-f docker-compose-production.yml up -d
]]><p>I heard about Docker few years ago, but wasn’t know about best practice how to use that.<br>I’ve tried Laradock, it’s way too many stuffLaravel Unit Test Mail Sendhttp://jslim.net/blog/2021/02/02/Laravel-Unit-Test-Mail-Send/2021-02-02T01:54:33.000Z2024-02-21T10:41:37.621ZCase 1: Mail send without Mailable class
Sometime we don’t use mailable class, instead we want to send directly with send method.
1 2 3 4 5 6 7 8 9 10 11 12
<?php functionsendMailOrderShipped($order) { $subject = 'Order ' . $order->id . ' is shipped'; $recipient = $order->user->email; \Illuminate\Support\Facades\Mail::send('emails.order-shipped', compact('order'), function ($message) use ($subject, $recipient) { $message ->to($recipient) ->subject($subject) ; }); }
]]><h2 id="Case-1-Mail-send-without-Mailable-class"><a href="#Case-1-Mail-send-without-Mailable-class" class="headerlink" title="Case 1: MailThinkpad - Set battery charging threshold in Linuxhttp://jslim.net/blog/2020/11/06/Thinkpad-Set-battery-charging-threshold-in-Linux/2020-11-06T10:00:14.000Z2024-02-21T10:41:37.621ZWith kernel 4.17 above, we can set the threshold directly
]]><p>With kernel 4.17 above, we can set the threshold directly</p>
<figure class="highlight angelscript"><table><tr><tdActivate Windows 10 in VirtualBoxhttp://jslim.net/blog/2020/04/24/Activate-Windows-10-in-VirtualBox/2020-04-24T13:13:51.000Z2024-02-21T10:41:37.621ZI’m using Windows 10 in VirtualBox for testing purpose, where my main OS is formatted to Ubuntu.
I noticed I can activate the Windows 10 with the key sealed in hardware, get the key with the follwing command
]]><p>I’m using Windows 10 in VirtualBox for testing purpose, where my main OS is formatted to Ubuntu.</p>
<p>I noticed I can activate theWeb development testing in Android Virtual Devicehttp://jslim.net/blog/2020/02/11/Web-development-testing-in-Android-Virtual-Device/2020-02-11T10:10:13.000Z2024-02-21T10:41:37.621ZSome time, we will need to test web development in mobile devices. Previously, I used to test in iOS simulator, the virtual host will just work.
E.g. http://myproject.test, by inputing this URL to simulator Safari, will just work fine.
Recently I tried to install AVD, unfortunately, the device (simulator) just don’t know about myproject.test. In this case, need to edit the hosts file
First, find out which device you want to use
1 2 3 4
$ /path/to/android/sdk/platform-tools/adb devices List of devices attached emulator-5554device emulator-5556device
Set the emulator to writable (nexus_5 here is the device name)
Choose x86 Images, then choose Android 7.1.1(non Google APIs)(see reference below for more details)
]]><p>Some time, we will need to test web development in mobile devices.<br>Previously, I used to test in iOS simulator, the virtual host willInstall Arch Linuxhttp://jslim.net/blog/2020/01/22/Install-Arch-Linux/2020-01-22T14:49:03.000Z2024-02-21T10:41:37.621ZFirst of all, I must say that I was referring OSTechNix for the installation guide.
But when I tried to install, I faced some minor issue, that’s why I write this post. Also, I not follow everything from the guide (but most of the things)
If you don’t want to use double of your RAM size to create the swap, you can refer to this.
Install base system
Mount the disk
1 2 3
$ mount /dev/sda1 /mnt $ mkdir /mnt/home $ mount /dev/sda5 /mnt/home
Install
1 2 3
# this step refer https://wiki.archlinux.org/index.php/Installation_guide $ pacstrap /mnt base linux linux-firmware $ genfstab -U /mnt >> /mnt/etc/fstab
Initial setup to the installed system
1 2 3 4 5 6 7 8 9
$ arch-chroot /mnt $ pacman -S vim dhcpcd $ vim /etc/locale.gen $ locale-gen $ vim /etc/locale.conf # set your own timezone $ ln -s /usr/share/zoneinfo/Asia/Kuala_Lumpur /etc/localtime $ hwclock --systohc --utc
]]><p>First of all, I must say that I was referring <a href="https://www.ostechnix.com/">OSTechNix</a> for the installation guide.</p>
<p>ButWhy Vue.js $emit not workinghttp://jslim.net/blog/2020/01/09/Why-Vue-js-emit-not-working/2020-01-09T11:54:36.000Z2024-02-21T10:41:37.621ZI’m working Vue with Laravel, creating a component (nested view), and try to handle the user event in the root (Laravel blade file).
But the problem is, in the root view, the event listener never get called.
]]><p>I’m working Vue with Laravel, creating a component <em>(nested view)</em>, and try to handle the user event in the root <em>(LaravelWhy Google Analytics pageviews different from filter by day and by monthhttp://jslim.net/blog/2020/01/06/Why-Google-Analytics-pageviews-different-from-filter-by-day-and-by-month/2020-01-06T08:00:31.000Z2024-02-21T10:41:37.621ZI wrote a script to sync Google Analytics (GA) pageviews to own DB in daily basis. E.g.
2019-12-01 -> 342 pageviews
2019-12-02 -> 621 pageviews
2019-12-03 -> 781 pageviews
2019-12-04 -> 388 pageviews
2019-12-05 -> 562 pageviews
…
2019-12-31 -> 597 pageviews
So that I can generate report (in my web app, not GA) and filter by date range.
But then, I encounter an issue, when I filter the report range from 2019-06-01 to 2019-06-30, the total pageviews are different from GA report.
Then I cross check it day by day, and both (GA & web app) are tally.
👆 from 2019-06-01 to 2019-06-21, both are tally
👆 from 2019-06-01 to 2019-06-22, the result are different. From here, I assume the result for 2019-06-22 has problem
But when I cross check for 2019-06-22, both are tally again 🤔
👆 from 2019-06-19 to 2019-06-22, the result are tally also.
Then after googled for a while, I think is caused by the GA sampling, perhaps from range 2019-06-01 to 2019-06-22, the data set are too large, thus Google just pick a sample set of data. See the references 👇
]]><p>I wrote a script to sync Google Analytics <em>(GA)</em> pageviews to own DB in daily basis.<br>E.g.</p>
<ul>
<li>2019-12-01 ->Find out app API endpointhttp://jslim.net/blog/2019/12/18/Find-out-app-API-endpoint/2019-12-18T15:02:23.000Z2024-02-21T10:41:37.621ZHave you ever think of, to find out any app API endpoint?
I’m just know about this. I will be doing this in iPhone.
Go to Settings -> Wi-Fi, select the Wi-Fi you currently connected. Make sure it’s same network with your Mac
Set it to manual
Set the IP of your Mac (you can find it from ifconfig in terminal)
Open Safari in your iPhone
Click on the Apple icon, and install certificate
Go to Settings -> General -> Profile, install mitmproxy profile
Go to Settings -> General -> About -> Certificate Trust Settings, enable full trust for root certificates for mitmproxy
Test it out
All settings is done, now you can try to open an app
You can see the request header, and response as well
]]><p>Have you ever think of, to find out any app API endpoint?</p>
<p>I’m just know about this. I will be doing this in iPhone.</p>
<h2Becareful of JavaScript blocking the main threadhttp://jslim.net/blog/2019/11/28/Becareful-of-JavaScript-blocking-the-main-thread/2019-11-28T13:16:28.000Z2024-02-21T10:41:37.621ZI’ve just made a mistake on production site, the client’s website.
I was working on a tracking script, which let client to include into their site.
I added a for loop, to update all elements (string) with replace method. Something like this:
1 2 3 4 5 6 7
var processed = arr.map(function (item) { let charToRemove = ['a', 'b', 'c', 'etc']; for (var i in charToRemove) { item = item.replace(charToRemove[i], ''); } return item.trim(); });
Outside of this function, is a recursive function.
Of course, I created an empty blog (Wordpress) with fake content, and the script work just nice. Tested many times.
In production
When the client embed the script into their site (is a forum), after a while, their user open a post to complain about this, making their browser & PC hang.
Then why? In my blog has no issue, but their forum got?
I found out, their forum has many tracking script, GTM, Facebook, and a lot more, I think probably too many things to load at once, and my script is also heavy and blocking the browser main thread.
I do a test after fixing it (by removing the arr.map()).
1 2 3 4
let begin = Date.now(); recursiveFunc(); let timespan = Date.now() - begin; console.log('total ' + timespan + 'ms');
Without this, it took less than 100ms, with this, took about 30 sec.
So, becareful when there are blocking loops, and try to simulate as close to production environment as possible.
Sometime shit just happen in production, but never happen in staging.
]]><p>I’ve just made a mistake on production site, the client’s website.</p>
<p>I was working on a tracking script, which let client toHow to prevent duplicated join of table in Laravel Query Builderhttp://jslim.net/blog/2019/08/22/How-to-prevent-duplicated-join-of-table-in-Laravel-Query-Builder/2019-08-22T14:07:30.000Z2024-02-21T10:41:37.621ZLaravel Query Builder is an awesome feature, really.
When comes to generate a complicated report, with complicated filter/sort, the code logic can be very confusing.
I’ve encouter a problem with 1 of the complex report, duplicated table join. The controller method has over 1,500 lines.
Thus, I figure out that we can get the joined tables from Laravel Query.
The helper function as below, we can check if we have joined the table before.
<?php /** * Check if the table has already been joined in the query * @param \Illuminate\Database\Query\Builder $query * @param string $table * @return bool */ functionhas_table_joined(\Illuminate\Database\Query\Builder $query, $table) { if (empty($query->joins)) returnfalse; foreach ($query->joins as$join) { if (is_string($join->table) && $join->table == $table) { returntrue; } if (!is_string($join->table)) { preg_match('(\w+)', (string)$join->table, $matches); if (count($matches) > 0 && $matches[0] == $table) { returntrue; } } } returnfalse; }
Usage
1
2
3
4
5
6
7
8
9
10
<?php $query = \DB::table('table_name')->select(...); ... if ($some_filter) { if (!has_table_joined($query, 'table_foo')) { $query->join('table_foo', ...); } $query->where(...); } ...
]]><p>Laravel <a href="https://laravel.com/docs/5.8/queries">Query Builder</a> is an awesome feature, really.</p>
<p>When comes to generate aThe efficient way to debug JS/CSS in production sitehttp://jslim.net/blog/2019/08/08/The-efficient-way-to-debug-JS-CSS-in-production-site/2019-08-08T11:52:22.000Z2024-02-21T10:41:37.621ZRecently I discovered this package, which allows us to run JavaScript & css in any domain.
Before I know about this, I debug JavaScript through Chrome console. But it’s quite troublesome, when I want to run a whole chunk of JavaScript code.
With this package, I can just write the code in a JS file according the domain, e.g. google.com.js, so long the URL matched google.com, it will execute the code from google.com.js.
(You can find the google sample code from the installation guide)
Another use case
Another use case for myself, is I can use to scrap website content, and test my script here.
I use Puppeteer to scrap others site content, and use JavaScript to access their DOM. (refer to my simple module)
Everytime I want to test and see the output, I have to keep running the command over & over again. e.g.
1 2 3 4
... var body = await page.evaluate(() => { // JS code goes here });
Running the script take longer time, as need to instantiate the browser, then load the page, evaluate the script, close browser.
With Witchcraft, I can now write the // JS code goes here to mydomain.com.js, and view the output in console.
After the output correct, then I just copy the JS code over to the scraper.
]]><p>Recently I discovered <a href="https://github.com/luciopaiva/witchcraft">this package</a>, which allows us to run JavaScript & cssdocker-compose for Elasticsearch & Kibanahttp://jslim.net/blog/2019/07/11/docker-compose-for-Elasticsearch-Kibana/2019-07-11T11:20:29.000Z2024-02-21T10:41:37.621ZCreate a file docker-compose.yml with the following content:
]]><p>Create a file <strong>docker-compose.yml</strong> with the following content:</p>
<figure class="highlight yml"><table><tr><tdjQuery infinite scroll articleshttp://jslim.net/blog/2019/06/24/jQuery-infinite-scroll-articles/2019-06-24T10:33:37.000Z2024-02-21T10:41:37.621ZQuite often, we have seen a lot of news site (e.g. forbes.com), when you scrolled until end of the article, it will shows another article.
I was working on this too, and can’t find any plugin for this.
But then, now every time scroll, it will trigger many requests on loadAnotherArticle(). To prevent it, add a loading flag…
1 2 3 4 5 6 7 8 9 10 11 12 13
// to prevent multiple requests on same article var loading = false;
$(window).scroll(function () { // this is for before reach the bottom-most, it trigger to load next article let offsetPrefix = 500;
if ($(document).height() - $(this).height() - offsetPrefix < $(this).scrollTop()) { if (!loading) { loadAnotherArticle(); } } });
What if want to change the URL & meta title/description when scroll to next article?
1 2 3 4 5 6 7 8 9 10
// helper function to update the meta content functionupdateMeta (item) { window.history.replaceState(item, item.title, item.url); document.title = item.title; $('meta[name="description"]').attr('content', item.description); $('meta[name="og:title"]').attr('content', item.og_title); $('meta[name="og:description"]').attr('content', item.og_description); $('meta[property="og:image"]').attr('content', item.image); $('meta[property="og:url"]').attr('content', item.url); };
The tricky part comes, what URL should be used if in the middle of 1st & 2nd article? Here what I do is, determined by the visible area, which every is higher.
// those articles already loaded to `<body>` var loadedArticles = [];
// ref: https://stackoverflow.com/questions/24768795/get-the-visible-height-of-a-div-with-jquery/26831113#26831113 functionelementVisibleHeight ($el) { var elH = $el.outerHeight(), H = $(window).height(), r = $el[0].getBoundingClientRect(), t=r.top, b=r.bottom; returnMath.max(0, t>0? Math.min(elH, H-t) : Math.min(b, H)); }
$(window).scroll(function () { ...
// I use lodash for array processing // assign the visible height value to each loaded articles _.each(loadedArticles, function (item) { item.visibleHeight = elementVisibleHeight($('#article-' + item.id)); });
// now get the article that has maximum visible area var maxItem = _.maxBy(loadedArticles, function (item) { return item.visibleHeight; });
// prevent it trigger multiple times if (maxItem.title != $('title').text()) { updateMeta(maxItem); } });
// ref: https://stackoverflow.com/questions/24768795/get-the-visible-height-of-a-div-with-jquery/26831113#26831113 functionelementVisibleHeight ($el) { var elH = $el.outerHeight(), H = $(window).height(), r = $el[0].getBoundingClientRect(), t=r.top, b=r.bottom; returnMath.max(0, t>0? Math.min(elH, H-t) : Math.min(b, H)); }
$(window).scroll(function () { // this is for before reach the bottom-most, it trigger to load next article let offsetPrefix = 500;
if ($(document).height() - $(this).height() - offsetPrefix < $(this).scrollTop()) { if (!loading) { loadAnotherArticle(); } }
// I use lodash for array processing // assign the visible height value to each loaded articles _.each(loadedArticles, function (item) { item.visibleHeight = elementVisibleHeight($('#article-' + item.id)); });
// now get the article that has maximum visible area var maxItem = _.maxBy(loadedArticles, function (item) { return item.visibleHeight; });
// prevent it trigger multiple times if (maxItem.title != $('title').text()) { updateMeta(maxItem); } });
P/S:
loadAnotherArticle() implement by yourself
The assumed article object is like
1 2 3 4 5 6 7 8 9 10
{ "id":1, "title":"How to kickstart JavaScript?", "description":"This is the description", "og_title":"How to kickstart JavaScript?", "og_description":"This is the open graph description", "image":"http://jslim.net/path/to/image.jpg", "url":"http://jslim.net/path/to/articles/", "content":"<div>The html content</div>", }
]]><p>Quite often, we have seen a lot of news site <em>(e.g. <a href="https://www.forbes.com/">forbes.com</a>)</em>,<br>when you scrolledHow to setup Google Optimize server side test with GTMhttp://jslim.net/blog/2019/06/19/How-to-setup-Google-Optimize-server-side-test-with-GTM/2019-06-19T12:22:53.000Z2024-02-21T10:41:37.621ZRecently I come across A/B testing, to see which algorithm is most effective to trigger user clicks.
I assume you have Google Analytics ready. Let’s create an experiment, and select the type A/B test.
Create a variant, put in whatever name you like. Then set Page Targeting to URLequalsSERVER_SIDE. Link up with GA & set the objective
2. Setup in GTM
1. Create Data Layer variables
Create 2 variables: experiment ID & variant
2. Create new tag for Google Analytics (if you don’t have)
Check the option Enable overriding settings in this tag
Add 2 variables to Fields to Set
Set the trigger to All Page
The fields to set is allow you to define which experiment & which variant to run.
3. Coding
In server side (I use PHP here), randomly choose a variant, and select the algorithm to use
1 2 3 4 5 6 7 8 9 10 11 12 13 14 15 16 17
<?php $exp_id = 'xxxxxxxxxx';
// get the cookie value form GA, to make sure the experiment result always consistent $ga_cookie = $_COOKIE['_ga']; $sess_key = 'exp-' . $ga_cookie; $exp_var = $_SESSION[$sess_key]; if ($exp_var === null) { $exp_var = rand(0, 1); $_SESSION[$sess_key] = $exp_var; }
if ($exp_var == 1) { // if variant 1, which algorithm to use } else { // by default, which algorithm to use }
In front end, trigger the experiment manually, by setting the dataLayer variable
]]><p>Recently I come across A/B testing, to see which algorithm is most effective to trigger user clicks.</p>
<p>Here I use <aSetup OpenVPN in AWS for RDS accesshttp://jslim.net/blog/2019/06/07/Setup-OpenVPN-in-AWS/2019-06-07T05:17:41.000Z2024-02-21T10:41:37.621ZWhen we use AWS, often we will use RDS, for security reason, is better to not to expose to public.
What if we want to access via MySQL client? Here’s why we need VPN.
1. Create an EC2 instance
After you created an EC2 instance (I chose Ubuntu 18.04), then create an elastic IP and associate with this instance.
Because we don’t want risk the IP to change when the instance restarted.
]]><p>When we use AWS, often we will use RDS, for security reason, is better to not to expose to public.</p>
<p><imgLaravel auto deployment with GitLab CI/CDhttp://jslim.net/blog/2019/06/02/Laravel-auto-deployment-with-GitLab-CI-CD/2019-06-02T13:06:32.000Z2024-02-21T10:41:37.621ZI’ve been heard of continuous integration long ago, thus I decide to give it a try. I found the official guideline from GitLab itself, and it looks quite complicated. End up I follow this article.
Challenge
I’m not going to repeat the original article, here what I wanted to share is the problems that I faced, and it took me days to try and error to make it works.
1. Composer install error
I’ve Nova installed, and it required a json file for authentication purpose.
5. No application encryption key has been specified
1
production.ERROR: No application encryption key has been specified. {"exception":"[object] (RuntimeException(code: 0): No application encryption key has been specified. at /var/www/mysite/releases/2/vendor/laravel/framework/src/Illuminate/Encryption/EncryptionServiceProvider.php:44)
This is very obvious, the APP_KEY is empty. So I run
]]><p>I’ve been heard of continuous integration long ago, thus I decide to give it a try.<br>I found <awindow.onbeforeunload trigger ajax requesthttp://jslim.net/blog/2019/04/17/window-onbeforeunload-trigger-ajax-request/2019-04-17T10:28:42.000Z2024-02-21T10:41:37.621ZInitially I was using jQuery.ajax call to send a request to server before user leave the page.
]]><p>Initially I was using jQuery.ajax call to send a request to server before user<br>leave the page.</p>
<figure class="highlightUse Google Analytics API with Laravel 5http://jslim.net/blog/2019/04/02/Use-Google-Analytics-API-with-Laravel-5/2019-04-02T12:22:48.000Z2024-02-21T10:41:37.617ZNo doubt that Google is very powerful. I’ve been researching for Google Analytics (GA) API for quite sometime, due to it’s complex documentation (somehow I think is very hard to find what I need).
I will show the demo in Laravel command, it’s easier and comfortable for me.
2. Grant your service account to access Google Analytics
Without this step, you won’t be able to get any data. Because GA will treat the service account as an actual account, must grant at least a READ access.
$page = 1; $total_pages = 5; // total number of pages to retrieve while ($data->reports[0]->nextPageToken > 0 && $page < $total_pages) { $this->info(sprintf('Getting page %d', ($page + 1))); // There are more rows for this report. we apply the next page token to the page token of the orignal body. $body->reportRequests[0]->setPageToken($data->reports[0]->nextPageToken); $data = $ga_reporting->reports->batchGet($body); $callback($data->reports[0]); // due to too much data, get by chunk $page++; } }
]]><p>No doubt that Google is very powerful. I’ve been researching for<br>Google Analytics <em>(GA)</em> API for quite sometime, due to it’sDataTable re-order rowshttp://jslim.net/blog/2019/03/01/DataTable-re-order-rows/2019-03-01T10:30:11.000Z2024-02-21T10:41:37.617ZIn CMS, often the navigation menu is editable in backend, and can change the order. Let’s see how to implement using DataTable.
if (table) { table.ajax.reload(null, true); return; } table = $('#my-table').DataTable({ 'serverSide': true, 'paging': true, 'rowReorder': { 'selector': 'tr', 'dataSrc': 'seq', // follow the json data }, 'columnDefs': [ { 'orderable': true, 'targets': 0, 'className': 'reorder' }, { 'orderable': false, 'targets': '_all' } ], 'columns': [ { 'data': 'seq' }, { 'data': 'col_1' }, { 'data': 'col_2' }, { 'data': 'col_3' }, ], 'ajax': { 'url': '/get-menu-data', 'type': 'GET', 'data': function (d) { // do in this way, otherwise table.ajax.reload() not working Object.assign(d, getParams()); return d; }, }, });
// every time drag the row will send a request to server to update the `seq` column table.on( 'row-reorder', function ( e, diff, edit ) { var postData = []; for ( var i = 0, ien = diff.length ; i < ien ; i++ ) { var rowData = table.row(diff[i].node).data(); postData.push({ 'id': rowData.id, 'new_seq': diff[i].newData, }); }
$.ajax({ url: '/update-menu-seq', dataType: 'json', type: 'post', async: false, // disable async, otherwise the table will reload before the db update data: { seqs: postData, }, success: function (data, textStatus, jqXHR) { }, error: function (jqXHR, textStatus, errorThrown) { alert(errorThrown); }, complete: function (jqXHR, textStatus) { } }); }); } loadTable(); });
]]><p>In CMS, often the navigation menu is editable in backend, and can change the order.<br>Let’s see how to implement using <aLaravel - Integrate oEmbed into TinyMCEhttp://jslim.net/blog/2019/02/20/Laravel-Integrate-oEmbed-into-TinyMCE/2019-02-20T15:21:26.000Z2024-02-21T10:41:37.617ZoEmbed is a kind of standard to retrieve 3rd party site info.
Example, in rich editor like TinyMCE, if want to embed a YouTube video, what we usually do is
Get the YouTube video embed code
Click on the TinyMCE view source button
Paste the embed code into the content
I did that previously, and it works. But when I do the same thing to Instagram post, it doesn’t work so well, especially embed more than 1 post.
If you ever use Wordpress before, you will notice when you paste a YouTube link directly to editor, and it will load the video, without the need of embed code.
Let’s add the oEmbed feature into your Laravel app
1. install a composer package
Because I couldn’t found any good JavaScript oEmbed plugin, then I decided to use this PHP plugin.
'images' => $info->images, //List of all images found in the page 'image' => $info->image, //The image choosen as main image 'image_width' => $info->imageWidth, //The width of the main image 'image_height' => $info->imageHeight, //The height of the main image
'code' => $info->code, //The code to embed the image, video, etc 'width' => $info->width, //The width of the embed code 'height' => $info->height, //The height of the embed code 'aspect_ratio' => $info->aspectRatio, //The aspect ratio (width/height)
'provider_name' => $info->providerName, //The provider name of the page (Youtube, Twitter, Instagram, etc) 'provider_url' => $info->providerUrl, //The provider url 'provider_icons' => $info->providerIcons, //All provider icons found in the page 'provider_icon' => $info->providerIcon, //The icon choosen as main icon
'published_date' => $info->publishedDate, //The published date of the resource 'license' => $info->license, //The license url of the resource 'linked_data' => $info->linkedData, //The linked-data info (http://json-ld.org/) 'feeds' => $info->feeds, //The RSS/Atom feeds ]; } catch (\Embed\Exceptions\InvalidUrlException $e) { returnresponse()->json([ 'error' => sprintf('%s: %s', get_class($e), $e->getMessage()) ], 404); } catch (\Exception$e) { returnresponse()->json([ 'error' => sprintf('%s: %s', get_class($e), $e->getMessage()) ], 500); } }
functionisValidURL(str) { var a = document.createElement('a'); a.href = str; return (a.host && a.host != window.location.host); }
tinymce.init({ // remember to add a 'paste' plugin plugins: '... ... ... paste',
// make the embed content non-editable noneditable_noneditable_class: 'embed-content',
// here we interrupt the paste process paste_preprocess: function(plugin, args) { let input = args.content.trim();
// skip if not a valid URL if (!isValidURL(input)) return;
$.ajax({ url: '/oembed', dataType: 'json', type: 'get', async: false, // set the async to false, because we want to replace the original content with the embed code data: { url: input }, success: function (data, textStatus, jqXHR) { if (!data.code) return;
// wrap the embed code with a div, to prevent it to be editable args.content = '<div class="embed-content">' + data.code + '</div>'; }, error: function (jqXHR, textStatus, errorThrown) { }, complete: function (jqXHR, textStatus) { } }); }, });
Now, let’s try to paste a YouTube link to TinyMCE editor. It should works 😉
]]><p><a href="https://oembed.com/">oEmbed</a> is a kind of standard to retrieve 3rd party site info.</p>
<p>Example, in rich editor like <aLaravel Eloquent join with subqueryhttp://jslim.net/blog/2019/02/19/Laravel-Eloquent-join-with-subquery/2019-02-19T16:03:52.000Z2024-02-21T10:41:37.617ZLet’s take the query from this post as example
1 2 3 4 5 6 7 8 9 10 11 12
SELECT books.id AS book_id , books.isbn , books.title , t_borrowers.user_ids FROM books LEFTJOIN ( SELECT user_books.book_id , CONCAT('#', GROUP_CONCAT(user_books.user_id SEPARATOR '#,#'), '#') AS user_ids FROM user_books GROUPBY user_books.book_id ) AS t_borrowers ON t_borrowers.book_id = books.id WHERE (t_borrowers.user_ids LIKE'%#1#%'OR t_borrowers.user_ids LIKE'%#3#%');
See there’s a sub-select inside? Let’s see how to construct this query in Laravel
]]><p>Let’s take the query from <a href="/blog/2019/02/19/MySQL-a-trick-to-filter-multi-values-column/">this post</a> as example</p>
<figureMySQL - a trick to filter multi-values columnhttp://jslim.net/blog/2019/02/19/MySQL-a-trick-to-filter-multi-values-column/2019-02-19T14:22:19.000Z2024-02-21T10:41:37.617ZFor certain reason, sometime we want to filter the data in a multi-values column.
e.g.
books
id
isbn
title
1
8-230185-1321
The Secret C++
2
23801-23815-9
MySQL for tummy
3
78-923722-223
Programmer Bible
users
id
username
name
1
js
JS
2
foo
Mr Foo
3
bar
Ms Bar
user_books
book_id
user_id
date
2
1
2019-01-03 12:38:29
1
3
2019-01-08 18:08:09
3
2
2019-01-13 22:37:12
Let say now want to filter the books has borrowed by user ID 1 & 3
If normal select
1 2 3 4 5 6 7
SELECT books.id AS book_id , books.isbn , books.title , t_borrowers.user_ids FROM books LEFTJOIN user_books ON user_books.book_id = books.id WHERE user_books.user_id IN (1, 3);
Filter in single column
1
2
3
4
5
6
7
8
9
10
11
12
SELECT books.id AS book_id , books.isbn , books.title , t_borrowers.user_ids FROM books LEFTJOIN ( SELECT user_books.book_id , CONCAT('#', GROUP_CONCAT(user_books.user_id SEPARATOR '#,#'), '#') AS user_ids FROM user_books GROUPBY user_books.book_id ) AS t_borrowers ON t_borrowers.book_id = books.id WHERE (t_borrowers.user_ids LIKE'%#1#%'OR t_borrowers.user_ids LIKE'%#3#%');
The trick is, to add a symbol (here I use #) to wrap the ID when concat the values, then in bottom there use LIKE & OR to filter, remember to wrap around the ID when filter.
This example may not exactly shows up the purpose of using sub-query & wrap the value with symbol. It look complicated & uncessary, but, in some cases may need to do in this way.
]]><p>For certain reason, sometime we want to filter the data in a multi-valuesGuzzle HTTP client cannot download file with special characterhttp://jslim.net/blog/2019/01/11/Guzzle-HTTP-client-cannot-download-file-with-special-character/2019-01-11T00:16:09.000Z2024-02-21T10:41:37.617ZI’m using Guzzle to download image file, the code as below
download($normal_url); // this 1 works download($special_char_url); // this throw 404 error
The thai characters file name throw error
1
GuzzleHttp\Exception\ClientException: Client error: `GET http://example.com/path/to/%E0%B8_%E0%B8%A3%E0%B8%B5%E0%B8%A1%E0%B8%AD%E0%B8%B2%E0%B8_%E0%B8_%E0%B9_%E0%B8%B3.jpg` resulted in a `404 Not Found` response:
The URL encoding is actually wrong, because I paste the URL to Chrome address bar, and then copy again, it gives
]]><p>I’m using <a href="http://docs.guzzlephp.org/en/stable/">Guzzle</a> to download image file, the code as below</p>
<figureTinyMCE insert js/css into iFrame head elementhttp://jslim.net/blog/2018/10/17/TinyMCE-insert-js-css-into-iFrame-head-element/2018-10-17T14:47:56.000Z2024-02-21T10:41:37.617ZTinyMCE is an iFrame element with full HTML content.
Sometime we would like to add in Bootstrap & jQuery or any plugins into it. Let’s see how we achieve it.
1 2 3
tinymce.init({ selector: '.tinymce', });
Above is the basic setup. To add in Bootstrap stylesheet, just add in content_css option
1 2 3 4
content_css: [ 'https://stackpath.bootstrapcdn.com/bootstrap/4.1.3/css/bootstrap.min.css', '/css/custom-mce.css', // if you want to add in custom styles ],
What about JavaScript? We can make use of init_instance_callback option
init_instance_callback: function(editor) { // get the head element let head = editor.dom.select('head')[0];
// just add in whatever plugins needed addScript('https://code.jquery.com/jquery-3.3.1.min.js');
// this is needed, without the delay, it will show jQuery is not defined setTimeout(function () { addScript('https://stackpath.bootstrapcdn.com/bootstrap/4.1.3/js/bootstrap.min.js'); addScript('/path/to/your/script.js'); }, 500);
]]><p>TinyMCE is an iFrame element with full HTML content.</p>
<p>Sometime we would like to add in Bootstrap & jQuery or any plugins intoAWS Lambda test in local machinehttp://jslim.net/blog/2018/10/14/AWS-Lambda-test-in-local-machine/2018-10-14T06:58:50.000Z2024-02-21T10:41:37.617ZI believe many developer first time deal with AWS Lambda will have this question: “How can I test the code in my machines?”
After keep trying hundreds of times, I found a way to do it.
I will show the example in Node.js
1. Setup a new project
1 2 3
$ mkdir mylambda $ cd mylambda/ $ npm init
Input all necessary info
1
$ npm install aws-sdk --save
2. Create a base script
1 2 3 4 5 6 7 8 9 10 11 12 13
const aws = require('aws-sdk'); var s3 = new aws.S3();
exports.handler = function(event, context, callback) { try { // your script goes here
]]><p>I believe many developer first time deal with AWS Lambda will have this question: “How can I test the code in my machines?”</p>
<p>AfterPython trick - copy file among computers in LAN networkhttp://jslim.net/blog/2018/07/26/Python-trick-copy-file-among-computers-in-LAN-network/2018-07-26T16:07:34.000Z2024-02-21T10:41:37.617ZThe conventional way of file transfer between PCs, is via thumb drive.
Some time the file size are too large and not able to copy to FAT thumb drive.
Now, let’s play a little trick…
Open up a terminal, and cd to the directory that the files you want to copy over.
1 2 3
$ cd /path/to/file-dir $ python -m SimpleHTTPServer Serving HTTP on 0.0.0.0 port 8000 ...
The 2nd line actually serve as a HTTP server in current directory.
Just click on the files you need, and download it :)
]]><p>The conventional way of file transfer between PCs, is via thumb drive.</p>
<p>Some time the file size are too large and not able to copyHow to add more hosts to phpMyAdminhttp://jslim.net/blog/2018/07/20/How-to-add-more-hosts-to-phpMyAdmin/2018-07-20T14:18:40.000Z2024-02-21T10:41:37.617ZIf want to add in more hosts in phpMyAdmin, just edit the file config.inc.php
Replace the following content
1 2 3 4 5 6
/* Authentication type */ $cfg['Servers'][$i]['auth_type'] = 'cookie'; /* Server parameters */ $cfg['Servers'][$i]['host'] = 'localhost'; $cfg['Servers'][$i]['compress'] = false; $cfg['Servers'][$i]['AllowNoPassword'] = false;
]]><p>If want to add in more hosts in phpMyAdmin, just edit the file <strong>config.inc.php</strong></p>
<p>Replace the followingHow I personalize my Linux confighttp://jslim.net/blog/2018/07/15/How-I-personalize-my-Linux-config/2018-07-15T14:20:58.000Z2024-02-21T10:41:37.617ZI begin touching Linux back in 2011. I still remember, I learning vim, command line, etc.
The first thing my mentor told me to do was, clone his dotfiles. If you first time heard about this term, I’m pretty sure that you’re new to Unix world.
If you’re new to unix environment, you’ll find it actually save you lots of time.
]]><p>I begin touching Linux back in 2011. I still remember, I learning vim, command line, etc.</p>
<p>The first thing my mentor told me to doLaravel event multi listeners not workinghttp://jslim.net/blog/2018/07/11/Laravel-event-multi-listeners-not-working/2018-07-11T15:13:08.000Z2024-02-21T10:41:37.617ZThe Laravel Event feature is pretty useful, just like Trigger in DBMS;
I’ve tried to register more than 1 Listener to an event.
if ($event->account->is_fb_login) { returnfalse; }
... } }
The return false; indicate that the rest of listeners will not be executed.
So what I did was, use return; instead of return false;. i.e.
1 2 3
if ($event->account->is_fb_login) { return; }
]]><p>The <a href="https://laravel.com/docs/5.6/events">Laravel Event</a> feature is pretty useful, just like <aUbuntu server not support chinese characterhttp://jslim.net/blog/2018/05/25/Ubuntu-server-not-support-chinese-character/2018-05-25T10:02:43.000Z2024-02-21T10:41:37.617ZI’m using Amazon EC2, Ubuntu 16.04.
I noticed this problem when I try to generate a pdf file from php, the filename was not the right chinese character.
]]><p>I’m using Amazon EC2, Ubuntu 16.04.</p>
<p>I noticed this problem when I try to generate a pdf file from php, the filename was not theGuest post: Some Facts About Amazonhttp://jslim.net/blog/2018/03/26/Guest-post-Some-Facts-About-Amazon/2018-03-26T03:07:31.000Z2024-02-21T10:41:37.617ZToday’s largest online retailer used to be originally known as ‘Earth’s Largest Bookstore’. They were actually sued for that statement by Barnes & Noble, because the claim was supposedly ‘fake’. The two companies later decided to settle off court.
It was back in July 1995 when Amazon first opened the virtual doors to its store. At the beginning, this bookstore was situated in a small garage. Nowadays, it’s one of the biggest success stories of the modern world thanks to an ever increasing portfolio of products, mesmerizingly efficient logistics and, generally, very good prices across the board. Amazon’s history has so far been filled with plenty of interesting stories, so we’ve decided to share some with you.
Back in the old days, Amazon had no inventory. So, whenever customers ordered a book, the employees would have to order it from a bookseller, wait for it to arrive at their offices, and then re-ship it to the buyer. For common titles, people only had to wait for about a week before their order arrived. However, if a book was more difficult to find, people would have to wait for up to a month before getting their order.
Another interesting fact is the name behind the brand. The owner of Amazon, Jeff Bezos, at first actually wanted to name his bookstore ‘Cadabra’ from the word ‘Abracadabra’. But while talking to the phone with one of his lawyers, he was told that it sounds too much like ‘cadaver,’ which was the reason to pick another name.
Bezos turned to the dictionary and decided to look up the words under the first letter of the alphabet. He settled on ‘Amazon’ because back when he was just starting out his company, the website listings were ordered alphabetically. Therefore, choosing a name with the first letter of the alphabet meant that his website would sit higher up on these listings.
There are plenty of other interesting facts and stories that surround Amazon, since it’s been around for the past 23 years. If you’d like to know more, take a look at the infographic below.
Disclaimer: I did not earn any commission or any benefits from this guest post, other than a back link to my blog. 100% of the content above is not written by me.
]]><p>Today’s largest online retailer used to be originally known as ‘Earth’s Largest Bookstore’. They were actually sued for that statementAngular 4 download file from server via httphttp://jslim.net/blog/2018/03/13/Angular-4-download-file-from-server-via-http/2018-03-13T05:17:18.000Z2024-02-21T10:41:37.617ZWhen want to download a file from server, usually just provide a <a href... will do. But what if the file only allow authorised user to access? Means you have to download first, in this case will have to use http
]]><p>When want to download a file from server, usually just provide a <code><a href...</code> will do. But what if the file only allowCefSharp listen to JavaScript eventhttp://jslim.net/blog/2018/01/30/CefSharp-listen-to-JavaScript-event/2018-01-30T07:23:45.000Z2024-02-21T10:41:37.617ZCefSharp is a Chromium browser embedded to an application.
In my case, I’m using WinForms (CefSharp.WinForms v57.0.0).
What I want to achieve here:
When user click on the <a> element, the C# code there need to perform some action.
switch (eventName) { case"click": { // do whatever you want here Console.WriteLine(dataDict["data1"]); // output 'foo' Console.WriteLine(dataDict["data2"]); // output 'bar' break; } } }
In JavaScript code
1 2 3 4 5 6 7 8 9 10
$('a').click(function(e) { if (!window.boundEvent) { console.log('window.boundEvent does not exist.'); return; } window.boundEvent.raiseEvent('click', JSON.stringify({ data1: 'foo', data2: 'bar' })); });
]]><p><a href="https://github.com/cefsharp/CefSharp">CefSharp</a> is a Chromium browser embedded to an application.</p>
<p>In my case, I’mPayPal Rest API with Laravel 5 and Angularhttp://jslim.net/blog/2018/01/22/PayPal-Rest-API-with-Laravel-5-and-Angular/2018-01-22T06:35:45.000Z2024-02-21T10:41:37.617ZPreviously I wrote a post regarding to Integrate PayPal SDK into Laravel 4. And I believe now Laravel 5 is quite different from Laravel 4. Also, PayPal API also updated now.
This post involved Front End (Angular 5) & Back End (Laravel 5).
/** * Available option 'sandbox' or 'live' */ 'mode' => 'sandbox',
/** * Specify the max request time in seconds */ 'http.ConnectionTimeOut' => 30,
/** * Whether want to log to a file */ 'log.LogEnabled' => true,
/** * Specify the file that want to write on */ 'log.FileName' => storage_path() . '/logs/paypal.log',
/** * Available option 'FINE', 'INFO', 'WARN' or 'ERROR' * * Logging is most verbose in the 'FINE' level and decreases as you * proceed towards ERROR */ 'log.LogLevel' => 'FINE' ], 'webhooks' => [ 'payment_sale_completed' => env('PAYPAL_PAYMENT_SALE_COMPLETED_WEBHOOK_ID'), ], ];
$signature_verification = newVerifyWebhookSignature(); $signature_verification->setAuthAlgo($headers['PAYPAL-AUTH-ALGO'][0]); $signature_verification->setTransmissionId($headers['PAYPAL-TRANSMISSION-ID'][0]); $signature_verification->setCertUrl($headers['PAYPAL-CERT-URL'][0]); // get the webhook ID in config file $signature_verification->setWebhookId(config('paypal.webhooks.payment_sale_completed')); // Note that the Webhook ID must be a currently valid Webhook that you created with your client ID/secret. $signature_verification->setTransmissionSig($headers['PAYPAL-TRANSMISSION-SIG'][0]); $signature_verification->setTransmissionTime($headers['PAYPAL-TRANSMISSION-TIME'][0]);
// for error message, I log it into a file for debug purpose $exception_log_file = storage_path('logs/paypal-exception.log');
try { /** @var \PayPal\Api\VerifyWebhookSignatureResponse $output */ $output = $signature_verification->post($this->_api_context); } catch (\Exception$ex) { file_put_contents($exception_log_file, $ex->getMessage()); exit(1); } $status = $output->getVerificationStatus(); // 'SUCCESS' or 'FAILURE' // if the status is not success, then end here if (strtoupper($status) !== 'SUCCESS') exit(1);
$json = json_decode($request_body, 1);
// Because PayPal don't let us to add in custom data in JSON form, so I add it to a field 'custom' as encoded string. Now decode to get the data back $custom_data = json_decode($json['resource']['custom'], 1); $user = User::find($custom_data['user_id']); // to get the User
// save the payment info
// generate invoice
// email to user
echo$status; // at the end must echo the status exit(1); } }
You can see there are green tick and yellow exclamation mark. The echo $status; is to tell the PayPal server that this webhook has been processed. Otherwise it will resend the POST webhook request.
In Angular
Here is pretty simple, just need to add in the JavaScript code to the component.
ngAfterViewChecked() { this.configurePaypal(); } configurePaypal() { if (!this.didRenderPaypal) {
var userId = 2;
this.loadPaypalScript().then(() => { paypal.Button.render({ env: 'sandbox', // sandbox | production // Create a PayPal app: https://developer.paypal.com/developer/applications/create client: { sandbox: environment.services.paypal.clientId, production: environment.services.paypal.clientId }, // Show the buyer a 'Pay Now' button in the checkout flow commit: true,
// payment() is called when the button is clicked payment: function(data, actions) {
// Make a call to the REST api to create the payment return actions.payment.create({ payment: { transactions: [ { amount: { total: $('#total').val(), currency: 'MYR', details: { subtotal: $('#subtotal').val(), tax: $('#tax').val(), } }, custom: JSON.stringify({ // YOU CAN ADD CUSTOM DATA HERE user_id: userId, qty: $('#qty').val() }) } ] } }); },
// onAuthorize() is called when the buyer approves the payment onAuthorize: function(data, actions) { // Make a call to the REST api to execute the payment return actions.payment.execute().then(function() { console.log(data); window.alert('Payment Complete!'); }); }
The PayPal JavaScript file must be injected during run time.
You can see I use a lot of jQuery (e.g. $('total').val()), is because the code block inside is cannot be set a typescript variable directly, the total amount may change if user change products. Thus, jQuery can ensure it get the correct value from the form.
Now you run your Angular app, you should see a PayPal button there.
Once you make the payment, the webhook will be triggered.
Update: 2018-01-25
Let say you don’t want the payment processing part by webhooks, you can do it in the JavaScript success block.
... onAuthorize: function(data, actions) { // Make a call to the REST api to execute the payment return actions.payment.execute().then(function() { that.http .post( 'https://www.yoursite.com/api/paypal/checkout', data ) .toPromise() .then(res => { // success submit console.log(res.json()); }) .catch(res => { // POST error console.log(res); }); }); } ...
]]><p>Previously I wrote a post regarding to <a href="/blog/2014/09/19/integrate-paypal-sdk-into-laravel-4/">Integrate PayPal SDK into LaravelAllow Vagrant to access from other computers in LAN networkhttp://jslim.net/blog/2017/11/22/Allow-Vagrant-to-access-from-other-computers-in-LAN-network/2017-11-22T03:29:55.000Z2024-02-21T10:41:37.617ZI’m using Laravel Homestead. By default, the config is set to private network with IP 192.168.10.10.
Now, let’s allow it to access from other clients.
In the PC with Homestead installed (e.g. 192.168.1.115)
]]><p>I’m using <a href="https://laravel.com/docs/5.5/homestead">Laravel Homestead</a>. By default, the config is set to <em>privateHow to backup MySQL database from time to timehttp://jslim.net/blog/2017/04/19/How-to-backup-MySQL-database-from-time-to-time/2017-04-19T08:16:35.000Z2024-02-21T10:41:37.617ZTo backup your database from time to time, this can be done by write a simple shell script, and setup a cron job to run it
output_file=$backup_dir/`date +"%Y-%m-%d_%H-%M-%S.sql"` # the tables data you want to exclude, but keep the structure excluded_tables=( ex_table1 ex_table2 ex_table3 )
ignored_tables_string_with_option='' ignored_tables_string='' for tbl in"${excluded_tables[@]}" do : ignored_tables_string_with_option+=" --ignore-table=${db_name}.${tbl}" ignored_tables_string+=" ${tbl}" done
# change this line if you use postgresql mysqldump $db_name -u $db_user -h $db_host -p$db_pass${ignored_tables_string_with_option} > $output_file mysqldump $db_name -u $db_user -h $db_host -p$db_pass${ignored_tables_string} --no-data >> $output_file
total_sql=`ls -l $backup_dir/*.sql | wc -l`
if [ $total_sql -gt $max_backup_files ]; then old_file=`ls$backup_dir/*.sql | sort | head -n 1` echo"Exceed $max_backup_files files, remove $old_file" rm -f $old_file fi
Setup cronjob
1
$ crontab -e
add the following content, example to backup everyday 11pm
1
0 23 * * * /path/to/script.sh >/dev/null 2>&1
]]><p>To backup your database from time to time, this can be done by write a simple shell script, and setup a cron job to run it</p>
<figureJavaScript class define a callback delegate methodhttp://jslim.net/blog/2017/03/02/JavaScript-class-define-a-callback-delegate-method/2017-03-02T07:12:55.000Z2024-02-21T10:41:37.617ZI recently working on a JavaScript project, which required to write class.
Usually I just use 3rd party plugin for most of my project, e.g. jQuery.ajax
something like that, but when I try to create a class which has a method like success in jQuery.ajax, to let the user who use my library to be able to handle the callback. So here is what I found:
]]><p>I recently working on a JavaScript project, which required to write <em>class</em>.</p>
<p>Usually I just use 3rd party plugin for mostLaravel 5 custom validatorhttp://jslim.net/blog/2016/12/16/Laravel-5-custom-validator/2016-12-16T07:17:44.000Z2024-02-21T10:41:37.617ZAs the official documentation doesn’t specify how exactly to create a custom validation class.
1. Create custom validator class
You can create in any where as you like. For my example, I will create in app/Libraries/CustomValidator.php
]]><p>As the official documentation doesn’t specify how exactly to create a custom<br>validation class.</p>
<h3Automate WinForm app publish to match NAppUpdate standardhttp://jslim.net/blog/2016/11/04/Automate-WinForm-app-publish-to-match-NAppUpdate-standard/2016-11-04T04:00:45.000Z2024-02-21T10:41:37.617ZIf you’re using NAppUpdate framework to publish your WinForm app, this post is for you.
Assume that you already setup NAppUpdate successfully. Now we want to simplify it to just 1 click publish, and the others clients can just update it
Server side
In your server, you need a path to store the xml file. For my case, I will create a subdomain for it. E.g.
The index.php you can just simply put some dummy text into it, because the most important file is release.xml
The content of release.xml is auto generated. I’ve created the php file, download it to your server, and place it anywhere, (e.g. /path/to/publish.php)
Now once your app published, the cronjob will execute this php script, and the script will generate release.xml, and copy the necessary files to releases folder.
Inside the releases folder will then have all version of what you have published.
]]><p>If you’re using <a href="https://github.com/synhershko/NAppUpdate">NAppUpdate</a> framework to publish your WinForm app, this post isSetup cronjob & queue in Elastic Beanstalk with Laravelhttp://jslim.net/blog/2016/07/18/setup-cronjob-and-queue-in-elastic-beanstalk-with-laravel/2016-07-18T18:39:16.000Z2024-02-21T10:41:37.617ZThis is basically part-2 continue from Setup Laravel 5 in Amazon Elastic Beanstalk.
In most cases, we need to run some long process tasks in background, by either cronjob or queue.
Here I’ll demostrate both.
Create a worker tier
We need to separate normal http operation from long process background tasks. So let’s create a worker environment
Place this 2 files in .ebextensions. Again, same as supervise, you need to add INS_CRONTAB environment variable in worker tier, and set the value to enable.
One thing to take note, whenever the environment scale up to multiple server, your crontab may run multiple times, thus, I suggest that create a table (e.g. cronjob) in database, and add 2 attributes: executed_at and completed_at.
Thus, in your php script, you only run those job with executed_at = null, to avoid duplication.
]]><p>This is basically part-2 continue from <a href="/blog/2016/05/24/setup-laravel-5-in-amazon-elastic-beanstalk/">Setup Laravel 5 in AmazonPython script to simulate multiple concurrent requests to web applicationhttp://jslim.net/blog/2016/06/29/python-script-to-simulate-multiple-concurrent-requests-to-web-application/2016-06-29T01:03:14.000Z2024-02-21T10:41:37.617ZI first created this script to heavy test the web application hosted in elastic beanstalk.
Why python? Just for fun :)
Let’s begin
First, define a main function for the python script
1 2 3 4 5 6 7 8 9 10 11 12 13
import datetime import time
defmain(): for i inrange(0, 20): print datetime.datetime.now()
# http requests goes here
time.sleep(1) # every 1 second submit http requests
# define a base url base_url = 'http://example.com'
# Assumed that your web application need to login url = base_url + '/auth/login' payload = { 'username': 'root', 'password': 'root', } res = requests.post(url, data=payload)
# we need the session cookie cookies = res.cookies
# need to pass the cookies in order to tell the server that I'm "that" person # this is GET request, because need to get the CSRF token before can do a POST res = requests.get(url, cookies=cookies) html = res.text.encode('utf-8') # the "pattern" is depends on how you construct your html page pattern = 'name="csrf-token" content="(\w+)"' matches = re.findall(pattern, html) token = matches[0]
# POST to generate sales report payload = { 'date': '2016-06-27', '_token': token, 'sales_id': random.randint(1, 30), } res = requests.post(url, cookies=cookies, data=payload)
]]><p>I first created this script to heavy test the web application hosted in elastic beanstalk.</p>
<p>Why <strong>python</strong>? Just forEnable ssh login without passwordhttp://jslim.net/blog/2016/06/29/enable-ssh-login-without-password/2016-06-29T00:52:25.000Z2024-02-21T10:41:37.617ZIn client PC
]]><h3 id="In-client-PC"><a href="#In-client-PC" class="headerlink" title="In client PC"></a>In client PC</h3><p>Generate ssh key if you don’tAWS extend disk volume on an EC2 instancehttp://jslim.net/blog/2016/06/14/aws-extend-disk-volume-on-an-ec2-instance/2016-06-14T23:25:36.000Z2024-02-21T10:41:37.617ZThere may have certain situation that we need to extend disk volume on an instance.
Create a new volumn on AWS
Visit EC2 service, and click on the Volumes on the left menu. Then create volume
Volume Type: for normal case, just select General Purpose SSD, unless you have a high-write usage, then you can choose Provisioned IOPS SSD
Size (GiB): Just put the size you need
Availability Zone: Make sure you select the zone that same as the instance you want to extend
Snapshot ID: Leave it
Encryption: Leave it
Then create
Now you can see that the Status is available. Right-click the row, and click on Attach Volume
ubuntu@ip-xxx-31-xx-xx:~$ sudo mkfs -t ext4 /dev/xvdf mke2fs1.42.9 (4-Feb-2014) Filesystem label= OS type: Linux Block size=4096 (log=2) Fragment size=4096 (log=2) Stride=0 blocks, Stripe width=0 blocks 1310720 inodes, 5242880 blocks 262144 blocks (5.00%) reserved for the super user First data block=0 Maximum filesystem blocks=4294967296 160 block groups 32768 blocks per group, 32768 fragments per group 8192 inodes per group Superblock backups stored on blocks: 32768, 98304, 163840, 229376, 294912, 819200, 884736, 1605632, 2654208, 4096000
Allocating group tables: done Writing inode tables: done Creating journal (32768 blocks): done Writing superblocks and filesystem accounting information: done
Last is to mount it to /storage(it can be any path you like)
Edit the file /etc/fstab(you may use nano if you’re not familiar with vim)
Remember to backup before edit the file
1
2
ubuntu@ip-xxx-31-xx-xx:$ sudo cp /etc/fstab /etc/fstab.orig ubuntu@ip-xxx-31-xx-xx:$ sudo vim /etc/fstab
Update the content
1 2
LABEL=cloudimg-rootfs / ext4 defaults,discard00 <------ THIS IS THE DEFAULT LINE /dev/xvdf /storage ext4 defaults 00
Now create a folder for that new disk volume
1
ubuntu@ip-xxx-31-xx-xx:$ sudo mkdir /storage
Then mount all
1
ubuntu@ip-xxx-31-xx-xx:$ sudo mount -a
Double check it
1 2 3 4 5 6 7 8 9 10
ubuntu@ip-xxx-31-xx-xx:$ df -h Filesystem Size Used Avail Use% Mounted on udev 492M 12K 492M 1% /dev tmpfs 100M 344K 99M 1% /run /dev/xvda1 7.8G 1.6G 5.8G 22% / none 4.0K 0 4.0K 0% /sys/fs/cgroup none 5.0M 0 5.0M 0% /run/lock none 497M 0 497M 0% /run/shm none 100M 0 100M 0% /run/user /dev/xvdf 20G 44M 19G 1% /storage <------- THIS IS NEW
]]><p>There may have certain situation that we need to extend disk volume on an instance.</p>
<h2 id="Create-a-new-volumn-on-AWS"><aAWS EC2 - Enable remote access on mysqlhttp://jslim.net/blog/2016/06/05/aws-ec2-enable-remote-access-on-mysql/2016-06-05T20:33:00.000Z2024-02-21T10:41:37.617ZI think most of us know that enable remote access, need to create a new user with % host.
But in EC2, there are some security config need to be done.
Update the security group of the EC2 instance
Go to your AWS console, select the instance where you host your database (MySQL).
Then select the security group
Make sure you add a rule in the In bound there, for MySQL, and set the IP to 0.0.0.0
Update the mysql binding address
Edit the file /etc/mysql/my.cnf, and change the binding address to 0.0.0.0
(EDIT: 2019-04-04, you may also update the file /etc/mysql/conf.d/mysql.cnf , for newer version of MySQL. Thanks for Dawood pointing out.)
1
bind-address=0.0.0.0
then restart mysql server
1
$ sudo /etc/init.d/mysql restart
Create a new user for any host in MySQL
1 2 3 4
CREATE USER 'foo'@'%' IDENTIFIED BY 'your-awesome-pass';
# grant privileges to table(s) GRANT ALL PRIVILEGES ON db_name.* TO 'foo'@'%' WITH GRANT OPTION;
NOTE: bare in mind that 'foo'@'localhost' & 'foo'@'%' are consider as different user, you may have 2 different passwords for each of them
]]><p>I think most of us know that enable remote access, need to create a new user with <code>%</code> host.</p>
<p>But in EC2, there are someSetup Laravel 5 in Amazon Elastic Beanstalkhttp://jslim.net/blog/2016/05/23/setup-laravel-5-in-amazon-elastic-beanstalk/2016-05-23T23:42:55.000Z2024-02-21T10:41:37.617ZProblem
This is my first time dealing with AWS. Initially, I setup my Laravel project in a normal EC2 instance, and manually install mysql, web server, etc.
Then a friend of mine told me that this kind of infrastructure is not scalable. Eventually I go for Elastic Beanstalk.
Go to Configuration on your left side, then select Instances
If you don’t have a key, create it. Download it and put into your ~/.ssh/ directory.
NOTE: Bare in mind that whenever you ssh in and change something, the changes only temporary, once it scale up and down the changes will be lost
Add environment variables
If you notice, there is a file named .env.sample in all laravel project, and you need to rename/copy it as .env(without sample), this is because the configuration cannot be push to git repo, due to security reason.
Now, in elasticbeanstalk, if you ssh in and rename it to .env, then when it scale up and down, the .env will be lost, and the site may be down. Thus, the you have to add the config settings to environment variables
Configure RDS for your project
Go to Services(in the top left), and choose RDS, then follow the instruction.
Now go to your instances
Get the link and put it in your environment variable.
]]><h2 id="Problem"><a href="#Problem" class="headerlink" title="Problem"></a>Problem</h2><p>This is my first time dealing with AWS.Adsterra make my site traffic drop & get banned by Chromehttp://jslim.net/blog/2016/05/16/adsterra-make-my-site-traffic-drop-and-get-banned-by-chrome/2016-05-16T23:21:15.000Z2024-02-21T10:41:37.617ZToday I would like to share with you, I had put Adsterra on this site. As they claimed that high CPM rate.
Right now, I notice that my site has blocked by Google Chrome.
I guess is because of, when first load the page, the first click will redirect to somewhere, this is really annoying also.
I found out there is a link about terraclick, and is from the javascript file that from Adsterra. So I remove it quickly.
Now, I check back my Google Analytics
The session drop until 50+. If you still can see this post, I hope that you don’t simply trust all these claim about high CPM bla bla bla.
Use Google AdSense, otherwise use RevenueHits. At lease I know that RevenueHits can make me some revenue, better than those scam Ads platform (really make my site shit).
My revenue drop also. Please review carefully before you apply any ads on your site.
]]><p>Today I would like to share with you, I had put Adsterra on this site. As they claimed that high CPM rate.</p>
<p>Right now, I noticeSession hijacking: facebook.com examplehttp://jslim.net/blog/2016/03/28/session-hijacking-facebook-dot-com-example/2016-03-28T18:55:13.000Z2024-02-21T10:41:37.617ZFirst of all, session hijacking is a technique that steal the cookies from authenticated user, and lie to the server that you’re the authenticated user.
I’m going to show an example on how to get into the facebook account.
Assumption: I already have the authenticated cookies on my hand.
1. Open facebook.com with Firefox
I still think that Firefox is the best browser ever for developer.
You can see the Facebook login page now. Now I need to import the cookies into here.
Go to Manage Cookies menu, select “facebook.com” in the Domain there. Now you can see a few cookies here.
See the box I highlighted? Facebook use https, so httpOnly choose false, isSecure choose true and isSession also true. These are session cookies.
Now will be like this.
3. Successful login
Refresh the page, and now…
DONE!
Summary
The concept is like you want to go to foreign country, but you don’t have a passport. Now you steal/get the passport from someone (ignore the passport photo, just an example here). Now you tell the custom that you’re actually the someone, and you’ll get pass.
]]><p>First of all, <a href="https://en.wikipedia.org/wiki/Session_hijacking">session hijacking</a> is a technique that steal the cookies fromWeb app with Windows app print pdf file from download linkhttp://jslim.net/blog/2016/03/07/web-app-with-windows-app-print-pdf-file-from-download-link/2016-03-07T23:16:53.000Z2024-02-21T10:41:37.617ZScenario
A web app that allow user to click on a link/button, then trigger the selected printer and print out the document directly.
Problem & Solution
Due to security reason, there is no way to trigger hardware via JavaScript. Thus, I create a Windows Form Application (WFA) using C#.
This application is actually just a wrapper that wrap a browser (I’m using CefSharp browser), so that I can get the printer list by using C#, then pass to the browser.
1. Create a Windows Form Application
I assume you know how to do this. I’m using Visual Studio in this case.
Also, you need to add a few references that required for this project:
// after the page loaded, check if the url is setup printers page privatevoidOnFrameLoadEnd(object sender, FrameLoadEndEventArgs e) { if (e.Url.Contains("setup/printers")) addPrinterOptionsToDropdown(); }
// Javascript privatevoidaddPrinterOptionsToDropdown() { // (Optional) Filter a few printer model Regex regex = new Regex(@"\b(EPSON|Canon)\b", RegexOptions.IgnoreCase);
string js = "$('select').empty();";
foreach (string sPrinters in System.Drawing.Printing.PrinterSettings.InstalledPrinters) { MatchCollection matches = regex.Matches(sPrinters); if (matches.Count < 1) continue;
privatestring suggestedFilename = null; // without the session, the file cannot be downloaded publicvoidsetSessionCookie(string sessionCookie) { this.sessionCookie = sessionCookie; }
publicvoidOnBeforeDownload(IBrowser browser, DownloadItem downloadItem, IBeforeDownloadCallback callback) { if (!callback.IsDisposed) { using (callback) { callback.Continue(downloadItem.SuggestedFileName, showDialog: true); } } }
]]><h2 id="Scenario"><a href="#Scenario" class="headerlink" title="Scenario"></a>Scenario</h2><p>A web app that allow user to click on aA better alternative for AdSensehttp://jslim.net/blog/2016/02/25/a-better-alternative-for-adsense/2016-02-25T20:14:31.000Z2024-02-21T10:41:37.617ZPreviously, I was using AdSense for some time, but the earning seems not that attractive. Until, I discover RevenueHits, within 4 months, I received my first payment, USD25.50.
Awesome! You can sign up here.
]]><p>Previously, I was using AdSense for some time, but the earning seems not that attractive. Until, I discover <aChange document root in DirectAdminhttp://jslim.net/blog/2016/02/23/change-document-root-in-directadmin/2016-02-23T19:46:03.000Z2024-02-21T10:41:37.617ZFor those of you developing Laravel application, sure you have face this issue if you’re hosted in DirectAdmin hosting.
Besides, if you want to setup auto deployment like Rocketeer, also you will need to change the document root.
Let’s take an example in my scenario, Laravel + Rocketeer auto deployment
1. Login to your DirectAdmin, and go to “Custom HTTPD Configurations”
As I mention just now, using Rocketeer in this case, thus it will point to current directory (softlink), and public is because of laravel project.
4. Restart web server
Login with root user, then restart
1
$ service httpd restart
Now it should works.
]]><p>For those of you developing <a href="https://laravel.com/">Laravel</a> application, sure you have face this issue if you’re hosted inPHP Laravel 5 generate long PDF file in running in backgroundhttp://jslim.net/blog/2016/02/04/php-laravel-5-generate-long-pdf-file-in-running-in-background/2016-02-04T19:44:45.000Z2024-02-21T10:41:37.617ZIf you have come across a problem with generating a large PDF file in your Laravel application, probably is not a good idea for the user to wait.
One of the solution is to process the PDF generation in background.
<?php Schema::create('cronjob', function($table) { $table->increments('id'); $table->string('type', 40); $table->text('data')->nullable(); $table->integer('user_id')->unsigned()->default(0); // user who created the cron $table->datetime('executed_at')->nullable(); // the execution start time $table->datetime('completed_at')->nullable(); // the complete timestamp });
Don’t forget also create a model class, Cronjob.php
$path = storage_path('files/users/' . \Auth::user()->id . '/html'); @mkdir($path, 0755, true); $filename = 'awesome-html-file.html'; file_put_contents($path . '/' . $filename, $html); // save to a temporary html file
// schedule generate pdf in cronjob $cronjob = newCronjob(); $cronjob->type = 'generate_pdf'; $cronjob->data = json_encode([ 'html' => $filename, ]); $cronjob->user_id = \Auth::user()->id; // keep the current user identity, because in cron, it won't know which user is current user $cronjob->save();
returnredirect()->back() ->with('alert.success', 'PDF is currently processing in background. Please refresh the page later.'); }
DONE :)
]]><p>If you have come across a problem with generating a large PDF file in your Laravel application, probably is not a good idea for the userLaravel-dompdf set custom paper sizehttp://jslim.net/blog/2015/12/28/laravel-dompdf-set-custom-paper-size/2015-12-28T00:56:10.000Z2024-02-21T10:41:37.617ZOften, many web application required functions like export to pdf, but not all the time is A4 paper size.
I’m using laravel-dompdf for the project. I will not talk about the setup. Let’s see the code directly.
]]><p>Often, many web application required functions like <em>export to pdf</em>, but not all the time is <aLaravel 5 with Facebook error - Cross-site request forgery validation failed. Required param "state" missinghttp://jslim.net/blog/2015/12/01/laravel-5-with-facebook-error-cross-site-request-forgery-validation-failed-required-param-state-missing/2015-12-01T04:41:10.000Z2024-02-21T10:41:37.617ZThe reason of this error is due to Laravel doesn’t use native PHP session store.
1. Create a custom session handler class
1 2
$ mkdir /path/to/project/app/Libraries/Facebook $ vim /path/to/project/app/Libraries/Facebook/FacebookPersistentDataHandler.php
]]><p>The reason of this error is due to Laravel doesn’t use native PHP session store.</p>
<h2 id="1-Create-a-custom-session-handler-class"><aSetup wildcard subdomain in Laravel Homesteadhttp://jslim.net/blog/2015/12/01/setup-wildcard-subdomain-in-laravel-homestead/2015-12-01T04:36:50.000Z2024-02-21T10:41:37.617ZBefore start, you need to setup vagrant and ssh into the virtual machine
1 2
$ vagrant up $ vagrant ssh
1. Edit your Nginx config
1
$ sudo vim /etc/nginx/sites-available/laravel.app
In the server_name there
1
server_name laravel.app *.laravel.app;
2. Install dnsmasq & configure
1
$ sudo apt-get install dnsmasq
Then edit the config file
1
$ sudo vim /etc/dnsmasq.conf
Add in the following content
1 2 3 4
local=/laravel.app/ domain=laravel.app
address=/laravel.app/127.0.0.1
Restart dnsmasq
1
$ sudo /etc/init.d/dnsmasq restart
3. Go back to host machine (I’m using OS X here)
Open up the Network Preferences
Click on the Advanced… tab
Now add these DNS to the settings, in the DNS tab
NOTE: for 192.168.1.1, this you should follow your router address, because some may be 192.168.0.1 or others
The /etc/hosts value would be
1
127.0.0.1 laravel.app
4. Verify
Before that, double check your /etc/hosts in the host OS
]]><p>Before start, you need to <a href="/blog/2015/10/31/vagrant-for-php-development-environment/">setup vagrant</a> and ssh into the virtualExploring The Factors That Can Lead To The Success Of An Applicationhttp://jslim.net/blog/2015/11/26/exploring-the-factors-that-can-lead-to-the-success-of-an-application/2015-11-26T05:41:33.000Z2024-02-21T10:41:37.617ZAuthor Signature:Addison Cohen is a mobile app developer working with Appsted Ltd. You can contact him if you want to hire iPhone app developer for the development of the most comprehensive mobile application solutions. He loves sharing latest information on mobile technologies like iOS, Android development processes.
The giant mobile marketplace already has a plethora of applications, and many more will release while I’m writing this article. Therefore, for the folks who want to make their application stand out in the pool of applications, a distinct app idea and a right approach are a must.
No matter what is the genre of application that you are interested in developing, there are certain common factors that can lead to the success or failure of an application. Thus, by keeping the winning factors in mind, you can increase the likelihood of your app success in the market.
Fortunately, there are many examples in the industry, who have committed mistakes while developing an application, from which you can learn and shun away the common mistakes. Here are some best practices that one must employ to ensure an intriguing and worthwhile application.
1. Designing is the Foundation – Don’t overlook it!
For any type of application, design plays a pivotal role in its success. A poorly designed application won’t attract users. And, this is surely something that you won’t want to happen. For a well designed application, one must consider the four main steps. Let’s have a look into these steps.
a.) Big Idea – The core idea behind the development of an application must be predefined, and addressed appropriately while designing the app. This idea must be something big and really useful. One may conduct several brainstorming sessions to come up with a valuable app idea.
b.) Plan – Once the app idea is clear, it is essential to strategically think of a plan that can help you execute the app development process. Here you will decide whether you need to focus on various functions, or on a key feature.
c.) Layout – Now, design the user interface by packaging the tangible products altogether to form a legible and impressive layout. Make sure that your design is simple and effective enough to entice users and encourage them to further interact with the application.
d.) Functionality – Till this point, it can be assumed that half of the development task is done. Now, you must ensure that the integrated features are performing flawlessly to deliver a great user experience.
2. Integrate Features that are in vogue..
Users, especially mobile device users tend to have a short attention span, and thus, they easily get distracted. For this reason it is advisable to integrate a few key features in your application, while ensuring that they work brilliantly. However, you can eventually upgrade the features with an increasing user base and requirements. Moreover, it is imperative to take care that whatever features you want to include in your app, they must deliver an absolute UX.
3. Make the content relevant and contextual
While planning the content of an application, it is vital to ensure that all the information provided in your application is relevant and making sense to the users’ search. Concentrate on the key functionality of your application that is going to attract your potential users, and then think of additional features that are somehow contextual to the key feature. This can help you make your app go viral.
4. Call to Action should be instant and clear…
If the app UI is making it confusing for users to decide where to click next, they might end up abandoning the application. Thus, the actions that you want your users to perform must be showcased in an attractive fashion. Your target users must be able to clearly see the CTA (Call to Action) buttons on a page. This will not only enhance the UX, but will also help you achieve your ultimate goal.
5. Offer notification, only if required!
The significance of notifications can’t be gainsaid. While notifications can augment the UX, they can also ruin the experience if they are included in apps that don’t demand such feature. Thus, it can be said that notifications are not advisable for every application. However, whenever they make sense, they must be added.
6. Reap the benefits of Analytics..
The foremost benefit of integrating analytics in an application is that it lets one recognize the features, which are being neglected and which are being used by users. Having such insights can definitely help you iterate your app features to make it more useful. With robust analytics, you can identify the trends and instantly make suitable changes to further enhance the UX and elevate the application download rate.
7. Offer timely and localized information
To make your application stand ahead the curve, you must offer the best features to your users. If you can deliver localized information in a timely way, it can amazingly boost the credibility of your application. For instance, let’s consider a news application. Apart from sharing regular headlines and news across the globe, if it can share news and happenings of the local area where you are at that moment, it will make the application more impressive and interesting. Thus, think out of the box and allow your application to take the benefits of location-based information by implementing the latest technologies like Beacon, Wi-Fi, GPS, etc., whichever is suitable for you.
Conclusion
Today, when truckloads of applications are already competing for their success in the wobbly mobile marketplace, it is not an easy pie to develop a successful application. However, by keeping a few essential factors in mind, one can surely heighten the app success rate. I hope the aforementioned factors will help you focus your application in the right direction.
]]><p><strong>Author Signature:</strong> <em>Addison Cohen is a mobile app developer working with Appsted Ltd. You can contact him if you wantImportant Measures To Be Taken While Developing An E-commerce Sitehttp://jslim.net/blog/2015/11/26/important-measures-to-be-taken-while-developing-an-e-commerce-site/2015-11-26T05:36:59.000Z2024-02-21T10:41:37.617ZAuthor Biography:
This post is just arrived through the hard work of Samuel Dawson who is a expert HTML to WordPress service provider. Samuel has refined here so many things on how you can build a impressive website just to start E Commerce business.
Developing an efficient ecommerce site from the scratch is not an easy task. There are various issues related to product designing process and product delivery systems with various website designing and marketing strategies. With a multiple variety of online tools, it has become relatively easy to fetch and avail free and affordable resources that would surely help any ecommerce website shine across the world.
After certain decisions are made, next step is to develop an excellent online e-commerce shopping website. To develop a highly engaging e-commerce website, every possible element that serves a purpose of offering your customers with every proper e-commerce solutions is what you need to do for taking your e-commerce business at next step.
1. Developing an e-commerce site with website with crystal clear details, with predictable results that is visually appealing.
As said in various blogs or on various ecommerce website that a visitor must buy something. This makes your business to rise higher instantly by easily optimizing the sales part so that the path that leads to any visitor is heading towards right direction.
Some of the important steps that needs to be taken are as follows:-
Call to action button follows the rule of accessing a transparent text with conspicuous design to engage visitors that would easily find what lies behind the scenes. An ultimate idea is to observe an overall design of the product that looks appealing enough to visitors to buy them with rapid rising results.
Navigation process and structures for developing various e-commerce websites define a clear, concise and high accuracy rates that refrains from duplicacy of common items such as About Us section. Another important thing that falls into this category is that of Support and Help section that needs to be easily reachable for visitors
Next comes your Product with descriptions categories that offers a variety of different products as well as services with differentiating them in terms of various categories so that visitors can get access to various information wherever they go.
2. Social proof is what customers look for
Customers are extremely dependent upon public reviews that describes about a particular product as well as service and such is an obvious case with an online shopping mode. This is one of the reason why people frequently refer to third-party websites for multiple reviews. On the same side, if reviews are brought into our own product page, it will prevent them from having second thought.
As published on the Wall Street Journal years ago, people respond better to peer level than to any financial incentives. The same thing is valid for digital world as well. In such cases, people will prefer to have more products because everyone is following the same pattern. This could be a message for everyone to send it by adding more users’ testimonial with expert reviews in your product pages.
3. Thoroughly follow a check-out process for better e-commerce business
Creating a seamless checkout process definitely requires number of simple integration process for well-rated WordPress plugins. Its very obvious that if you want your customers to easily get back and forth from their shopping carts, then surely one needs to perform following steps:
Minimizing the user data required to register and enable them to shop as they want it.
Allowing them to continue with shopping even if they’re in the middle of a checkout process, would be of great advatage while building new e-commerce site.
Displaying various related data with respect to shopping that includes subtotals, quantity of the product, etc.
Displaying a contact form and an open chat option will increase the number of people for contact purpose at any time.
4. Secure transactions are the only transactions.
Well in current days, almost each one of us are aware of various potential threats of online shopping that clearly defines that they are quite likely to abandon their shopping carts whatever way they feel for dealing with the payment process, might not be secure enough.
One needs to make sure that in-order to validate a proper security measures, its quite essential to use proper websites features and potentially adds familiar security icon options and logos that will finally help shoppers feel more comfortable with transaction process.
5. Build relationships but exclude social site buttons from product pages.
As shown on the basis of several studies that most of the product pages are not dealing with shares that displays next to these buttons that are highly threatening because it might appear as a negative social thought that can obviously hamper your start-up e-commerce business.
]]><p><strong>Author Biography:</strong></p>
<p><em>This post is just arrived through the hard work of Samuel Dawson who is a expert <arobots.txt could be vulnerablehttp://jslim.net/blog/2015/11/14/robots-dot-txt-could-be-vulnerable/2015-11-14T19:26:20.000Z2024-02-21T10:41:37.617ZRobots.txt designed to prevent search engine to crawl your page or content, some of the content probably you don’t want others to search about it.
Example, below shows that this site prevent all user agent (mostly search engine) to crawl the content of the entire site.
1 2
User-agent: * Disallow: /
However, this could be a loophole for giving a chance to hacker to hack into your site, because you have exposed the paths.
]]><p><a href="http://www.robotstxt.org/">Robots.txt</a> designed to prevent search engine to crawl your page or content, some of the contentMake use of Laravel 5 default loginhttp://jslim.net/blog/2015/11/12/make-use-of-laravel-5-default-login/2015-11-12T06:02:46.000Z2024-02-21T10:41:37.617ZIf you see the default AuthController.php, you can actually see this use AuthenticatesAndRegistersUsers. They called this as traits, which was introduced in PHP 5.4.0
By using their default login, you have to create your own view, e.g.
In the app/Http/Controllers/Auth/AuthController.php, you can specify your username in the table (some of people will use email instead). The $redirectPath is refer to after you successful login, where should it redirect to?
]]><p>If you see the default <strong>AuthController.php</strong>, you can actually see this <code>useIntegrate GoogleAds API to Laravel 5http://jslim.net/blog/2015/11/05/integrate-googleads-api-to-laravel-5/2015-11-05T04:02:46.000Z2024-02-21T10:41:37.617ZThis may be too simple for you. At the beginning, I was thinking like how the PSR works, what class should I add to config/app.php‘s provider (actually no need), etc.
Eventually I realised that, it was quite simple.
1. Edit the composer.json
Add "googleads/googleads-php-lib": "6.*" to the require section.
e.g.
1 2 3 4 5
"require":{ "php":">=5.5.9", "laravel/framework":"5.1.*", "googleads/googleads-php-lib":"6.*" <----------- this line }
; Uncomment clientCustomerId to make requests against a single AdWords account, ; such as when you run the examples. ; If you don't set it here, you can set the client customer ID dynamically: ; $user = new AdWordsUser(); ; $user->SetClientCustomerId(...);
; If you do not have a client ID or secret, please create one of type ; "installed application" in the Google API console: ; https://cloud.google.com/console client_id = "INSERT_OAUTH2_CLIENT_ID_HERE" client_secret = "INSERT_OAUTH2_CLIENT_SECRET_HERE"
; If you already have a refresh token, enter it below. Otherwise run ; GetRefreshToken.php. refresh_token = "INSERT_OAUTH2_REFRESH_TOKEN_HERE"
3. How to use
1 2 3 4 5 6 7
<?php Route::get('adwords', function () { $user = newAdWordsUser(config_path('googleads/adwords.ini')); print_r($user); // for debug only // other actions here returnview('adwords'); });
That’s all~
]]><p>This may be too simple for you.<br>At the beginning, I was thinking like how the PSR works, what class should I add toVagrant for PHP development environmenthttp://jslim.net/blog/2015/10/31/vagrant-for-php-development-environment/2015-10-31T04:02:46.000Z2024-02-21T10:41:37.617ZWhat is Vagrant?
I asked this question before, I think is about 1 year+ ago. Many times, I search for it, but couldn’t understand how it work.
Until recently, I found that Laravel also recommended it. I tried and eventually I found it really useful!
Just an example here, look at the section folders, it actually created a shared folder in the VM. ~/dev/web is the local folder which keep all the web project (make sure it exists before you run vagrant up), whereas the /home/vagrant/dev will be inside the VM
For sites, is actually the virtual hosts for a particular project, in this example is to map laravel.homestead.com to the project named laravel
Now you can create the VM
1 2
$ cd ~/dev/homestead $ vagrant up
Now edit your /etc/hosts file, by adding the following line
1
192.168.10.10 laravel.homestead.com
(the ip address was in your ~/.homestead/Homestead.yaml)
Now open up your browser, and type in the address laravel.homestead.com, and you will see the page!
You can remain your development in the host OS, but host the project in VM.
You can actually verify this by open a new terminal
1 2
$ cd ~/dev/homestead $ vagrant ssh
Now you logged in to the VM
1 2 3
$ cd ~/dev $ ls -l drwxr-xr-x 1 vagrant vagrant 816 Oct 21 08:55 laravel/
Go back to the previous terminal, create a dummy file
1
$ touch ~/dev/web/new-file
Switch back to the second terminal
1 2 3
$ ll drwxr-xr-x 1 vagrant vagrant 816 Oct 21 08:55 laravel/ -rw-r--r-- 1 vagrant vagrant 816 Oct 21 08:57 new-file
Means now you can create any other PHP projects beside Laravel in this environment as you like.
Enjoy yourself :)
]]><h2 id="What-is-Vagrant"><a href="#What-is-Vagrant" class="headerlink" title="What is Vagrant?"></a>What is Vagrant?</h2><p>I asked thisTop 5 Strategies to Heighten Security of Your WordPress Sitehttp://jslim.net/blog/2015/10/30/top-5-strategies-to-heighten-security-of-your-wordpress-site/2015-10-30T08:01:09.000Z2024-02-21T10:41:37.617ZAuthor Bio :
Sophia is a renowned WordPress developer by profession. If you’re about to Hire WordPress developer, then you can get in touch with her. Sophia already has multiple WordPress-related articles under her name.
Despite investing a significant amount of time and efforts, your WordPress website may still be vulnerable to attacks. In fact, on an average nearly 20,000 sites are identified as hacked every day. Unfortunately, you won’t find any “One size Fits All” approach that can help make a WordPress website secure from getting hacked. But, there are a few simple to follow strategies that can help harden your WordPress site security. In this post, I’ve listed 5 simple yet crucial strategies that will safeguard your site against potential threats.
1. Limit The Use Of the Term “WordPress” On Your Site
While having a WordPress site can help establish your business as a strong online identity, the irony is that very mention of the terminology “WordPress” on your site can put it at risk. That’s because, the immense popularity of the WordPress CMS makes it a favorite target for hackers. Malicious users can launch brute force attacks, if they’ll identify the WordPress version you’re running, or the WP theme or plugins you have installed. Of course, you can completely avoid using the term WordPress on your website, but try to limit its use.
You can deal with such an issue by changing some default permalinks of your WordPress site. Doing so, will help keep your site safe against brute force attacks, SQL-injection and other attacks.
2. Don’t Forget to Change Default Administrator Name
One common mistake that site owners tend to make is that they overlook or forget to change the default username (i.e. admin) for their WordPress account. Keep in mind that not changing the administrator name makes the brute force successful, as hackers just need to guess your password to break into your site admin interface.
You just need to create a new admin user for changing your website default user name. Once you’ve created a new admin user account, make sure to delete the original default admin user from your admin panel.
3. Use an Updated WordPress Version
Each new WordPress release comes with several new and improved features. More importantly, the latest version boasts security fixes to resolve bugs found in previous WP version. Thus, running your site on an up-to-date WordPress version will not just help add many more features, but will also help fix security loopholes and issues.
For example, in order to keep WordPress sites secure the latest WordPress version 4.3 has introduced a new approach for generating secure passwords. When using this new version, you won’t be receiving passwords through email instead you will be getting a password reset link. The best part is that WordPress will automatically create a password for every new user profile.
4. Correct File Permissions is Crucial For Website Security
Not using the correct right permissions for your website files and directories can impose a threat to your website security. Wondering why? As you may know, you can write on your WordPress site from the server. This often creates a problem when your site runs on a shared server. Such kind of server hosts multiple sites, and thus there is a greater possibility that your files can be accessed by some other site owner. You won’t face any problem if your file permission allows users to read it. However, avoid assigning write permission on your file, or some malicious user may write faulty code, making it vulnerable to attacks.
With the following commands, you can protect all your WordPress files and folders safe and accessible only to authenticated users:
1 2
$ find /path/to/your/wordpress/install/ -type d -execchmod 755 {} \; $ find /path/to/your/wordpress/install/ -type f -execchmod 644 {} \;
5. Use Plugins To Address Specific Security Issues
Last but definitely not the least, there is a plugin available online that can help meet your needs, including measures to keep your website protected against attacks. Here are 3 great and highly useful plugins that ensures in making your site
All In One WP Security And Firewall: This is an excellent plugin that helps monitor a WordPress site for vulnerabilities. That’s not it! The plugin enforces latest security techniques to handle such vulnerabilities. Interestingly enough, it makes use of exceptional “security points grading system” that helps analyze if you’re protecting your site accurately on the basis of security features you’ve activated or not.
WP Security Audit Log: Wouldn’t it be better if you can stop possible hacker attacks from happening on your WordPress site? This can be achieved with the help of WP Security Audit Log plugin. It helps to store an audit log including the changes and activities that helps improve WordPress productivity and stop hacker attacks. Security log is an extremely useful plugin for professionals and site owners to track changes that takes place on multiple website.
Google Authenticator: Two step login authentication has proved an effective technique that hardens website security by adding an extra layer of security to it. Using such a technique requires users to enter an authenticated code that they receive on their mobile phone along with a username and password to login into the website’s admin interface. For this purpose, you can make use of the Google Authenticator plugin. It provides an app that enables two-way authentication on Android, or iPhone or Blackberry device.
Conclusion
So, that’s it! Hope that reading the post will help you find the suitable ways to increase your website security to a great extent. However, make sure to create a backup of your site before making any update and changes to the WordPress core files, as it will help you restore your original website in case it is being hacked and damaged by hackers.
]]><h2 id="Author-Bio"><a href="#Author-Bio" class="headerlink" title="Author Bio :"></a>Author Bio :</h2><p>Sophia is a renowned WordPressSelenium vs PhantomJS - Which One is Better For Testing Web Appshttp://jslim.net/blog/2015/10/26/selenium-vs-phantomjs-which-one-is-better-for-testing-web-apps/2015-10-26T04:02:46.000Z2024-02-21T10:41:37.617ZAbout the Author - As an mobile app developer and computer programmer of Xicom Technologies Ltd.-Android App Development Services, Amanda Cline explains which is better selenium or phantom JS for testing web apps. Technology intrigues me and this is why I like to read and write about mobile apps and web development related topics specially.
With millions of apps available in the app marketplace, several organizations and individuals are fighting in order to attain maximum app downloads. Many believe that the success of an app depends on its capabilities, usability and the platform for which the app is built. While this is true, but you must also focus on testing the apps. Remember that ignoring to test an app can lead to its failure.
No matter whether you’re creating a web application for the desktop or a mobile app, be sure that the app is tested thoroughly before releasing it for public use. Doing so, will ensure that your app is bug-free and will let you know about the errors that you need to troubleshoot. Thankfully, there are a few high quality JavaScript testing frameworks that provide convenience and ease to test apps.
In this post, we’ll be talking about two popular JS frameworks such as Selenium and PhantomJS that helps perform functional tests on web applications. I’ll let you know about the major difference between both these testing frameworks by discussing about their pros and cons, to help you decide which one will best suit your app testing needs. But, let’s first have a brief introduction to Selenium and PhantomJS frameworks.
Overview Of Selenium and PhantomJS
Selenium serves as an easy-to-use testing framework for web apps. It provides a record/playback tool to carry out the process of authoring tests cases even without the familiarity of test scripting language. This testing framework helps to write tests in different programming languages (like Ruby, C#, Java, etc.) with the help of a domain-specific language (called Selenese). The tests can then be run against most modern web browsers. Selenium helps in running the tests against some of the major web browsers and platforms. This framework can be downloaded for free, since it is an open-source software.
PhantomJS isn’t exactly a test framework and rather works in sync with a test runner that help in launching tests. Some of the test runners that PhantomJS use for carrying out tests on JavaScript apps are Buster.JS, Mocha, Hiro, Laika and many more. It uses JavaScript API to integrate a test automation system in the browser.
Selenium : Pros and Cons
Let us first have a look at the pros of the Selenium framework:
Great Support: Selenium framework has a large community of developers who keep on creating plugins that can make the framework fully-compatible with all modern style JavaScript front-end frameworks
Detailed Documentation: It provides an extensive yet easy to understand documentation that contains data that can help you learn about the process of testing the apps.
Allows to Run Multiple Tests: Selenium helps in running multiple tests on different browser windows simultaneously.
Offers Bindings in Popular Programming Languages: Because of the ability to perform bindings in extensively used programming languages, you can pick any language based on your needs.
Execute and View Tests in Real-time: Selenium gives the capability of executing feature test in real-time over the web.
Additionally, it saves the debugging effort by allowing users to see browsers activities in real time.
Below are some of the cons of the Selenium framework:
In order to test your app on multiple browsers and operating systems, you will have to configure the tests in a centralized configuration file.
The Selenium framework does not produce detailed results.
Running different test cases using the Selenium framework might turn out to be time-consuming.
Manual testing can be difficult.
PhantomJS: Pros and Cons
Some of the pros of PhantomJS are listed below:
Headless Testing: The biggest advantage of PhantomJS framework is that it’s headless, and does not require performing any additional overhaul using the real browser.
Avoids 3rd Party Integration: It does not requires integration with a third-party service.
Executes Multiple Tests in Set Time: The framework helps execute multiple test cases in a fixed time period.
Limits Use of Resources: It makes use of fewer resources for running tests on the web app.
Smoke Testing: The PhantomJS framework is an ideal choice for performing smoke testing of web applications.
Manual Testing: PhantomJS makes manual testing a breeze.
Finally, let’s have a quick glance at disadvantages of PhantomJS:
Is only compatible with major operating systems such as Linux, Windows, Mac OS X to name a few.
Since PhantomJS acts as a single version of WebKit, it does not appear a good choice for developers involved in testing web applications.
Running unit interface tests that require to run on multiple browsers fails to cover all the tests.
Conclusion
Not focusing on performing unit tests for apps can put you in a lot of trouble, and will require you to spend more time and efforts in maintaining the app. However, you can easily test your web applications in a highly efficient manner using the two most popular Selenium and PhantomJS frameworks. Here, in this post I’ve covered many pros and cons of both these frameworks that will help you make the right decision about choosing a suitable framework to test your web app.
Credits:
Written by: Amanda Cline
]]><p><strong>About the Author</strong> - <em>As an mobile app developer and computer programmer of Xicom Technologies Ltd.-<aSetup Ruby on Rails in Debian 7http://jslim.net/blog/2015/10/12/setup-ruby-on-rails-in-debian-7/2015-10-12T06:46:27.000Z2024-02-21T10:41:37.617Z1. Update the source list
Assumed that ruby & gem are not installed. Need to install rvm first.
Before that, rvm require some packages which are not available on the default debian repo. Thus update the apt list first
Remember to switch to root user
1
$ su -
Edit the list file
1
$ vi /etc/apt/sources.list
Make sure all these are inside
1
2
3
4
5
deb http://security.debian.org/ wheezy/updates main deb-src http://security.debian.org/ wheezy/updates main
deb http://http.kali.org/kali kali main non-free contrib deb-src http://http.kali.org/kali kali main non-free contrib
]]><h2 id="1-Update-the-source-list"><a href="#1-Update-the-source-list" class="headerlink" title="1. Update the source list"></a>1. UpdateHow branding is important to a developer?http://jslim.net/blog/2015/08/01/how-branding-is-important-to-a-developer/2015-08-01T00:53:25.000Z2024-02-21T10:41:37.617ZWhen we talk about “Branding”, often we thought about sales & marketing.Yes, nothing wrong here! In fact, many developers/geeks doesn’t know that it is important to them too.
I’m here just to share a little bit of my personal experience.
My little story begin
This was started in year 2011, that was my intership program. My supervisor, Mr Ang (drop me an email if you interest to know him) advice me to sign up an GitHub account. Yes, I do follow, by that time I didn’t know what is this for. After a couple of months before I leave the company, he then suggest me to create an open source project, at first I have no idea what project I can create, also didn’t know the purpose…
Blogging
Until I got my first job as a Cold Fusion programmer, this language was new to me, thus I have a lot to learn. From here, I started to blog in Octopress platform (I love markdown, also I can use my favourite editor, ViM to write). My intention was to jot down the learning so that I can refer anytime. But up until this point, I realized that my blog has helps a lot of developers out there to solve their problems.
2 years+ later, my website just grown up. Refer Alexa rank & Google Analytics below.
Alexa rank
Google Analytics
In March 2015, I received an email from Packt publishing, offer me to review a book Mastering Laravel . I think they get my email from my blog, you can see how a normal software developer can reach to the world.
GitHub
Aside from blogging, GitHub also a platform for us as a developer to show case our skills & passion.
Back in 2013, I had been assigned an in-house project which was to create an iOS app that can decrypt encrypted-QR-code. From here, the first thing I did was to google about the keywords “RSA decryption in iOS”, of course, after few days of searching without getting any solution!
Some time bad thing can unleash our potention! Because I’m the “most senior” other than boss, I have to find a way to get it works! At the end I think of using C language to decrypt it, since Objective-C can mix with C code.
After sometime, I modified the messy code and publish in my GitHub account. Until now, it has 40 stars & 21 forks, although it may not be a very great number, but I believe it has already helps many other developers.
Stackoverflow
If you’re a developer, I’m 100% sure that you know about this platform. Have you ever post any questions? Have you ever answer any questions?
There are some users in Stackoverflow I always see their name, which has high reputation as well. Often the questions they post, or the answers they post are very helpful to us.
If you never post anything here, I suggest you start posting, it helps others, also helps you!
Write books
I never write any book before. Previously I attended an event about publish books, I’ve learned that write a book can actually build up your name quickly.
Imagine that you write a book, and publish for free (eBook may be a good choice here), even though you may not see any tangible profit, but how many people in this world download your book? From here, you’re making tons of intangible profit.
Summary
Of course, there are many more like give a technical talk, etc. also helps in building up your name. In current century, we’re talking about portfolio, not a degree certificate, not a fancy resume!
I highly recommend you to start a blog if you haven’t.
If you’re a most expert programmer in the world, but nobody knows you, then you’re just a nobody.
]]><p>When we talk about <strong>“Branding”</strong>, often we thought about sales & marketing.Yes, nothing wrong here! In fact, manyList of possible PHP errorshttp://jslim.net/blog/2015/07/28/list-of-possible-php-errors/2015-07-28T23:51:39.000Z2024-02-21T10:41:37.617ZWhat is this?
Many times, we struggled on finding out the cause of error. Especially, it works on local environment, but failed in live server.
For some hosting, especially shared hosting, we have no freedom to change the php settings and we have to guess which section caused the error and what is it about.
This usually caused us hours & hours to figure it out.
Thus, I wrote this post.
Please comment on below OR drop me an email at me@jsl.im, if you want to contribute to this post.
Thanks
Errors
1. Can’t use method return value in write context
Failed example
1 2 3 4
<?php if (empty($obj->method())) { // do something }
Correct way
1 2 3 4 5 6
<?php $result = $obj->method();
if (empty($result)) { // do something }
Move the result out as a separate variable, even though it may not be use in the section below.
]]><h2 id="What-is-this"><a href="#What-is-this" class="headerlink" title="What is this?"></a>What is this?</h2><p>Many times, we struggled onDebian apt-get not workinghttp://jslim.net/blog/2015/05/05/debian-apt-get-not-working/2015-05-05T06:47:19.000Z2024-02-21T10:41:37.617ZI’m facing this when I fresh install Debian 7.
No matter what I trying to install, it doesn’t works.
Keep showing E: Unable to locate package …
1 2 3 4 5 6 7 8 9 10
root@debian:~# apt-get install git Reading package lists... Done Building dependency tree Reading state information... Done E: Unable to locate package git root@debian:~# apt-get upgrade Reading package lists... Done Building dependency tree Reading state information... Done 0 upgraded, 0 newly installed, 0to remove and 0 not upgraded.
Then I found the solution. Edit the source list
1
# vi /etc/apt/sources.list
to this content
1 2 3 4 5 6
deb http://ftp.at.debian.org/debian wheezy main contrib
# Line commented out by installer because it failed to verify: deb http://security.debian.org/ wheezy/updates main # Line commented out by installer because it failed to verify: deb-src http://security.debian.org/ wheezy/updates main
]]><p>I’m facing this when I fresh install Debian 7.</p>
<p>No matter what I trying to install, it doesn’t works.</p>
<p>Keep showingIntegrate iPay88 to iOS mobile platformhttp://jslim.net/blog/2015/03/30/integrate-ipay88-to-ios-mobile-platform/2015-03-30T21:36:44.000Z2024-02-21T10:41:37.617ZThe first payment gateway I dealed with was PayPal. At that moment, I found it sucks, very tedious to integrate into iOS platform. Until now, I need to work with iPay88, which has no native iOS SDK, and the process even more tedious than PayPal. I share this because of the toughness & not easy to find any resources on web. Hope you enjoy.
1. Register a merchant account with iPay88
You will get Merchant Code and Merchant Key.
After that, submit a request URL to iPay88 support. Where the request URL is the page that you submit to iPay88 site, you will know later.
2. Create a page that support submit payment info to iPay88
But wait a minute, during the development, the URL should be localhost. Don’t worry, we can use virtual host here, you can refer this in my other blog post section 3. Make sure you put the real url to /etc/hosts
1
127.0.0.1 mysite.com
So when you access http://mysite.com, you are not refering to the live site, but the development site in your local machine, now you can test with iPay88.
This cannot be done in cURL
I have tried using cURL as well, in fact it need to be a POST request in a webpage form.
3. Create a response handler
response.php
1 2 3 4 5 6 7 8 9 10 11 12 13 14 15 16 17 18
<?php if (isset($_REQUEST['ErrDesc'])) { redirect('failure.php'); } if (isset($_REQUEST['Signature']) && $_REQUEST['Signature'] != $my_signature) { // NOTE that $my_signature you can store it in session before submit the form to iPay88 redirect('failure.php'); // for security purpose }
// store the info returned by iPay88, you will get this in the document provided by iPay88
// after process everything, redirect to success page redirect('success.php');
The file above will be a POST request, if you don’t want to use $_REQUEST, you can use $_POST
Bare in mind (Updated: May 12, 2015)
Please take note on the backend.php
Sometime, there are some weird issue that may caused the response.php not working correctly. Thus, backend.php is needed here (I have faced the issue with CIMB click).
The backend.php will not work if you check for login session. e.g.
1 2 3 4 5
<?php if (is_loggedin()) exit; // will exit here
// code won't execute ...
That means you cannot deal with any session here (backend.php)
See com.mysite.myapp? Is this weird to you? If you have use Waze API you will see waze://?q=<address search term> this, waze:// is the custom scheme that only use in Waze app. Same to this, com.mysite.myapp:// is only use in this app
5. Show the page above in your app using UIWebView
- (BOOL)webView:(UIWebView *)webView shouldStartLoadWithRequest:(NSURLRequest *)request navigationType:(UIWebViewNavigationType)navigationType { // Update: May 12, 2015 // a hack to solve the Maybank2u TAC popup window issue if ([request.URL.path containsString:@"m2uTACProcess.do"]) {
// init a new webview (as a popup) _popupWebView = [[UIWebView alloc] initWithFrame:CGRectMake(0, 0, 280, 400)]; [_popupWebView loadRequest:request]; // show it in a popup, I tested with https://github.com/rnystrom/RNBlurModalView
returnNO; }
if ([[request.URL scheme] isEqual:@"com.mysite.myapp"]) { NSArray *component = [request.URL.description componentsSeparatedByString:@"://"]; if ([component[1] isEqual:@"closeClicked"]) { // com.mysite.myapp://closeClicked // action to perform after payment failed } if ([component[1] isEqual:@"successClicked"]) { // com.mysite.myapp://successClicked // action to perform after success } returnNO; } returnYES; } @end
See com.mysite.myapp again? We detect if the URL scheme is com.mysite.myapp, then perform some action.
When the time your app open this web view, you will see iPay88 page. The whole integration is done.
]]><p>The first payment gateway I dealed with was PayPal. At that moment,<br>I found it sucks, very tedious to integrate into iOSShow html description in UIWebView in a better wayhttp://jslim.net/blog/2015/03/27/show-html-description-in-uiwebview-in-a-better-way/2015-03-27T20:28:50.000Z2024-02-21T10:41:37.617Z
Let’s take a look on the output above, the Event Description content. Yes, it can achieved by using UILabel, but somehow HTML would be easy to construct the format. Thus I’m showing a demo on how to use UIWebView to achieve this.
This is using auto-layout
Add constraint
(I assumed that you know how to add constraint through storyboard)
Now add 4 or 5 constraints to UIWebView, make sure the Height constraint is added, you can put any value you like.
let heightConstraint = webView.constraints()[0] asNSLayoutConstraint // here is to update the height of UIWebView heightConstraint.constant =CGFloat(height) println("webview constraint after \(webView.constraints())") } } }
The output would be
1 2 3
webView content height 187.0 webview constraint before [<NSLayoutConstraint:0x786d49f0 V:[UIWebView:0x786d51e0(30)]>] webview constraint after [<NSLayoutConstraint:0x786d49f0 V:[UIWebView:0x786d51e0(187)]>]
The UIWebView constraints here has only 1, thus I assumed that the first constraint is the Height constraint, by changing the value of the first constraint, the height of UIWebView will be changed.
Open link by using safari (optional)
Now, if you want user to open safari when they click on the link, implement another method
Make sure the UIWebView is inside UIScrollView. As by using auto-layout, the UIScrollView content height will be expand based on its subviews.
]]><p><img src="/images/posts/2015-03-28-show-html-description-in-uiwebview-in-a-better-way/end-result.gif" alt="Desire result"></p>
<p>Let’siOS - UIActivityViewController custom share message to different providershttp://jslim.net/blog/2015/01/27/ios-uiactivityviewcontroller-custom-share-message-to-different-providers/2015-01-27T21:17:43.000Z2024-02-21T10:41:37.617ZBegin from iOS6, Apple simplify the share process by using UIActivityViewController. The thing is that, Twitter is only allow up to 140 characters on a post, thus we may need to customize the share text for Twitter.
One of the way is to subclass the UIActivityItemProvider. Here is how you can do it:
Customize message for each provider if you want to.
Just treat it as a message, assign it together with image (if you have one). The UIActivityViewController will then pick the correct message for corresponding provider.
]]><p>Begin from iOS6, Apple simplify the share process by using <code>UIActivityViewController</code>.<br>The thing is that, Twitter is onlyHandling login session in iOS & serverhttp://jslim.net/blog/2015/01/27/handling-login-session-in-ios-and-server/2015-01-27T17:54:55.000Z2024-02-21T10:41:37.617ZWhen comes to server & client side integration, there are many ways to handle the login session. Some people might keep the login user ID or token in NSUserDefaults, some are to keep the login session cookie. There is no right or wrong.
I’m here to share about session cookie way.
In server side (e.g. PHP)
Let say once user successfully login, the server will then keep the login user into session.
Keep those key as constants. By default, PHP session cookie name is PHPSESSID, if you’re using other framework, the key might be changed.
Once user logon, the session cookie will be kept at client-side, without the cookie, the server will not know that the user is currently logged in. Thus sync it when first enter the app.
Upon successful login, keep the session data to NSUserDefaults, we can then check whether the session is exists before call any server API.
Once logged out, remember to remove the session.
Sync the session cookie kept in NSUserDefaults into cookie storage.
]]><p>When comes to server & client side integration, there are many<br>ways to handle the login session. Some people might keepHow to rename Xcode project thoroughlyhttp://jslim.net/blog/2015/01/07/how-to-rename-xcode-project-thoroughly/2015-01-07T17:21:39.000Z2024-02-21T10:41:37.617ZI’m doing with lot of projects, some projects are similar, thus I can just clone from the existing project and rename it. But how to rename it completely?
1. Change the project name in Xcode
Click on the project, at the right pane, update the name to the name that you want, then hit <Enter>
Then it will prompt you which one to rename, just check all and hit <Enter>
2. Rename scheme
Click the scheme up there, then Manage schemes…
Then change the scheme name (click on that row, then hit <Enter>)
Oops… Some files haven’t change. The reason for this is because one of the file is actually a binary file, up until there the instruction is break. Let’s do again and exclude that binary file
Xcode 6.3.1 will crash during the rename. And I found a simpler way on doing that, refer here
1 2 3 4 5 6 7 8 9 10
# install the necessary package $ brew install rename ack
# run this for a couple of times $ find . -name 'JsFoo*' -print0 | xargs -0 rename -S 'JsFoo''JsBar'
$ ack --literal --files-with-matches 'JsFoo' | xargs sed -i '''s/JsFoo/JsBar/g'
# double confirm, if no output, that means success $ ack --literal 'JsFoo'
]]><p>I’m doing with lot of projects, some projects are similar, thus I can just clone from the<br>existing project and rename it. But how toiOS - handle keyboard in UITableView in UIViewControllerhttp://jslim.net/blog/2014/12/09/ios-handle-keyboard-in-uitableview-in-uiviewcontroller/2014-12-09T06:16:37.000Z2024-02-21T10:41:37.617ZMost of the time, we tend to put textField in a tableView, perhaps it is much simpler.
If your form in UITableView extends UITableViewController, then you can skip the post, UITableViewController will handle this issue for you.
But, in certain situations, we need to extends UIViewController and handle the keyboard with UITableView by our own.
The ViewController.m is subclass of UIViewController
When the keyboard shown, add footerView to that table and make sure the height is same as keyboard. (when add in the footerView, the contentSize of the tableView is actually increase, so that it has more room to scroll and the keyboard won’t block the content below)
When keyboard hide, remove the footerView, the tableView’s contentSize will then changed back to it’s original height.
This solution doesn’t need to care about the tableFooterView, but change it’s content inset instead.
]]><p>Most of the time, we tend to put <code>textField</code> in a <code>tableView</code>, perhaps it is much simpler.</p>
<p>If your form iniOS - event listener to property of propertyhttp://jslim.net/blog/2014/12/09/ios-event-listener-to-property-of-property/2014-12-09T06:00:38.000Z2024-02-21T10:41:37.617ZWhat does it mean? Let’s look at the view hierarchy
1 2 3
JSView |---- titleLabel |----...
In this case, I have a viewController that contain a property UILabeltitleLabel. I want to perform some action upon the text changed.
i.e.
1
jsView.titleLabel.text = @"new text";
Now, add an event listener (in iOS called observer) to it’s text changed
Don’t forget to remove it after the main view deallocated, otherwise the app will crash.
1 2 3 4 5 6 7 8
#pragma mark - observer -(void)observeValueForKeyPath:(NSString *)keyPath ofObject:(id)object change:(NSDictionary *)change context:(void *)context { if ([keyPath isEqualToString:@"_titleLabel.text"]) { NSLog(@"the title text has been changed"); } }
#pragma mark - observer -(void)observeValueForKeyPath:(NSString *)keyPath ofObject:(id)object change:(NSDictionary *)change context:(void *)context { if (object == _titleLabel) { if ([keyPath isEqualToString:@"text"]) { NSLog(@"the title text has been changed"); } } }
]]><p>What does it mean? Let’s look at the view hierarchy</p>
<figure class="highlight jboss-cli"><table><tr><td class="gutter"><pre><spaniOS - crop image based on a maskhttp://jslim.net/blog/2014/12/08/ios-crop-image-based-on-a-mask/2014-12-08T17:08:22.000Z2024-02-21T10:41:37.617ZI have a mask here (the Sun Goku hair), and I want to put a face to this mask.
#pragma mark - CropViewControllerDelegate // 2. - (void)cropViewControllerDidCroppedImage:(UIImage *)image { // Solution 1: crop the UIImage to oval shape UIBezierPath *path = [UIBezierPath bezierPathWithOvalInRect:CGRectMake(0, 0, image.size.width, image.size.height)]; //you have to account for the x and y values of your UIBezierPath rect UIGraphicsBeginImageContext(image.size); //this gets the graphic context CGContextRef context = UIGraphicsGetCurrentContext(); //you can stroke and/or fill CGContextSetFillColorWithColor(context, [UIColor colorWithPatternImage:image].CGColor); [path fill]; //now get the image from the context UIImage *bezierImage = UIGraphicsGetImageFromCurrentImageContext(); UIGraphicsEndImageContext(); // Solution 2: the image remain in rectangle, mask the UIImageView /* UIBezierPath *path = [UIBezierPath bezierPathWithOvalInRect:_cropImageView.bounds]; CAShapeLayer *maskLayer = [CAShapeLayer layer]; maskLayer.path = path.CGPath; _cropImageView.layer.mask = maskLayer; */ // save to library // uncomment it if you want to see the effect of the image after cropping // UIImageWriteToSavedPhotosAlbum(image, nil, nil, nil); _cropImageView.image = bezierImage; }
The delegate method of after cropping the image. There are 2 solution here:
Solution 1 is to crop the actual image to oval shape; where Solution 2 remain the image as rectangle, but mask out the UIImageView to display it as oval shape. (you uncomment the line and save it to see what is the difference) 3. The delegate method after taking photo, make sure pass the image to the crop view controller.
Test it, you can adjust the main image.
Then the final result will be like
You can download the sample project in my GitHub repo.
]]><p>I have a mask here <em>(the Sun Goku hair)</em>, and I want to put a face to this mask.</p>
<p><imgiOS disable support for iPad - hide from iPad AppStorehttp://jslim.net/blog/2014/11/18/ios-disable-support-for-ipad-hide-from-ipad-appstore/2014-11-18T02:38:41.000Z2024-02-21T10:41:37.617ZI’m sure you know about Whatsapp. Whatsapp was not available in iPad AppStore. To achieve this, change Info.plist file, right-click -> Open as -> Source Code
Then search for UIRequiredDeviceCapabilities, most probably you will see
Info.plist
1 2 3 4 5
<key>UIRequiredDeviceCapabilities</key> <array> <string>armv7</string> <string>telephony</string><!-- ADD THIS LINE --> </array>
It means this app only support for those device which can call.
]]><p>I’m sure you know about Whatsapp. Whatsapp was not available in iPad AppStore.<br>To achieve this, change <strong>Info.plist</strong>iOS - export to ipa thru command linehttp://jslim.net/blog/2014/11/13/ios-export-to-ipa-thru-command-line/2014-11-13T20:01:08.000Z2024-02-21T10:41:37.617ZRecently I have come across an issue which Xcode 6 keep crashing when exporting ipa or validate the app. I got no choice but have to export the ipa on command line.
]]><p>Recently I have come across an issue which Xcode 6 keep crashing when exporting ipa or validate the app.<br>I got no choice but have toUIScrollView with auto-layout solution for UITextField (keyboard)http://jslim.net/blog/2014/11/10/uiscrollview-with-auto-layout-solution-for-uitextfield-keyboard/2014-11-10T05:26:32.000Z2024-02-21T10:41:37.617ZI believe there are many people are facing this problem. Last time my approach was to change the the scrollView‘s contentSize upon keyboard appear, and restore to normal when keyboard dismiss.
Now the problem in auto layout of scrollView was the contentSize is based on it’s subviews. I have figured out a way to do that
In the case above, you have a UIScrollView in your ViewController, and a UITextField inside the UIScrollView.
I remention the problem here, when the textField on focus, the keyboard will brought up, and the scrollView‘s contentSize still the same, the keyboard may blocked the textField and become invisible, yet it cannot scroll up.
Let’s begin to solve this
Declare 2 ivars, a dummy view & it’s height constraint.
Initialize all views, and make sure translatesAutoresizingMaskIntoConstraints is set to NO for all views that wanted to use auto layout.
Add constraints to all these view. The matrics is actually variables that wanted to use inside the constraints’ visual format.
Initialize the dummy view’s height constraint separately to that ivar. Since it is dummy, so set the height (refer the constant argument) to 0.
Remember to add keyboard’s notification (listen to keyboard’s event)
When the keyboard is shown, remove the dummy view’s constraint first, then set the dummy view’s height to keyboard’s height, then only add the height constraint back to the dummy view.
When keyboard is hide, do the same thing with 6, but the constant now is 0.
Run it, and it will works as expected. Enjoy :)
]]><p>I believe there are many people are facing this problem. Last time my approach was to change the the <code>scrollView</code>‘sCocos2d-x V3 accurate physics body shape with PhysicsEditorhttp://jslim.net/blog/2014/10/09/cocos2d-x-v3-accurate-physics-body-shape-with-physicseditor/2014-10-09T15:56:36.000Z2024-02-21T10:41:37.617ZI mention about TexturePacker in my previous post. Now is PhysicsEditor.
Create a physics file
First of all, create a physics file with PhysicsEditor. Just drag image(s) to the left pane.
Set the Exporter to Chipmunk generic (PLIST) - BETA
Set the Relative both values to 0.5 to move the anchor point to the center
Click on that icon
You will see the face is highlighted, PhysicsEditor helps you to generate vertices/points of the image. You can change the tolerance value (by default is 1), of course, the lower the better, but will be slower (theoretically).
Once you have done, the image is now highlighted with its shape.
Publish it as .plist file. You have done the part.
Add the physics file to Xcode project
Drag the published file to Xcode file pane and select Create folder references.
It will looks like this.
Test it out in code
Before actually use the physics file, let’s try with the default API. Edit HelloWorldScene.cpp
1 2
auto spriteBody = PhysicsBody::createBox(sprite->getContentSize()); sprite->setPhysicsBody(spriteBody);
boolHelloWorld::init() { // ... auto spriteBody = PEShapeCache::getInstance()->getPhysicsBodyByName("2dx"); // the name you put in PhysicsEditor sprite->setPhysicsBody(spriteBody); }
Then finally you get
Although it is not perfect yet, but it basically solve the issue that I faced. Will continue to seek for solution to make it perfect :)
]]><p>I mention about <a href="/blog/2014/09/12/create-spritesheet-for-cocos2d-x-using-with-texturepacker/">TexturePacker in my previousObjective C macro - logging wrapperhttp://jslim.net/blog/2014/09/23/objective-c-macro-logging-wrapper/2014-09-23T21:28:31.000Z2024-02-21T10:41:37.617ZAs we know logging in Objective C is using NSLog. The problem here is I want to enable & disable the logging by changing a flag, NOT remove NSLog when don’t want to see the log; add NSLog when want to see the log.
There is a solution, which is CocoaLumberjack. However, I just want to see the message in console, don’t want such a huch package.
Thus I choose to use macro.
Let’s add the macro in Prefix.pch
1 2 3 4 5 6 7
...
// 1. the debug flag #define kDebugEnabled YES
// 2. the NSLog wrapper #define JSLog(message, ...) if (kDebugEnabled) NSLog(message, ##__VA_ARGS__)
I can now turn on or off (by changing the value to YES or NO) at anytime
The usage is exactly same as NSLog. e.g. JSLog(@"error %@", error);
]]><p>As we know logging in Objective C is using <code>NSLog</code>. The problem here<br>is I want to enable & disable the logging byCocos2d-x v3 open URLhttp://jslim.net/blog/2014/09/23/cocos2d-x-v3-open-url/2014-09-23T16:13:34.000Z2024-02-21T10:41:37.617ZIn Cocos2d-x (I’m using version 3), there is no built-in method to open an external URL. However, this can be achieved. Here I’m only showing on iOS & Android platform.
1 2 3 4
$ cd /path/to/game $ ls cocos2d/ proj.ios_mac/ proj.win32/ res/ CMakeLists.txt proj.android/ proj.linux/ proj.wp8-xaml/ src/
Now, this has to change the cocos2d‘s core files.
iOS
Edit the ./cocos2d/cocos/platform/ios/CCApplication.h
1 2 3 4 5
... voidopenURL(constchar *url); // ADD THIS LINE
protected: ...
Then edit ./cocos2d/cocos/platform/ios/CCApplication.mm, add the implementation for that method openURL
]]><p>In Cocos2d-x <em>(I’m using version 3)</em>, there is no built-in method to open an external URL. However, this can be achieved. HereIntegrate PayPal SDK into Laravel 4http://jslim.net/blog/2014/09/19/integrate-paypal-sdk-into-laravel-4/2014-09-19T05:45:03.000Z2024-02-21T10:41:37.617ZPayPal has release an official SDK to simplify our work. Here I want to show you how to integrate into Laravel 4.
<?php returnarray( // set your paypal credential 'client_id' => 'AcT3DS8a-SmTEtSl9hNcwyscoLypndD9q5L0YcfxmaUavz3p_xwFNRE-OauO', 'secret' => 'ENv8_RCXMfhcrzdSfAWjLWDiD_GJSD-Gbm5q2Pj92vIuobCtgLpR3SUxqAhZ',
/** * SDK configuration */ 'settings' => array( /** * Available option 'sandbox' or 'live' */ 'mode' => 'sandbox',
/** * Specify the max request time in seconds */ 'http.ConnectionTimeOut' => 30,
/** * Whether want to log to a file */ 'log.LogEnabled' => true,
/** * Specify the file that want to write on */ 'log.FileName' => storage_path() . '/logs/paypal.log',
/** * Available option 'FINE', 'INFO', 'WARN' or 'ERROR' * * Logging is most verbose in the 'FINE' level and decreases as you * proceed towards ERROR */ 'log.LogLevel' => 'FINE' ), );
// this is after make the payment, PayPal redirect back to your site Route::get('payment/status', array( 'as' => 'payment.status', 'uses' => 'IndexController@getPaymentStatus', ));
Update the controller, this method is when you submit the form or checkout shopping cart, then post to this route: app/controllers/IndexController.php
// PaymentExecution object includes information necessary // to execute a PayPal account payment. // The payer_id is added to the request query parameters // when the user is redirected from paypal back to your site $execution = newPaymentExecution(); $execution->setPayerId(Input::get('PayerID')); //Execute the payment $result = $payment->execute($execution, $this->_api_context);
echo'<pre>';print_r($result);echo'</pre>';exit; // DEBUG RESULT, remove it later
if ($result->getState() == 'approved') { // payment made returnRedirect::route('original.route') ->with('success', 'Payment success'); } returnRedirect::route('original.route') ->with('error', 'Payment failed'); }
See the DEBUG RESULT there, if you print it out, the output will be
My intention of this post is about to share how to integrate PayPal official SDK to Laravel 4. I’m not a PayPal expert here, those PayPal api, PayPal rules, etc question please refer to PayPal official website.
If you have any feedback or improvement, welcome to comment on this post, or drop me an email.
Thank you.
]]><p>PayPal has release an <a href="https://github.com/paypal/rest-api-sdk-php">official SDK</a> to simplify our work. Here I want to showCreate spritesheet for Cocos2d-x using with TexturePackerhttp://jslim.net/blog/2014/09/11/create-spritesheet-for-cocos2d-x-using-with-texturepacker/2014-09-11T16:17:17.000Z2024-02-21T10:41:37.617ZCreate spritesheet
Have you seen this sort of image before? The first time I saw this I thought this is created using Photoshop, and I also have no idea how to use this BIG image in the game.
Until… I started to look in the game development, I only know that this is actually created by spritesheet program/app.
Why? I have seen many game tutorials are talking about this, I tried it and found that it is very easy to use.
How to use demo
First of all, I’m going to do this in Cocos2d-x engine, so select Cocos2d here.
Now, drag images to the box
Here I drag 3 bird images, and you can see the left pane, there are hero_01.png, hero_02.png, hero_03.png, these are the original file name.
Once you’ve done, select Publish sprite sheet
It will prompt you twice, one is to save the plist file contains the meta data of the original images such as frame, offset, rotated, etc. It may sound complicated, but no worry, Cocos2d-x will handle it.
The second prompt is to save the merged image.
And you’ve done.
Use in Cocos2d-x
File structure
In AppDelegate.cppapplicationDidFinishLaunching() method, add
1 2 3 4 5 6 7 8 9 10 11 12 13
// 1. fix the resolution glview->setDesignResolutionSize(320, 480, ResolutionPolicy::EXACT_FIT); director->setContentScaleFactor(1);
// 2. add search path for images std::vector<std::string> searchPaths;
Load an image for the Hero (a.k.a bird) by default during object instantiation
Make the bird fly by running the move action
As we know that there are 3 images on hero.plist, thus fix it to 3. Then add all these 3 images (get from sprite frame cache) to an array, and then repeat it forever.
Add hero to GameScene
Edit GameScene.cpp, under the init() method, add the code below right before return statement
This is to instantiate a Hero object, set the position to center of screen then add to current scene.
Run it and you will get the animated bird, see screenshot below.
Done.
]]><h2 id="Create-spritesheet"><a href="#Create-spritesheet" class="headerlink" title="Create spritesheet"></a>Create spritesheet</h2><p><imgiOS - Working with block handlerhttp://jslim.net/blog/2014/08/29/ios-working-with-block-handler/2014-08-29T22:36:12.000Z2024-02-21T10:41:37.617ZIf you’re not new to Objective-C, then I’m pretty sure you know about delegate. Normally we use it when the outerViewController that want to trigger some actions when user touch a button on innerViewController.
A typically example will be ListViewController & DetailViewController.
When user touched on the button, then it invoke the done block, the doneSomething: is called by ListViewController
ListViewController.m
1 2 3 4 5
DetailViewController *controller = [[DetailViewController alloc] init]; [controller doneSomething:^{ // your actions will be invoked when user touch the button on DetailViewController }]; [self presentViewController:controller animated:YES completion:nil];
]]><p>If you’re not new to Objective-C, then I’m pretty sure you know about delegate. Normally we use it when theLaravel 4 - two pagination in a single pagehttp://jslim.net/blog/2014/08/22/laravel-4-two-pagination-in-a-single-page/2014-08-22T14:27:19.000Z2024-02-21T10:41:37.617ZAlright, if you’re existing Laravel user, you know that Laravel has make pagination easy. If you’re new, I will show you how.
Look for the Item and paginate it to n items per page
Pass in the necessary value to the view
Create a class named Item and extends Eloquent ORM, it will make your life easy
Do you realise there is no current page for pagination? Laravel did it for you. It will passed in the page=3 for example into the query string, so the paginate method will get the value from page(in this case is 3) and indicate that it is the current selected page.
The problem now is, what if I want to have 2 pagination in a single page?
Assumption:
each page has 10 items
Let’s take an example, there are 2 tabs of listing, both under the same page/same URL, let’s called it impression & conversion. Example, I have 999 items in impression, but I have only 44 items in conversion, on the impression when I click on page 10, it will shows the 101th item to 110th item, whereas conversion tab shows nothing. You know why? Because both of them taking the same argument from query string, i.e. page=10, both of them also look for page 10. What we want is impression page 10, but conversion remain page 1.
Solution
One of the solution that I found out is implement by using AJAX.
The where condition is to only match for either impression or conversion. Note that you must put it above the items. Always put the more precise route to above.
$(function() { // 1. functiongetPaginationSelectedPage(url) { var chunks = url.split('?'); var baseUrl = chunks[0]; var querystr = chunks[1].split('&'); var pg = 1; for (i in querystr) { var qs = querystr[i].split('='); if (qs[0] == 'page') { pg = qs[1]; break; } } return pg; }
]]><p>Alright, if you’re existing <a href="http://laravel.com/">Laravel</a> user, you know that Laravel has make pagination easy. If you’re7 lessons learnt from screwing up a live serverhttp://jslim.net/blog/2014/08/12/7-lessons-learnt-from-screwing-up-a-live-server/2014-08-12T06:21:48.000Z2024-02-21T10:41:37.617ZI’ve just did a shit today. I screw up the client’s server in such a way that I remove the apache server, and never get a way to install it back.
It makes me feel uncomfortable, sweating and stimulate my brain cell until I lost for some time…
However, I’ve learnt some lessons here. Please read all, especially if you’re newbie developer or fresh graduate.
1. Never bring habits from development to production
Imagine that during development, your web server suddenly doesn’t work, and you googles the solution for hours. What you’ll do now? For most of us the answer would be “remove the web server, then reinstall”, right? And most of the time we think we’re genius, because it was so simple, so fast, so easily solved. But… I did this today on the client’s server…
I’ve tried to setup a project for hours, but don’t know why it doesn’t works. I removed it. YEAH~~~ removed successfully without any error, but later on when I try to install, it failed, and again, I have no idea why…
Please do remember this, don’t bring whatever habits that you usually did in local machine to production.
2. Never trust solutions on stackexchange when comes to production
“Try this! It works like a charm”
Seen this before? If you visit stackoverflow often, you sure have seen it thousands of times.
1
$ yum erase ...
I run this command by referring to one of the stackexchange’s question. Of course, before remove I’ve think before, but since remove a package we can install it back later easily by yum install, so I run the command…
The consequence is, yum install doesn’t work… That moment I was “SHIT!!! What’s wrong with that? What I’ve done…”. I immediately awake (before that I was a little bit sleepy).
If you have found any solution online, please try it on local machine before apply it on live server.
3. Be hyper-extra careful when dealing with delete/remove something from server
Previously, I alwasy remind myself that database on live server must be extra careful, especially executing query.
But now, I only realise that when come’s to deletion (or something cannot be undone) must be very very careful. Yeah, removing a package/program might not affect the process much, and it can be install back easily.
Again, for my case it doesn’t install back easily (in fact, until now still not able to install it back), a lot of funny/unexpected situation may happen. Eventhough it can install back, but do you know the original configuration? Can you configure it back exactly same as the original?
Think about it.
4. Always double confirm
Confirm what? I attempt to start the httpd server, but it always failed, no matter how I configure. Then I run the following command
1
2
$ service httpd status Stopped
It shows that the server is not running. Since it does not running and yet it cannot be started. So I remove it. I never check carefully whether there are other services using it. I should double check with the following command
1
$ netstat -tulpn | less
If I check it first, I may not remove the server.
So, please check find other way(s) (if there are) to double confirm the thing is not running, eventhough one side shows that it is not using/running, but is always better to double confirm.
5. Never make assumption
From the message above shows that httpd is not running, that means it is not in use.
The above statement is my assumption. It was pretty logic, doesn’t it? Just like “If the door is locked, the light is off, that means there nobody in the house or everybody in sleep.”, but can it be someone still watching TV with no light?
Human light to make assumption base on their pass experience, me too. When dealing with other people server, don’t make assumption, because you’re not familiar with their configuration. What you configure all the time is not what they configure.
6. Take 10 - 15 minutes break when feeling frustrated
Before I get the root access, I already spent for quite a long time on researching how to install httpd without root access.
When the time that I get the root access, I immediately ssh to server and thought that I can get it done in 15 minutes. I was rushing (perhaps is because of overdue), you know, when we’re rushing, our mind cannot focus/think, once I found the solution(so call) then I straight away uninstall the package.
So when you’re really frustrated, don’t panic, take a break. I’m sure the consequence will be far better than you’re panic.
7. Always discuss with superior when doing something critical on server
“I want to be independent”
Some time, I feel like lack of confidence to get things done. Independent could be a good training for me.
Ya, independent is good. But some time, get an opinion from other perspective may not be bad, especially get opinion from those who’re more experience than you.
If I discuss with my superior today, this shit won’t happen and this post won’t be existed.
Thus, I advice you that don’t feel shy to ask your superior.
Conclusion
Things that already happened, could not be changed. Time wasn’t reverse. Remember, mistake is a learning process. Today I made this mistake, hopefully can help you to prevent making the same mistake as mine.
Please remember all the points above.
]]><p>I’ve just did a <strong>shit</strong> today. I screw up the client’s server in such a way that I remove the apache server, and never getHappyfox API - Create ticket with attachment using PHPhttp://jslim.net/blog/2014/07/26/happyfox-api-create-ticket-with-attachment-using-php/2014-07-26T22:43:12.000Z2024-02-21T10:41:37.617ZHappyfox is a ticketing service provider. Recently I’m dealing with it’s API and took me quite some time to figure out how to create a ticket with attachment. You can see the official documentation here.
<?php // get your data ready $data = array( 'subject' => 'How to change the DNS server', 'text' => 'Lorem ipsum dolor sit amet, consectetur adipisicing elit, sed do eiusmod tempor ...', 'category' => 1, // set your category (if you not sure about that, just put 1) 'email' => 'john.smith@example.com', // web user's email 'name' => 'John Smith', // web user's name
// Optional. Note that there is an '@' infront 'attachments' => '@/home/user/Desktop/screenshot.png', // attachment's path );
]]><p><a href="https://www.happyfox.com/">Happyfox</a> is a ticketing service provider. Recently I’m dealing with it’s API and took me quiteUse UIWebView with UIScrollViewhttp://jslim.net/blog/2014/07/18/use-uiwebview-with-uiscrollview/2014-07-18T05:27:08.000Z2024-02-21T10:41:37.617ZWhen we want to display a bunch of description, UIWebView is the choice.
NOTE: the “A button” is just for you to see the difference of different changes of webview
But what if we want it to transparent? Let’s try to set the background to clearColor
ViewController.m
1
_webView.backgroundColor = [UIColor clearColor];
Ooopsss…. Only its background is transparent. Want to make the whole view transparent? Let’s do in this way
ViewController.m
1 2 3 4 5 6 7 8 9 10 11 12 13
_webView.opaque = NO; _webView.backgroundColor = [UIColor clearColor]; for (UIView* subView in [_webView subviews]) { if ([subView isKindOfClass:[UIScrollViewclass]]) { for (UIView* shadowView in [subView subviews]) { if ([shadowView isKindOfClass:[UIImageViewclass]]) { [shadowView setHidden:YES]; } } } }
and see the result
Hmm… it looks better. Now let’s make it smooth, make the whole thing scroll together (html content and the “A button”)
Now, the problem is we need to know how much space (the height of the webView) needed for the html content. One of the way is we can get it thru JavaScript
#pragma mark - UIWebViewDelegate - (void)webViewDidFinishLoad:(UIWebView *)webView { // get the html content height NSString *output = [webView stringByEvaluatingJavaScriptFromString:@"document.getElementById(\"main-wrapper\").offsetHeight;"];
// adjust the height of webView CGRect frame = webView.frame; frame.size.height = [output intValue]; webView.frame = frame; }
Before that, add a <div>(with a unique ID, in this case I use “main-wrapper”) to wrap the html content, e.g.
Now it looks better, but we cannot see the content if too long, and also overlap with the button. To solve this, let’s add a UIScrollView in between the webView and self.view
[_scrollView addSubview:_aButton]; // the button below
Add these lines to bottom of webViewDidFinishLoad:
1 2 3 4 5 6 7
// adjust the position of the button frame = _button.frame; frame.origin.y = CGRectGetMaxY(webView.frame) + 15; _button.frame = frame;
// adjust the content size of scrollView _scrollView.contentSize = CGSizeMake(_scrollView.contentSize.width, CGRectGetMaxY(_button.frame) + 15);
(15 is margin)
See the scroll bar on the right side?
We’re done here. Now we have a smooth scrollable content view
Ahhhhh!!!! One more thing here
The initial height of UIWebView must not be 0, e.g.
ViewController.m
1
_webView = [[UIWebView alloc] initWithFrame:CGRectMake(0, 0, 320, 0)]; // <--- if height is 0
The result will be
This is due to document.getElementById('main-wrapper').offsetHeight; return a wrong value, and I don’t know why (if you know please comment), this took me 1 hours++ to figure out, at lease you must put 1 for the height.
]]><p>When we want to display a bunch of description, <code>UIWebView</code> is the choice.</p>
<p>Usually we do it in thisRemove the 1px Shadow From UISearchBarhttp://jslim.net/blog/2014/07/13/remove-the-1px-shadow-from-uisearchbar/2014-07-13T19:56:04.000Z2024-02-21T10:41:37.617ZWhen I added a UISearchBar to UITableView.tableHeaderView, it shows a border
]]><p>When I added a <code>UISearchBar</code> to <code>UITableView.tableHeaderView</code>, it shows a border</p>
<p><imgjQuery Flot - Create a stackable bar graph and line graph combinationhttp://jslim.net/blog/2014/07/07/jquery-flot-create-a-stackable-bar-graph-and-line-graph-combination/2014-07-07T05:34:47.000Z2024-02-21T10:41:37.617ZPlot a stack bar graph with line graph combination.
Loading...
Look at the graph above, is that cool?
1. Include all necessary JavaScript files.
1 2 3 4 5 6 7
<scriptsrc="http://ajax.googleapis.com/ajax/libs/jquery/1.11.0/jquery.min.js"></script> <scriptsrc="http://cdnjs.cloudflare.com/ajax/libs/flot/0.8.2/jquery.flot.min.js"></script> <scriptsrc="http://cdn.jsdelivr.net/jquery.flot.tooltip/0.7.1/jquery.flot.tooltip.min.js"></script> <scriptsrc="http://cdnjs.cloudflare.com/ajax/libs/flot/0.8.2/jquery.flot.resize.min.js"></script> <scriptsrc="jquery.flot.grow.js"></script><!-- you can get from http://jumflot.jumware.com/examples/Experimental/grow.html --> <scriptsrc="http://cdnjs.cloudflare.com/ajax/libs/flot/0.8.2/jquery.flot.stack.min.js"></script> <scriptsrc="http://cdnjs.cloudflare.com/ajax/libs/jquery-dateFormat/1.0/jquery.dateFormat.min.js"></script>
Notice that I’m using CDN for those library, of course you may host it yourself.
2. Add a placeholder for the graph
1
<divid="flot-graph"style="height:210px"></div>
Simple? Because all the data are populated from javascript.
3. Settings for the graph
The Settings here is refer to color, label, effect, etc. Let’s do it one by one
var flot_options = { series: { grow: { // grow animation active: true, // activate the plugin steps: 50// number of seperate steps will be shown from beginning to the end }, stack: true, // is stackable? shadowSize: 2// is the default size of shadows in pixels. Set it to 0 to remove shadows }, grid: { hoverable: true, // once hover, it will highlight clickable: true, tickColor: '#f0f0f0', // the color in the background (i.e. cell border color) borderWidth: 0, // the border for the graph container color: '#333333'// the color of the label (on the right-hand-side) }, xaxis:{ tickDecimals: 0, // the number of decimals to display tickSize: 1, // the size of interval between 2 ticks tickFormatter: function(val, axis) { // you can format the label text to display return val; } }, yaxis: { // same as x-axis ticks: 5, min: 0, tickDecimals: 0, tickFormatter: function(val, axis) { return val; } }, tooltip: true, // whether to show tooltip tooltipOpts: { content: function(label, x, y) { // format the content of tooltip returnparseInt(y) + ' ' + label; }, defaultTheme: false, shifts: { // the position from the cursor x: 0, y: 20 } } };
Now we already done the general settings for the graph. Let’s configure bar graph and line graph differently
var line_options = { show: true, // whether to show the line between ticks lineWidth: 2, // the thickness of the line fill: true, // whether the shape should be filled, in this case will be the color below the line fillColor: { // the color for the fill colors: [{ // this is to set the gradient opacity: 0.0 }, { opacity: 0.7 }] } };
var bar_options = { show: true, align: 'center', // alignment for the bar lineWidth: 0, // the border width of the bar fill: true, // fill with color? barWidth: 0.6// the width of the bars in units of the axis };
functionpopulateGraph(data) { var graph_data = [];
graph_data.push({ label: 'iOS', // the the label (show in the right side) bars: bar_options, // set the bar config defined just now color: '#d063e6', // set a different color for different bar data: data.ios// populate data to this bar });
// same as above graph_data.push({label: 'Android', bars: bar_options, color: '#a4c739', data: data.android});
graph_data.push({ label: 'User', lines: line_options, // set the line graph config stack: false, // this is line graph, and not stackable, thus set to false color: '#00aeef', points: {radius: 5, show: true}, // the `circle` size for the line graph data: data.user });
// set the overall data to the main graph with general settings $('#flot-graph').length && $.plot($('#flot-graph'), graph_data, flot_options); }
Note that the format for the data should be in this form [x, y](i.e. data.user above)
]]><p>Plot a stack bar graph with line graph combination.</p>
<div id="flot-1ine" style="height:210px">
<divGit - push a specific commit to a new repohttp://jslim.net/blog/2014/07/02/git-push-a-specific-commit-to-a-new-repo/2014-07-02T01:10:21.000Z2024-02-21T10:41:37.617ZDeveloper A was previously push everything to my-repo, eventually developer B created a new repo and clone all commits from old repo.
Developer B doesn’t inform A, thus A continue to work on old repo.
Now, B request A to push the latest commit to the new repo
First of all, add the new repo URL to the project
1 2
$ cd /path/to/project $ git remote add neworigin git@bitbucket.org:myname/my-new-repo.git
Then now A can push a specific commit to the new repo
]]><p>Developer A was previously push everything to <strong>my-repo</strong>, eventually developer B created a new repo and clone all commitsObjective-C switch statement inside a loophttp://jslim.net/blog/2014/06/30/objective-c-switch-statement-inside-a-loop/2014-06-30T04:52:22.000Z2024-02-21T10:41:37.617ZSince the switch statement has break, and usually we use break to stop the looping process. In my mind break & continue are like brother, usually use inside a loop.
I wonder what if continue inside the switch statement. So I try it out
1 2 3 4 5 6 7 8 9 10 11 12 13 14 15 16 17
for (int i = 0; i < 10; i++) { switch (i) { case3: NSLog(@"skip later"); continue; break; case5: NSLog(@"with no skip"); break; case7: NSLog(@"skip later"); continue; break; default: break; } NSLog(@"this is %d", i); }
and I get this output
1 2 3 4 5 6 7 8 9 10 11
thisis0 thisis1 thisis2 skip later thisis4 with no skip thisis5 thisis6 skip later thisis8 thisis9
So you can see here, the continue skip the loop by 1 turn; where as break has totally no effect to the loop, but to switch only
]]><p>Since the <code>switch</code> statement has <code>break</code>, and usually we use <code>break</code> to stop the looping process. In myZXingObjc encode QR codehttp://jslim.net/blog/2014/06/25/zxingobjc-encode-qr-code/2014-06-25T19:47:39.000Z2024-02-21T10:41:37.617ZTo generate QR code in iOS device, I’m using this library.
From the their GitHub repo, already got the instruction. Here I want to point out 2 things:
1. Assign to UIImage
1 2 3 4 5 6 7 8 9 10 11 12 13 14 15 16
NSString *text = @"The text to encode"; NSError *error = nil; ZXMultiFormatWriter *writer = [ZXMultiFormatWriter writer]; ZXBitMatrix* result = [writer encode:text format:kBarcodeFormatQRCode width:500 height:500 error:&error]; if (result) { CGImageRef image = [[ZXImage imageWithMatrix:result] cgimage];
// LOOK AT HERE, this line will crash imageView.image = [[UIImage alloc] initWithCGImage:image]; } else { NSLog(@"QR code encode error %@", [error localizedDescription]); }
See the code above, it will crash when convert CGImageRef to UIImage. So change to
]]><p>To generate QR code in iOS device, I’m using <a href="https://github.com/TheLevelUp/ZXingObjC">this library</a>.</p>
<p>From the theirEffectively debug UIView in Objective-Chttp://jslim.net/blog/2014/06/22/effectively-debug-uiview-in-objective-c/2014-06-22T15:55:06.000Z2024-02-21T10:41:37.617ZUsually I’m using NSLog to debug all sort of objects. When I encounter UINavigationBar background color issue, I loop through it’s subviews one by one. e.g.
1
2
3
for (id subview in navBar.subviews) { NSLog(@"subview %@", subview); }
Then I realize I need to go 1 level deeper, I add one more loop inside
1 2 3 4 5 6
for (id subview in navBar.subviews) { NSLog(@"subview %@", subview); for (id subsubview in subview.subviews) { NSLog(@"subsubview %@", subsubview); } }
which is not an effective way
Finally I found this recursiveDescription magic function to show all subviews recursively
It can’t be invoked by [view recursiveDescription], must be using performSelector. e.g.
1
NSLog(@"\nNav bar %@",[navBar performSelector:@selector(recursiveDescription)]);
P/S: Please remove this method before you submit the app to AppStore. This is private API, so there is high chances that your app will be rejected if you don’t remove this method.
]]><p>Usually I’m using <code>NSLog</code> to debug all sort of objects.<br>When I encounter <code>UINavigationBar</code> background colorDealing iOS 7 UIStatusBarhttp://jslim.net/blog/2014/06/16/dealing-ios-7-uistatusbar/2014-06-16T05:19:18.000Z2024-02-21T10:41:37.617ZI have a hard time on dealing with iOS 7 status bar.
In this example, I will set the status bar for each UIViewController
So now go to Info.plist file, and set View controller-based status bar appearance to YES
I just want to share few cases of dealing with status bar.
1. With UINavigationController with WHITE text color
Now create the very first (root) view controller with the following content
In JSAppDelegate.m(I’m using my own prefix JS), add the lines below
- (UIStatusBarStyle) preferredStatusBarStyle { returnUIStatusBarStyleLightContent; // light content means white text color }
Run it…Opps… why it still in black text color?
The reason is here, since the main view controller is inside a UINavigationController, then the status bar will follow the UINavigationController style.
Now go back to JSAppDelegate, and change the UINavigationBar style.
1 2 3
... navigationController.navigationBar.barStyle = UIBarStyleBlackTranslucent; // THIS LINE self.window.rootViewController = navigationController;
Run it… It works
2. UIImageView not cover up the top position
Now create another UIViewController, just name it JSTransparentBgViewController, but hide the UINavigationBar in this case
So add a function, before the view actually appear, hide the navigation bar
// set a light gray color so that you can see the text on status bar self.view.backgroundColor = [UIColor colorWithRed:235/255.0 green:235/255.0 blue:235/255.0 alpha:1];
[self setNeedsStatusBarAppearanceUpdate];
// by using scroll view, you can scroll & see the result UIScrollView *scrollView = [[UIScrollView alloc] initWithFrame:self.view.bounds]; scrollView.autoresizingMask = UIViewAutoresizingFlexibleBottomMargin | UIViewAutoresizingFlexibleHeight | UIViewAutoresizingFlexibleTopMargin; scrollView.contentSize = CGSizeMake(CGRectGetWidth(scrollView.frame), 800); [self.view addSubview:scrollView];
// this image should cover up the top portion of screen UIImageView *coverImageView = [[UIImageView alloc] initWithFrame:CGRectMake(0, 0, CGRectGetWidth(scrollView.frame), 300)]; coverImageView.image = [UIImage imageNamed:@"Cover"]; [scrollView addSubview:coverImageView];
You will get a result like this
so now you see that the status bar is not covered up
]]><p>I have a hard time on dealing with iOS 7 status bar.</p>
<p>In this example, I will set the status bar for eachHow to add Google Map to your web pagehttp://jslim.net/blog/2014/06/14/how-to-add-google-map-to-your-web-page/2014-06-14T22:27:11.000Z2024-02-21T10:41:37.617ZIntroduction
Here is to shows you how can you add google map to your web page by JavaScript (not using iframe). Besides, you will also learn about searching, and marker dragging.
1. Obtaining an Google Map API key
Just visit this page, it will shows the steps on how to obtain an API key.
<script> // Map setup var latlng = new google.maps.LatLng(3.12345, 101.12345); var mapOptions = { zoom: 8, // set the map zoom level center: latlng, // set the center region disableDefaultUI: true, zoomControl: true, // whether to show the zoom control beside mapTypeId: google.maps.MapTypeId.ROADMAP }; var map = new google.maps.Map(document.getElementById('map'), mapOptions); </script>
Just add the code above to your page, and refresh your browser…tadaaa~ Google Map is appear on your page now.
2. Add a marker (or pin) to your location
1 2 3 4 5 6 7 8 9 10
// ... var map = new google.maps.Map(document.getElementById('map'), mapOptions);
// ADD THIS var marker = new google.maps.Marker({ map: map, // refer to the map you've just initialise position: latlng, // set the marker position (is based on latitude & longitude) draggable: true// allow user to drag the marker });
Now, add the block of code after var map = .... Then refresh your browser again, then you will see
You can even customize your marker
1 2 3 4 5 6
var marker = new google.maps.Marker({ map: map, position: latlng, draggable: true, icon: 'https://maps.google.com/mapfiles/kml/shapes/schools_maps.png'// ADD THIS });
Just add one more line, you will see a different marker. Replace the icon URL to any URL that you want to show.
3. Add a search function
Add a search input above the map (or anywhere your prefer)
1 2 3 4 5 6 7
<!-- ADD THIS --> <inputtype="text"id="address"placeholder="Address"style="width: 100%;"/>
<divid="map"></div> ...
Then add an event handler, so that when user hit <ENTER> key, it search
// ... var marker = new google.maps.Marker({ map: map, position: latlng, draggable: true });
// ADD LINES BELOW // add an event handler document.getElementById('address').onkeyup = function(e) { if(e.keyCode == 13) { // keyCode 13 represent <ENTER> key geocoding(this.value); // get the value from address text box and pass to the search function returnfalse; } }
var geocoder = new google.maps.Geocoder(); functiongeocoding(keyword) { geocoder.geocode({address: keyword}, function(results, status) { if(status == google.maps.GeocoderStatus.OK) { // if got results // always take the first result only map.setCenter(results[0].geometry.location); // set the map region to center marker.setPosition(results[0].geometry.location); // change the marker position } else { // if no result, just alert user alert('Location not found.'); } }); }
4. What if you want to keep the latitude & longitude?
Add 2 more inputs after search box (or anywhere you prefer). In this case use a text box, just for you to see, usually end user don’t want to see this kind of data, is better to keep it hidden. (e.g. <input type="hidden" id="lat" value="3.1234" />)
<!-- ADD THIS --> Lat: <inputtype="text"id="lat"value="3.1234"/> Lng: <inputtype="text"id="lng"value="101.1234"/>
Now, you want to set the latitude & longitude when:
user drag the marker
user search by address
User drag the marker
Add an event handler to the marker.
1 2 3 4 5 6 7 8 9 10 11 12 13 14
functiongeocoding(keyword) { // ... }
// ADD THIS google.maps.event.addListener(marker, 'dragend', function() { // it will run this only if user DROP the marker down (drag end) var position = marker.getPosition(); // set the position value to text boxes document.getElementById('lat').value = position.lat(); document.getElementById('lng').value = position.lng(); });
User search by address
Just now we already add an event handler to search remember? Now just add some code to geocoding function
]]><h1 id="Introduction"><a href="#Introduction" class="headerlink" title="Introduction"></a>Introduction</h1><p>Here is to shows you how canDraw a shape using UIBezierPathhttp://jslim.net/blog/2014/06/13/draw-a-shape-using-uibezierpath/2014-06-13T06:59:27.000Z2024-02-21T10:41:37.613Z
]]><p><img src="/images/posts/2014-06-13-draw-a-shape-using-uibezierpath/shape.png" alt="Shape wanted"></p>
<p>To draw the shape above byUIView fill with color and leave a empty square in centerhttp://jslim.net/blog/2014/06/13/uiview-fill-with-color-and-leave-a-empty-square-in-center/2014-06-13T06:37:38.000Z2024-02-21T10:41:37.617Z
Create a UIView that fill with color, and leave an empty in center.
Initialize a bezier path filled with the whole UIView
Create another bezier path to represent the rectangle inside. Then merge the inner rectangle to the outer rectangle. For usesEvenOddFillRule you can read more in apple doc
Create a layer (CAShapeLayer is subclass of CALayer), set the path create just now to the layer, then fill it with a color (put whatever color that you like)
Add the layer to the UIView layer (by default, all UIViews come with a layer)
Once completed download, unzip it, and you will see all the source files
2. Access to your hosting server via FTP
FTP is File Transfer Protocol. Means that you need to upload the souce files to server via FTP.
You will need a FTP client. You can get a free 1, FileZilla is one of the most widely use FTP client. But in this tutorial I’m using ForkLift.
i. Login
You can see the pink box there, Server typically is your URL (or more precise is domain name). You will have this Username & Password after you subscribed the hosting plan. The Port just leave it 21.
ii. Copy wordpress to the hosting server
Make sure is inside public_html folder. Then edit the file .htaccess(if you don’t have, create it) with the following content.
Remember change it to your domain name (e.g. replace jslim89.com to yourdomain.com). The line 3 & 4 is when user type in the url www.jslim89.com, it will redirect to jslim89.com(without www)
Now go to your browser, type in your URL…
Oopsss!!! What is this? You’re not setup properly.
3. Configure in cPanel or DirectAdmin
cPanel & DirectAdmin are kind of web control panel for your hosting.
I’m showing all these in cPanel.
i. Login to cPanel
You will get the login info after you subscribe the hosting plan.
ii. Create a new database for WordPress
First of all, look for this
Then create a database (there is a prefix over there, we cannot change it), make sure its name is unique.
You have to create a database user for this particular database for security purpose, ONE user for ONE database.
Assign the user for the database you’ve just created.
At the end you will see this
4. Configure WordPress
Go back to FTP client, look for the file named wp-config-sample.php in your wordpress folder. Rename the file to wp-config.php
]]><h1 id="Description"><a href="#Description" class="headerlink" title="Description"></a>Description</h1><p>Now we want to setup WordPressMatch & Replace NSString using Regexhttp://jslim.net/blog/2014/06/11/match-and-replace-nsstring-using-regex/2014-06-11T02:42:18.000Z2024-02-21T10:41:37.613ZIn this example shows, to display current date in a label in a specific format (e.g. 31/12/14 12:59PM)
// 6. dateLabel.text = [NSString stringWithFormat:@"My special date %@", newDateFormat]; }];
Specify the date format (e.g. the result will be 31/12/2014 12:59PM), and select current date to display
Pass the format to the formatter, and store the date as string
We know that there is only 1 consecutive 4 integers in the string, so we want to extract it. The braces () here is to capture the matches text. Double back slash \\ here is to escape the back slash (as we know it is special character)
Now we match the whole date string (so we specify the range from index 0 to the string length) from the regex
We get the matched string now (i.e. 2014 in this case), then we replace the characters in the range (i.e. (6, 4) which is the index for 2014) with the last 2 characters of 2014
Finally we set the value to the label
]]><p>In this example shows, to display current date in a label in a specific format <em>(e.g. 31/12/14 12:59PM)</em></p>
<p>You can see thejQuery bind event dynamicallyhttp://jslim.net/blog/2014/06/09/jquery-bind-event-dynamically/2014-06-09T16:55:23.000Z2024-02-21T10:41:37.613ZBind event dynamically means to bind the event to new DOM element added from jQuery/JavaScript.
// add 2 more buttons $('#container-wrapper').append($('<ul>').attr({ 'class': 'list-container' })); reloadSortable(); // call this after add new element(s) });
]]><p>Bind event <strong>dynamically</strong> means to bind the event to new DOM element added from jQuery/JavaScript.</p>
<p>e.g.</p>
<figureMySQL count with subqueryhttp://jslim.net/blog/2014/06/09/mysql-count-with-subquery/2014-06-09T16:35:30.000Z2024-02-21T10:41:37.613ZExample
Below shows a forum web app. A post can only post by 1 user, its reply can reply by many users
Tables:
post
1 2 3 4 5 6 7 8
+-------------------+------------------+------+-----+---------+----------------+ | Field | Type | Null | Key | Default | Extra | +-------------------+------------------+------+-----+---------+----------------+ | id | int(10) unsigned | NO | PRI | NULL | auto_increment | | title | varchar(128) | NO || NULL || | user_id | int(10) unsigned | NO || 0 || | published_date | datetime | YES || NULL || +-------------------+------------------+------+-----+---------+----------------+
reply
1 2 3 4 5 6 7 8 9
+-------------------+------------------+------+-----+---------+----------------+ | Field | Type | Null | Key | Default | Extra | +-------------------+------------------+------+-----+---------+----------------+ | id | int(10) unsigned | NO | PRI | NULL | auto_increment | | message | varchar(128) | NO || NULL || | post_id | int(10) unsigned | NO || 0 || | user_id | int(10) unsigned | NO || 0 || | published_date | datetime | YES || NULL || +-------------------+------------------+------+-----+---------+----------------+
user
1 2 3 4 5 6 7
+-------------------+------------------+------+-----+---------+----------------+ | Field | Type | Null | Key | Default | Extra | +-------------------+------------------+------+-----+---------+----------------+ | id | int(10) unsigned | NO | PRI | NULL | auto_increment | | name | varchar(128) | NO || NULL || | email | varchar(128) | NO || NULL || +-------------------+------------------+------+-----+---------+----------------+
Desired result
We want to know all topics total_users, unique_users, i.e.
1 2 3
+-------------------+------------------+--------------+----------------+ | Topic | Total Users | Unique Users | Published Date | +-------------------+------------------+--------------+----------------+
1 2 3 4 5 6 7
SELECT topic.name AS topic_name , COUNT(reply.user_id) AS total_users , (SELECTCOUNT(DISTINCT user_id) FROM reply WHERE topic_id = topic.id) AS unique_users , topic.published_date FROM topic INNERJOIN reply ON topic.id = reply.topic_id GROUPBY topic.id ORDERBY unique_users
See the 3rd line of the query, we can select item from inner query and passing the value from outer query to it.
]]><h1 id="Example"><a href="#Example" class="headerlink" title="Example"></a>Example</h1><p>Below shows a forum web app. A <code>post</code>OS X Mavericks - left click not workinghttp://jslim.net/blog/2014/06/09/os-x-mavericks-left-click-not-working/2014-06-09T16:27:25.000Z2024-02-21T10:41:37.613ZI believe most of you have faced such a problem. Left-click & touchpad is not working.
I googled for an hour, found some possible solution in Apple Support Communities. But none of them work.
After few reboots for my Macbook, it still not working. Finally it works after I restarted (turn off and turn on the switch) my bluetooth mouse.
LOL…
]]><p>I believe most of you have faced such a problem. Left-click & touchpad is not working.</p>
<p>I googled for an hour, found someiOS - Change QR code color in UIImagehttp://jslim.net/blog/2014/05/27/ios-change-qr-code-color-in-uiimage/2014-05-27T16:52:21.000Z2024-02-21T10:41:37.613ZOriginal QR code
Red QR code
In order to change the QR code color, 2 steps need to be done
The method above is to change the color given to transparent
Step 2
Fill a new color to the image. You can use MGImageUtilities library
1 2 3 4 5
UIImage *qrcode = [UIImage imageNamed:@"qrcode"]; // replace the white color to transparent. NOTE: [UIColor whiteColor] won't works here qrcode = [self replaceColor:[UIColor colorWithRed:1.0f green:1.0f blue:1.0f alpha:1.0f] inImage:image withTolerance:255]; // now fill the image with red color qrcode = [qrcode imageTintedWithColor:[UIColor redColor]];
]]><p><strong>Original QR code</strong></p>
<p><img src="/images/posts/2014-05-28-ios-change-qr-code-color-in-uiimage/ori-qrcode.png"iOS - Countdown to millisecondshttp://jslim.net/blog/2014/05/27/ios-countdown-to-milliseconds/2014-05-27T01:15:44.000Z2024-02-21T10:41:37.613Z#import “CountdownViewController.h”
@implementationCountdownViewController{ // to keep a reference for current counting int countdownMilliseconds; }
@synthesize timerLabel = _timerLabel;
- (void)viewDidLoad { [super viewDidLoad];
// display countdown on this label self.timerLabel = [[UILabel alloc] initWithFrame:CGRectMake(40, 40, 240, 40)]; self.timerLabel.textAlignment = NSTextAlignmentCenter; [self.countdownView addSubview:self.timerLabel];
// start countdown [self startTimer]; }
- (void)startTimer { countdownMilliseconds = defaultBufferSeconds * 1000; // reset the current counting value // NSTimeInterval is in "second", now schedule it to every 10 milliseconds [NSTimer scheduledTimerWithTimeInterval:0.01 target:self selector:@selector(updateCountdown:) userInfo:nil repeats:YES]; }
- (void)updateCountdown:(NSTimer *)timer { int seconds, milliseconds; // don't forget to update the current counting value countdownMilliseconds -= (timer.timeInterval * 1000); seconds = countdownMilliseconds / 1000;
// since we only want to show 2 digits in milliseconds, so have to divide by 10 milliseconds = countdownMilliseconds % 1000; milliseconds /= 10; self.timerLabel.text = [NSString stringWithFormat:@"Countdown: %02d seconds %02d milliseconds", seconds, milliseconds];
// once current counting value reach 0, then stop the timer if (countdownMilliseconds <= 0) { [timer invalidate]; timer = nil; } }
]]><p>#import “CountdownViewController.h”</p>
<figure class="highlight obj-c"><table><tr><td class="gutter"><pre><spanRestructure a series of numbershttp://jslim.net/blog/2014/05/21/restructure-a-series-of-numbers/2014-05-21T04:40:16.000Z2024-02-21T10:41:37.613ZExample:
$max_input = max($input); // find the missing value in ascending order & avoid duplication $missing_values = []; for ($i = 1; $i <= $max_input; $i++) { // skip if current value is not missing OR is already inside the $missing_values container if (in_array($i, $input) || in_array($i, $missing_values)) continue; $missing_values[] = $i; }
$results = []; foreach ($inputas$i) { // goes through all input values $diff = 0; // this is the `-1`, `-2`, `-4` (green color) on the mapping there foreach ($missing_valuesas$mv) { if ($i < $mv) break; $diff++; // count the number of missing values infront of current value } // finally minus the difference will get the desired result $results[] = $i - $diff; }
]]><p>Example:</p>
<figure class="highlight asciidoc"><table><tr><td class="gutter"><pre><span class="line">1</span><br><spanHow to use Apache .htpasswdhttp://jslim.net/blog/2014/05/05/how-to-use-apache-htpasswd/2014-05-05T16:52:18.000Z2024-02-21T10:41:37.613ZIn order to prevent your site from outsider, you may need to add a password prompt so that only authenticated user can access.
Before that, create a .htaccess to project’s document root (e.g. if the document root is in project/public, then it should located project/public/.htaccess) contains the following content
The file is using absolute path, if relative path, it will point to apache document root.
Create a .htpasswd with some users
1
2
3
4
5
6
7
8
9
10
11
12
13
14
15
16
17
$ cd /absolute/path/to/your/project/document_root # -c option is used when the .htpasswd file doesn't exists, so it will create a new file $ htpasswd -c .htpasswd admin New password: Re-type new password: Adding password for user admin
# add another user $ htpasswd .htpasswd jslim New password: Re-type new password: Adding password for user jslim
# verify that 2 users are in the .htpasswd $ tail .htpasswd admin:$apr1$5OC.YPUn$sM17ex8wLCKZADIUx8J.6/ jslim:$apr1$z6OQQjv9$8mGc3Vw6a8fLfHiuTTqkw.
Note that the password here is encrypted.
Now you open up your browser, type in the URL, you will see the prompt before you actually see the content
]]><p>In order to prevent your site from outsider, you may need to add a password prompt so that only authenticated user caniOS - Customize UITabBar appearancehttp://jslim.net/blog/2014/05/04/ios-customize-uitabbar-appearance/2014-05-04T17:12:19.000Z2024-02-21T10:41:37.613ZFinal look will be
The selected tab will be in dimmed background
The selected/unselected tab icon & text will be in white color
Before that, add a helper function to turn UIColor into UIImage
You may put this code to AppDelegate or anywhere else
+ (UIImage *)imageFromColor:(UIColor *)color forSize:(CGSize)size withCornerRadius:(CGFloat)radius { CGRect rect = CGRectMake(0, 0, size.width, size.height); UIGraphicsBeginImageContext(rect.size); CGContextRef context = UIGraphicsGetCurrentContext(); CGContextSetFillColorWithColor(context, [color CGColor]); CGContextFillRect(context, rect); UIImage *image = UIGraphicsGetImageFromCurrentImageContext(); UIGraphicsEndImageContext(); // Begin a new image that will be the new image with the rounded corners // (here with the size of an UIImageView) UIGraphicsBeginImageContext(size); // Add a clip before drawing anything, in the shape of an rounded rect [[UIBezierPath bezierPathWithRoundedRect:rect cornerRadius:radius] addClip]; // Draw your image [image drawInRect:rect]; // Get the image, here setting the UIImageView image image = UIGraphicsGetImageFromCurrentImageContext(); // Lets forget about that we were drawing UIGraphicsEndImageContext(); return image; }
Then add this to application:didFinishLaunchingWithOptions:
1 2 3 4 5 6 7 8 9 10 11 12 13 14 15 16 17 18
UIColor *backgroundColor = [UIColor greenColor];
// set the bar background color [[UITabBar appearance] setBackgroundImage:[AppDelegate imageFromColor:backgroundColor forSize:CGSizeMake(320, 49) withCornerRadius:0]];
// set the text color for selected state [[UITabBarItem appearance] setTitleTextAttributes:[NSDictionary dictionaryWithObjectsAndKeys:[UIColor whiteColor], UITextAttributeTextColor, nil] forState:UIControlStateSelected]; // set the text color for unselected state [[UITabBarItem appearance] setTitleTextAttributes:[NSDictionary dictionaryWithObjectsAndKeys:[UIColor whiteColor], UITextAttributeTextColor, nil] forState:UIControlStateNormal];
// set the selected icon color [[UITabBar appearance] setTintColor:[UIColor whiteColor]]; [[UITabBar appearance] setSelectedImageTintColor:[UIColor whiteColor]]; // remove the shadow [[UITabBar appearance] setShadowImage:nil];
// Set the dark color to selected tab (the dimmed background) [[UITabBar appearance] setSelectionIndicatorImage:[AppDelegate imageFromColor:[UIColor colorWithRed:26/255.0 green:163/255.0 blue:133/255.0 alpha:1] forSize:CGSizeMake(64, 49) withCornerRadius:0]];
Remark: Those icon images is in white color
Until this stage, you will get this,
by right it should shows white color, but somehow the icon image has changed.
]]><p>Final look will be</p>
<p><img src="/images/posts/2014-05-05-ios-customize-uitabbar-appearance/tabbar-appearance-2.png" alt="DesiredLazy way for web application staging deploymenthttp://jslim.net/blog/2014/04/29/lazy-way-for-web-application-staging-deployment/2014-04-29T05:19:55.000Z2024-02-21T10:41:37.613ZWhen comes to deployment, usually what we do is copy modified files over the server. It may takes some time on doing so.
The Git URL please don’t use SSH, use HTTPS instead. The reason here is we don’t want to put our private key on server. Besides, there are 3 developers share the same copy.
The last command here you can see I put my username, you can put whatever you want as long as you can remember. Usually what we see is git remote add origin ...., but in this case different developers may have different URL, e.g. https://dev1@bitbucket.org/myorganization/my-private-app.git. Thus use username rather than origin
Update the project
1 2
$ git pull jslim89 master # Thentype your bitbucket account password, because we are not using private key
$ git remote add dev1 https://dev1@bitbucket.org/myorganization/my-private-app.git $ git pull dev1 master # typein their own password
Done :)
]]><p>When comes to deployment, usually what we do is copy modified files over the server. It may takes some time on doing so.</p>
<p>I’veBootstrap 3 dropdown menu not showing on mobile browserhttp://jslim.net/blog/2014/04/28/bootstrap-3-dropdown-menu-not-showing-on-mobile-browser/2014-04-28T16:46:15.000Z2024-02-21T10:41:37.613ZI believe that most of you had face this kind of problem. Bootstrap 3 dropdown menu is clickable on desktop browser, but when comes to mobile, then it has no effect at all.
The html above works, then I try move the dropdown menu down to the DOM element level by level. Finally, I found out this might be the view overlapping issue. Then I realize the .navbarz-index was set to 1000. i.e.
1
2
3
4
.navbar { z-index: 1000; ... }
Now, I move the dropdown menu to the original place, then change the css
Just ONE line of code, solve my issue that makes me struggle for hours. This may not be exactly your case, I’m just share how I debug and found the solution, hope this can be a guideline for you :)
]]><p>I believe that most of you had face this kind of problem. <a href="http://getbootstrap.com/components/#btn-dropdowns">Bootstrap 3PHP - replace certain lines in a filehttp://jslim.net/blog/2014/04/09/php-replace-certain-lines-in-a-file/2014-04-09T06:24:07.000Z2024-02-21T10:41:37.613ZI’ve come across such a scenario, to duplicate a project when a new user sign up, some of the settings in config.php have to change accordingly.
<?php $client = ....; $client_key = ...; $config_file = $client.'/config.php'; $newcontent = ''; // open the file $fp = fopen($config_file, 'r'); if ($fp) { // read the content line by line while (($line = fgets($fp)) !== false) { if (preg_match('/CLIENT_NAME/', $line)) { // e.g. want to replace the client name $newcontent .= 'define(\'CLIENT_NAME\', \'' . $client . '\');'.PHP_EOL; } elseif (preg_match('/CLIENT_KEY/', $line)) { // e.g. want to replace client secret key $newcontent .= 'define(\'CLIENT_KEY\', \'' . $client_key . '\');'.PHP_EOL; } else { // otherwise just append the line $newcontent .= $line; } } } fclose($fp); // replace the file with new content file_put_contents($config_file, $newcontent);
]]><p>I’ve come across such a scenario, to duplicate a project when a new user sign up, some of the settings in <code>config.php</code> havePHP - create database with PDOhttp://jslim.net/blog/2014/04/09/php-create-database-with-pdo/2014-04-09T05:17:33.000Z2024-02-21T10:41:37.613Z
<?php define('DB_HOST', '127.0.0.1'); // use ip address instead of `localhost` // existing user that has permission to create database and grant access define('DB_ROOT_USER', 'root'); define('DB_ROOT_PASS', 'rootpass');
// the database you want to create $dbname = 'my_new_db'; // specific user for this particular database $dbuser = 'my_new_db_user'; $dbpass = 'new_dbpassword';
try { // login with root user $dbh = newPDO('mysql:host='.DB_HOST, DB_ROOT_USER, DB_ROOT_PASS);
// create database $dbh->exec( "CREATE DATABASE `$dbname`; CREATE USER '$dbuser'@'localhost' IDENTIFIED BY '$dbpass'; GRANT ALL ON `$dbname`.* TO '$dbuser'@'localhost'; FLUSH PRIVILEGES;" ) ordie(print_r($dbh->errorInfo(), true));
// use database $dbh = newPDO('mysql:host='.DB_HOST.';dbname='.$dbname, DB_ROOT_USER, DB_ROOT_PASS);
// optional: import existing sql file if you have $imported = $dbh->exec(file_get_contents('existingdata.sql')); if ($imported === false) { // even if success, it may also return some code die(print_r($dbh->errorInfo(), true)); }
]]><figure class="highlight php"><table><tr><td class="gutter"><pre><span class="line">1</span><br><span class="line">2</span><br><spanInfinite scroll using on UITableViewhttp://jslim.net/blog/2014/04/01/infinite-scroll-using-on-uitableview/2014-04-01T05:38:01.000Z2024-02-21T10:41:37.613ZIf we have 100 records, perhaps we can GET them in one short. But what if, we have 1000 or even 10k records?
Thus, here I shows an example on implement lazy loading on iOS app, as well as pull to refresh.
// to keep track of what is the next page to load @property (nonatomic, assign) int currentPage; // to keep the objects GET from server @property (nonatomic, strong) NSMutableArray *myList;
// init table list self.tableView = [[UITableView alloc] initWithFrame:self.view.bounds]; self.tableView.autoresizingMask = UIViewAutoresizingFlexibleBottomMargin| UIViewAutoresizingFlexibleTopMargin | UIViewAutoresizingFlexibleHeight; self.tableView.delegate = self; self.tableView.dataSource = self; [self.view addSubview:self.tableView]; __weaktypeof(self) weakSelf = self; // refresh new data when pull the table list [self.tableView addPullToRefreshWithActionHandler:^{ weakSelf.currentPage = initialPage; // reset the page [weakSelf.myList removeAllObjects]; // remove all data [weakSelf.tableView reloadData]; // before load new content, clear the existing table list [weakSelf loadFromServer]; // load new data [weakSelf.tableView.pullToRefreshView stopAnimating]; // clear the animation // once refresh, allow the infinite scroll again weakSelf.tableView.showsInfiniteScrolling = YES; }];
// load more content when scroll to the bottom most [self.tableView addInfiniteScrollingWithActionHandler:^{ [weakSelf loadFromServer]; }]; }
// if no more result if ([[responseObject objectForKey:@"items"] count] == 0) { self.tableView.showsInfiniteScrolling = NO; // stop the infinite scroll return; } _currentPage++; // increase the page number int currentRow = [_myList count]; // keep the the index of last row before add new items into the list
// store the items into the existing list for (id obj in [responseObject valueForKey:@"items"]) { [_myList addObject:obj]; } [self reloadTableView:currentRow];
// clear the pull to refresh & infinite scroll, this 2 lines very important [self.tableView.pullToRefreshView stopAnimating]; [self.tableView.infiniteScrollingView stopAnimating];
- (UITableViewCell *)tableView:(UITableView *)tableView cellForRowAtIndexPath:(NSIndexPath *)indexPath { staticNSString *cellIdentifier = @"MyListCell"; UITableViewCell *cell = [tableView dequeueReusableCellWithIdentifier:cellIdentifier]; if (cell == nil) { cell = [[UITableViewCell alloc] initWithStyle:UITableViewCellStyleDefault reuseIdentifier:cellIdentifier]; } // minus 1 because the first row is the search bar id item = [_myList objectAtIndex:indexPath.row];
Otherwise the contentSize of scrollView will have problem when calling showsInfiniteScrolling = NO;
See the images below:
Not working example
Working example
Done :)
]]><p>If we have 100 records, perhaps we can GET them in one short. But what if, we have 1000 or even 10k records?</p>
<p>Thus, here I showsDistribute iOS app via websitehttp://jslim.net/blog/2014/03/31/distribute-ios-app-via-website/2014-03-31T05:50:44.000Z2024-02-21T10:41:37.613ZThe first time I seen this is emu4ios.net. Then I found this is very useful and convenient for my beta tester.
I shows an exmple to host the ipa & plist files on Dropbox. The reason for not host them on my personal website is due to SSL issue. See here
Without https
1st: Generate ipa file
Open your XCode, then archive the project
Then select distribute
Select Save for Enterprise or Ad Hoc Deployment distribution method
Then choose the provisioning profile that you have selected before Archive
Then send the link over to your beta tester, then they will be able to install via Safari.
]]><p>The first time I seen this is <a href="http://emu4ios.net/">emu4ios.net</a>. Then I found this is very useful and convenient for my betaRunning multiple nodejs app in ONE server using Nginxhttp://jslim.net/blog/2014/03/13/running-multiple-nodejs-app-in-one-server-using-nginx/2014-03-13T15:47:19.000Z2024-02-21T10:41:37.613ZEnvironment
This is running on Ubuntu 13.10
Here I would like to use Sails.js framework(version 0.9.13) to create node.js app.
$ cd $ mkdir public_html && cd public_html $ sails new project1 $ sails new project2
Edit the home page for both projects (to differentiate them)
project1/views/home/index.ejs
1
<h1>This is project 1</h1>
project2/views/home/index.ejs
1
<h1>This is second project</h1>
3. Change the environment to production
project1/config/local.js
1 2 3 4
module.exports = { port: 8081, // change the port to 8081 environment: 'production' };
project2/config/local.js
1 2 3 4
module.exports = { port: 8082, // change the port to 8082 environment: 'production' };
In order to make the app run on background, we need forever
1
$ sudo npm install -g forever
Now start the app using forever
1 2 3 4 5
$ cd ~/public_html/project1 $ forever start app.js warn: --minUptime not set. Defaulting to: 1000ms warn: --spinSleepTime not set. Your script will exitif it does not stay up for at least 1000ms info: Forever processing file: app.js
Let’s open up your browser, and type localhost:8081… Oops… it doesn’t work like expected
module.js:340 throw err; ^ Error: Cannot find module'sails' at Function.Module._resolveFilename (module.js:338:15) at Function.Module._load (module.js:280:25) at Module.require (module.js:364:17) at require (module.js:380:17) at Object.<anonymous> (/home/js/public_html/sails2/app.js:2:1) at Module._compile (module.js:456:26) at Object.Module._extensions..js (module.js:474:10) at Module.load (module.js:356:32) at Function.Module._load (module.js:312:12) at Function.Module.runMain (module.js:497:10) error: Forever detected script exited withcode: 8
Now, the error tell us that we need to install Sails.js locally
1 2 3
$ forever stopall # stop all process $ cd ~/public_html/project1 $ sudo npm install sails # without -g option
Repeat the same thing on project2
Now open up the browser, it should show up the content.
4. Bind different domain name to different project
]]><h1 id="Environment"><a href="#Environment" class="headerlink" title="Environment"></a>Environment</h1><p>This is running on UbuntuUIImageView animation fade in & out between imageshttp://jslim.net/blog/2014/03/11/uiimageview-animation-fade-in-and-out-between-images/2014-03-11T15:06:46.000Z2024-02-21T10:41:37.613ZTo animate between images (not .gif) in a UIImageView like the example below
Original images
Result
The existing method in UIImageView simply won’t work.
]]><p>To animate between images <em>(not .gif)</em> in a UIImageView like the example below</p>
<p><strong>OriginalRemove the 1px shadow from UINavigationBarhttp://jslim.net/blog/2014/02/28/remove-the-1px-shadow-from-uinavigationbar/2014-02-28T05:25:15.000Z2024-02-21T10:41:37.613ZThere is a shadow (only 1 pixel) below the UINavigationBar
May be you can’t see clearly, zoom it see
We can see 1 pixel darkness. Where the gray area is what I want, the code is
]]><p>There is a shadow <em>(only 1 pixel)</em> below the UINavigationBar</p>
<p><imgUIAlertView delegate in class methodhttp://jslim.net/blog/2014/02/22/uialertview-delegate-in-class-method/2014-02-22T20:29:58.000Z2024-02-21T10:41:37.613ZTo handle the UIAlertView (or any others class) delegate in class method just have to change the minus - to plus +
Example
1 2 3 4 5 6 7 8 9 10 11 12 13 14
+ (void)someMethod:(NSString *)title withMessage:(NSString *)message { UIAlertView *alert = [[UIAlertView alloc]initWithTitle:title message:message delegate:self// same here cancelButtonTitle:@"Cancel" otherButtonTitles:@"Done", nil]; }
// change to PLUS + (void)alertView:(UIAlertView *)alertView clickedButtonAtIndex:(NSInteger)buttonIndex { NSLog(@"Button %d selected", buttonIndex); }
There is no need to conform to UIAlertViewDelegate protocol, without the statement below will also work.
]]><p>To handle the UIAlertView <em>(or any others class)</em> delegate in <aMySQL search order by relevance column using FULLTEXThttp://jslim.net/blog/2014/01/22/mysql-search-order-by-relevance-column-using-fulltext/2014-01-22T18:39:03.000Z2024-02-21T10:41:37.613ZI’ve blamed by one of the client and says that the keyword that match the title shown at bottom. So want me to order by column match.
Let’s verify that it already in Full Text (e.g. shows book table’s column)
1 2 3 4 5 6
SELECT index_name, group_concat(column_name) as columns FROM information_Schema.STATISTICS WHERE table_schema ='my_db_name' AND table_name ='book' AND index_type ='FULLTEXT' GROUPBY index_name
Objective: search result must shows the result that match the title first, then book’s keywords & description, followed by category’s name & description
Let see how the sql look like
1 2 3 4 5 6 7 8
SELECT book.* , MATCH (book.title) AGAINST ('PHP MySQL'INBOOLEAN MODE) AS relevance_1 , MATCH (book.keywords, book.description) AGAINST ('PHP MySQL'INBOOLEAN MODE) AS relevance_2 , MATCH (category.name, category.description) AGAINST ('PHP MySQL'INBOOLEAN MODE) AS relevance_3 FROM book LEFTJOIN category ON category.id = book.category_id WHEREMATCH (book.title, book.keywords, book.description, category.name, category.description) AGAINST ('PHP MySQL'INBOOLEAN MODE) ORDERBY (relevance_1 *3) + (relevance_2 *2) + relevance_3 DESC
The IN BOOLEAN MODE will return result either 1 or 0.
In the last row (ORDER BY), there is multiplication, that is weightage
relevance_1 * 3 - the most important
relevance_2 * 2 - the second important
relevance_3 - the least important (no multiply anything)
So order them descendingly will give the result most important first (higher the number, the more important)
]]><p>I’ve blamed by one of the client and says that the keyword that match the title shown at bottom. So want me to order by columnSetup PHP environment in Mavericks using XAMPPhttp://jslim.net/blog/2014/01/16/setup-php-environment-in-mavericks-using-xampp/2014-01-16T21:38:00.000Z2024-02-21T10:41:37.613ZI’ve been using MAMP for some time, unfortunately, it seems like outdated (seldom update), now I’ve switched to XAMPP and it is up to date.
To setup a PHP environment in Mac OS X 10.9:
1. Download XAMPP
You can download the latest version here. Then install it.
Bare in mind that by default, MySQL root user has no password, but will set it later
Installation
Once completed, launch it
Start MySQL server
Select Manage Servers tab
Select MySQL Database
Start it
Then close it.
2. Add some PHP projects
Hit Command ⌘ + Space key, type in terminal then hit Enter key.
Create project A
Create a directory to keep all projects _(e.g. public_html)_
1
$ mkdir ~/public_html
Create a project to that directory
1
$ mkdir ~/public_html/project_a
Create a home page for it
1
$ touch ~/public_html/project_a/index.php
then add the following content
index.php
1 2 3 4 5 6 7 8 9 10
<!DOCTYPE html> <html> <body>
<h1>Welcome to Foo Site</h1>
<p><?phpecho'Here you can put dynamic content.'; ?></p>
$ cd .. # go back 1 level up (directory) $ sudo chown -R root xampp # change the owner of `xampp` directory $ sudo chgrp -R wheel xampp # change the group of `xampp` directory $ sudo chmod 755 xampp/xampp # change the permission of `xampp` file to -rwxr-xr-x
]]><p>I’ve been using <a href="http://www.mamp.info/">MAMP</a> for some time, unfortunately, it seems like outdated <em>(seldom update)</em>,AFNetworking 2 - get JSON on errorhttp://jslim.net/blog/2014/01/12/afnetworking-2-get-json-on-error/2014-01-12T05:07:00.000Z2024-02-21T10:41:37.613ZI’ve just switched from AFNetworking 1.x to 2.x.
In AFNetworking 1.x, I make a request using JSONRequestOperationWithRequest method. i.e.
[[AFJSONRequestOperation JSONRequestOperationWithRequest:request success:^(NSURLRequest *request, NSHTTPURLResponse *response, id json) { NSLog(@"success %@", json); } failure:^(NSURLRequest *request, NSHTTPURLResponse *response, NSError *error, id json) { // get the json easily NSLog(@"failure %@", json); }] start];
The method above I can get the json(error message return from server) on failure.
However, in AFNetworking 2.x, I dig for quite some time only found the solution.
Create a subclass of AFJSONResponseSerializer
JSONResponseSerializerWithData.h
1 2 3 4 5 6 7 8
#import "AFURLResponseSerialization.h"
/// NSError userInfo key that will contain response data staticNSString * const JSONResponseSerializerWithDataKey = @"JSONResponseSerializerWithDataKey";
- (id)responseObjectForResponse:(NSURLResponse *)response data:(NSData *)data error:(NSError *__autoreleasing *)error { if (![self validateResponse:(NSHTTPURLResponse *)response data:data error:error]) { if (*error != nil) { NSMutableDictionary *userInfo = [(*error).userInfo mutableCopy]; NSError *jsonError; // parse to json id json = [NSJSONSerialization JSONObjectWithData:data options:NSJSONReadingAllowFragments error:&jsonError]; // store the value in userInfo if JSON has no error if (jsonError == nil) userInfo[JSONResponseSerializerWithDataKey] = json; NSError *newError = [NSError errorWithDomain:(*error).domain code:(*error).code userInfo:userInfo]; (*error) = newError; } return (nil); } return ([super responseObjectForResponse:response data:data error:error]); }
@end
Usage
ViewController.m
1 2 3 4 5 6 7 8 9 10
AFHTTPRequestOperationManager *manager = [AFHTTPRequestOperationManager manager]; // LOOK AT THIS LINE, change to the serializer you've just created manager.responseSerializer = [JSONResponseSerializerWithData serializer]; [manager POST:@"http://api.example.com/login" parameters:@{@"key1": @"value1", @"key2": @"value2"} success:^(AFHTTPRequestOperation *operation, id responseObject) { NSLog(@"success %@", responseObject); } failure:^(AFHTTPRequestOperation *operation, NSError *error) { // get the json here id json = error.userInfo[JSONResponseSerializerWithDataKey]; NSLog(@"failure %@", json); }];
]]><p>I’ve just switched from <strong>AFNetworking 1.x</strong> to <strong>2.x</strong>.</p>
<p>In <strong>AFNetworking 1.x</strong>, I make aRSA encryption & decryption on PHPhttp://jslim.net/blog/2014/01/08/rsa-encryption-and-decryption-on-php/2014-01-08T22:59:00.000Z2024-02-21T10:41:37.613ZI’ve come across RSA encryption on a very long string.
The solution is divide the long string into chunks according to the length of the key.
<?php $plain_text = 'Text you want to encrypt. e.g. Lorem ipsum dolor sit amet, consectetur adipisicing elit, sed do eiusmod tempor incididunt ut labore et dolore magna aliqua. Ut enim ad minim veniam, quis nostrud exercitation ullamco laboris nisi ut aliquip ex ea commodo consequat. Duis aute irure dolor in reprehenderit in voluptate velit esse cillum dolore eu fugiat nulla pariatur. Excepteur sint occaecat cupidatat non proident, sunt in culpa qui officia deserunt mollit anim id est laborum.';
// read the public key $public_key = openssl_pkey_get_public(file_get_contents('public_key.pem')); $public_key_details = openssl_pkey_get_details($public_key); // there are 11 bytes overhead for PKCS1 padding $encrypt_chunk_size = ceil($public_key_details['bits'] / 8) - 11; $output = ''; // loop through the long plain text, and divide by chunks while ($plain_text) { $chunk = substr($plain_text, 0, $encrypt_chunk_size); $plain_text = substr($plain_text, $encrypt_chunk_size); $encrypted = ''; if (!openssl_public_encrypt($chunk, $encrypted, $public_key)) die('Failed to encrypt data'); $output .= $encrypted; } openssl_free_key($public_key); echobase64_encode($output);
]]><p>I’ve come across RSA encryption on a very long string.</p>
<p>The solution is divide the long string into chunks according to the lengthPHP Laravel 4 - before & after actionhttp://jslim.net/blog/2013/12/20/php-laravel-4-before-and-after-action/2013-12-20T01:07:00.000Z2024-02-21T10:41:37.613ZWe may need to perform some actions before the controller function get called.
For example
Check user authentication before access to certain page.
]]><p>We may need to perform some actions before the controller function get called.</p>
<p>For example</p>
<h2Apache Virtual Host accessed by other machines in LANhttp://jslim.net/blog/2013/12/14/apache-virtual-host-accessed-by-other-machines-in-lan/2013-12-14T12:29:00.000Z2024-02-21T10:41:37.613ZEnvironment
This is tested on Ubuntu 13.04 that running on VMWare Fusion 5. Host machine is MacBookPro that running Mavericks.
Most of the time in our development, we have to work on different projects.
We have to setup virtual host for every project.
Scenario
In this case is we have 2 projects that used the same port number. foo project & bar project.
Later a software tester will need to test the project on his own machine.
Machine A has the IP 192.168.1.12. Machine B has the IP 192.168.1.13.
In Machine A (server machine that hosts all projects)
]]><h2 id="Environment"><a href="#Environment" class="headerlink" title="Environment"></a>Environment</h2><p>This is tested on Ubuntu 13.04PHP - Restructure multi-dimentional array into single dimentionhttp://jslim.net/blog/2013/12/13/php-restructure-multi-dimentional-array-into-single-dimention/2013-12-13T09:08:00.000Z2024-02-21T10:41:37.613ZSource
For example, we have array like this
1 2 3 4 5 6 7 8 9 10 11 12 13 14 15
<?php array( 'test_1' => array( 'msg_1' => 'this is the first desc', 'msg_2' => 'this is the second desc', ), 'test_2' => 'this is the third desc', 'test_3' => array( 'msg_1' => array( 'foo_1' => 'this is the fourth desc', ), 'msg_2' => 'this is the fifth desc', ), 'this is the sixth desc', );
Desired result
What we want the output is
1 2 3 4 5 6 7 8 9
Array ( [0] => thisis the first desc [1] => thisis the second desc [2] => thisis the third desc [3] => thisis the fourth desc [4] => thisis the fifth desc [5] => thisis the sixth desc )
Source code
1 2 3 4 5 6 7 8 9 10 11 12 13
<?php functionrestructure_array($obj) { if (!is_array($obj)) { returnarray($obj); }
]]><h2 id="Source"><a href="#Source" class="headerlink" title="Source"></a>Source</h2><p>For example, we have array like this</p>
<figureProblem with AFImageRequestOperation block not executedhttp://jslim.net/blog/2013/11/15/problem-with-afimagerequestoperation-block-not-executed/2013-11-15T03:59:00.000Z2024-02-21T10:41:37.613ZRecently I’ve faced a weird bug about displaying image from URL to UIImageView. Finally I found out is the header issue.
Server: Microsoft-IIS/8.0 Content-Type: image/jpeg X-Powered-By: ASP.NET Last-Modified: Thu, 24 Oct 201321:41:42 GMT Accept-Ranges: bytes Date: Fri, 15 Nov 201304:07:30 GMT Content-Length: 60585 Etag: "16e91dd41d1ce1:0"
Look at the Content-Type, Image1 with the Content-Typebinary/octet-stream(if you type the URL in browser it will force download), while Content-Type of Image2 is image/jpeg(it will display in browser if you type in the URL).
]]><p>Recently I’ve faced a weird bug about displaying image from URL to <code>UIImageView</code>. Finally I found out is theBring up UIPickerView when clicked on UIButtonhttp://jslim.net/blog/2013/10/16/bring-up-uipickerview-when-clicked-on-uibutton/2013-10-16T05:51:00.000Z2024-02-21T10:41:37.613ZWe don’t add UIPickerView as subview. There is a trick to achieve this.
Create a dummy UITextField
This text field is not visible to user, is a hidden field
]]><p>We don’t add UIPickerView as subview. There is a trick to achieve this.</p>
<h3 id="Create-a-dummy-UITextField"><aiOS - Working with MKMapViewhttp://jslim.net/blog/2013/10/09/ios-working-with-mkmapview/2013-10-09T03:45:00.000Z2024-02-21T10:41:37.613ZHere I want to discuss about using map in iOS application
First, import MapKit
ViewController.h
1
#import <MapKit/MapKit.h>
Then make sure your ViewController conform to MKMapViewDelegate
// don't miss this self.mapView.delegate = self; // if you want it to show user's current location self.mapView.showsUserLocation = YES; [self.view addSubview:self.mapView]; }
Remember to create a custom object the conform to MKAnnotation, lets call it MyPlace
#pragma mark - MKAnnotation // this will plot the marker to a correct place on map - (CLLocationCoordinate2D)coordinate { returnCLLocationCoordinate2DMake(self.latitude, self.longitude); }
// centered the region MKCoordinateRegion region = [self regionForAnnotations:places]; [self.mapView setRegion:region animated:YES];
// NOTE: if doesn't call this method, no marker will be shown [self.mapView addAnnotations:places]; }
#pragma mark - MKMapViewDelegate // this method will only be called if addAnnotation method is call - (MKAnnotationView *)mapView:(MKMapView *)mapView viewForAnnotation:(id<MKAnnotation>)annotation { // check wether is refer to the class you created just now if ([annotation isKindOfClass:[MyPlace class]]) { staticNSString *identifier = @"MyLocation"; // just like UITableViewCell, also using dequeue reusable MKPinAnnotationView *annotationView = (MKPinAnnotationView *)[self.mapView dequeueReusableAnnotationViewWithIdentifier:identifier];
UIButton *rightButton; if (annotationView == nil) { annotationView = [[MKPinAnnotationView alloc] initWithAnnotation:annotation reuseIdentifier:identifier]; // make configuration annotationView.enabled = YES; annotationView.canShowCallout = YES; annotationView.animatesDrop = NO; annotationView.pinColor = MKPinAnnotationColorGreen; // provide custom image as marker if you want to annotationView.image = [UIImage imageNamed:@"IconMarker"];
// optional: make it draggable annotationView.animatesDrop = YES; annotationView.draggable = YES; // optional: you can add a button rightButton = [UIButton buttonWithType:UIButtonTypeDetailDisclosure]; [rightButton addTarget:self action:@selector(placeTouched:) forControlEvents:UIControlEventTouchUpInside]; annotationView.rightCalloutAccessoryView = rightButton; } else { annotationView.annotation = annotation; } // add a tag with a specific offset // remember to put this outside, the annotation will be reuse everytime, // if this is only set on annotation creation, you may have chances to get the wrong info rightButton.tag = 4000 + ((MyPlace *)annotation).theId; return annotationView; } returnnil; }
]]><p>Here I want to discuss about using <strong>map</strong> in iOS application</p>
<h3 id="First-import-MapKit"><aUse custom font in iOS applicationhttp://jslim.net/blog/2013/10/08/use-custom-font-in-ios-application/2013-10-08T03:04:00.000Z2024-02-21T10:41:37.613ZThere are few steps to add custom font in your Xcode project.
Make sure you check Copy items into destination group’s folder (if needed)
Select Create groups for any added folders
Check Add to targets for your project
Step 3: Verify is your font now in Bundle resources
Go to Project -> Targets and select your project. In Build Phases tab, look for Copy Bundle Resources and make sure the font is there.
Step 4: Print out all available font
1 2 3 4 5
for (NSString *familyName in [UIFont familyNames]) { for (NSString *fontName in [UIFont fontNamesForFamilyName:familyName]) { NSLog(@"Font: %@", fontName); } }
]]><p>There are few steps to add custom font in your Xcode project.</p>
<h2 id="Step-1-Add-UIAppFonts-to-your-Info-plist"><aWordpress form submission get 404http://jslim.net/blog/2013/10/04/wordpress-form-submission-get-404/2013-10-04T07:59:00.000Z2024-02-21T10:41:37.613ZHave you ever face a problem, when there is GET request, it shows the form properly. However when there is POST request, there are 2 situations:
The form has errors, then show error messages properly.
]]><p>Have you ever face a problem, when there is <strong>GET</strong> request, it shows the form properly. However when there isRemove unwanted/dummy character in C languagehttp://jslim.net/blog/2013/09/25/remove-unwanted-slash-dummy-character-in-c-language/2013-09-25T11:22:00.000Z2024-02-21T10:41:37.613ZI’ve encounter this issue in RSA decryption (RSA_private_decrypt)
New chunk: 33-9998-123-123408101123451250-PARADM01_00023054-CY00
Declaring a new variable with additional 1 more character of the original result
Copy the original result to the new variable
Inject a null character to the end of the new variable
Hope this helps. :)
]]><p>I’ve encounter this issue in RSA decryption (<code>RSA_private_decrypt</code>)</p>
<figure class="highlight c"><table><tr><tdHow iPhone communicate with server in PHPhttp://jslim.net/blog/2013/09/22/how-iphone-communicate-with-server-in-php/2013-09-22T07:16:00.000Z2024-02-21T10:41:37.613ZI have few friends as me about this.
– How iOS can retrieve/update from/to MySQL/MSSQL database? –
There are 2 parts:- Server side and Client side
In this example the Server side will refer to Apache, MySQL and PHP. While Client side is iPhone App in Objective-C.
Server side
Assume that your Base URL is http://api.yoursite.com
// store the result in array form $result_set = array(); $i = 0; while ($i < $count) { $result_set[$i] = array(); $result_set[$i]['username'] = mysql_result($result, $i, 'username'); $result_set[$i]['first_name'] = mysql_result($result, $i, 'first_name'); $result_set[$i]['last_name'] = mysql_result($result, $i, 'last_name'); $i++; }
mysql_close();
echojson_encode($result_set);
// set the header to JSON header('Content-Type: application/json'); exit;
Add a new user
POST http://api.yoursite.com/user/add
1 2 3 4 5 6 7 8 9 10 11 12 13 14 15 16 17 18 19
<?php // only process it if it is POST request if ($_SERVER['REQUEST_METHOD'] === 'POST') { $sql = "INSERT INTO user VALUES ($_POST['username'], $_POST['first_name'], $_POST['last_name'])"; mysql_query($sql);
echojson_encode(array( 'message' => 'John Smith has been inserted' )); } else { // if not POST, then return 404 echojson_encode(array( 'message' => 'Endpoint not found' )); header('HTTP/1.1 404 Not Found'); }
// set the header to JSON header('Content-Type: application/json'); exit;
Client side
In this example will using this library - AFNetworking. It has been simplify a lot of code from iOS SDK (or just call it as a wrapper)
]]><p>I have few friends as me about this.</p>
<p>– <strong>How iOS can retrieve/update from/to MySQL/MSSQL database?</strong> –</p>
<p>ThereInvoke a method call from AppDelegate via Notificationhttp://jslim.net/blog/2013/09/16/invoke-a-method-call-from-appdelegate-via-notification/2013-09-16T04:12:00.000Z2024-02-21T10:41:37.613ZThink of a scenario here:
You have a class LoginViewController, while Facebook login api call is keep on AppDelegate.m, and you want to perform some action after success login via Facebook.
]]><p>Think of a scenario here:</p>
<p>You have a class <strong>LoginViewController</strong>, while Facebook login api call is keep onGet JSON using PHP cURL from web servicehttp://jslim.net/blog/2013/09/12/get-json-using-php-curl-from-web-service/2013-09-12T08:41:00.000Z2024-02-21T10:41:37.613ZThis example is to show how to detect user’s country
// Set the url, number of GET vars, GET data curl_setopt($ch, CURLOPT_URL, $url); curl_setopt($ch, CURLOPT_POST, false); curl_setopt($ch, CURLOPT_HTTPHEADER, $headers); curl_setopt($ch, CURLOPT_RETURNTRANSFER, true );
curl_setopt($ch, CURLOPT_SSL_VERIFYPEER, false);
// Execute request $result = curl_exec($ch);
// Close connection curl_close($ch);
// get the result and parse to JSON $result_arr = json_decode($result, true);
// set HTTP header $headers = array( 'Content-Type: application/json' );
// set POST params $fields = array( 'key' => '<your_api_key>', 'format' => 'json', 'ip' => $_SERVER['REMOTE_ADDR'], ); $url = 'http://api.ipinfodb.com/v3/ip-country';
// Open connection $ch = curl_init();
// Set the url, number of POST vars, POST data curl_setopt($ch, CURLOPT_URL, $url); curl_setopt($ch, CURLOPT_POST, true); curl_setopt($ch, CURLOPT_HTTPHEADER, $headers); curl_setopt($ch, CURLOPT_RETURNTRANSFER, true );
]]><p>This example is to show how to detect user’s country</p>
<p>For <strong>GET</strong> request</p>
<figure class="highlightiOS - Get the radius of MKMapViewhttp://jslim.net/blog/2013/07/02/ios-get-the-radius-of-mkmapview/2013-07-02T06:27:00.000Z2024-02-21T10:41:37.613ZSome time we might have too much locations want to show to user, unfortunately, it may cause some performance issue if load all locations in one short.
One of the solution is lazy loading, only load the visible location in map. Thus, in order to achieve this, we need Center Coordinate and “Radius”(actually it is not radius, but just call it radius)
For getting radius, depends on where you want to get the 2nd point. Lets take the Top Center
1 2 3 4 5 6
- (CLLocationCoordinate2D)getTopCenterCoordinate { // to get coordinate from CGPoint of your map CLLocationCoordinate2D topCenterCoor = [self.mapView convertPoint:CGPointMake(self.mapView.frame.size.width / 2.0f, 0) toCoordinateFromView:self.mapView]; return topCenterCoor; }
- (CLLocationDistance)getRadius { // get center coordinate CLLocationCoordinate2D centerCoor = [self.mapView centerCoordinate]; CLLocation *centerLocation = [[CLLocation alloc] initWithLatitude:centerCoor.latitude longitude:centerCoor.longitude]; // get top left coordinate CLLocationCoordinate2D topLeftCoor = [self.mapView convertPoint:CGPointMake(0, 0) toCoordinateFromView:self.mapView]; CLLocation *topLeftLocation = [[CLLocation alloc] initWithLatitude:topLeftCoor.latitude longitude:topLeftCoor.longitude]; // get top right coordinate CLLocationCoordinate2D topRightCoor = [self.mapView convertPoint:CGPointMake(self.mapView.frame.size.width, 0) toCoordinateFromView:self.mapView]; CLLocation *topRightLocation = [[CLLocation alloc] initWithLatitude:topRightCoor.latitude longitude:topRightCoor.longitude]; // the distance from center to top left CLLocationDistance hypotenuse = [centerLocation distanceFromLocation:topLeftLocation];
// half of the distance from top left to top right CLLocationDistance x = [topLeftLocation distanceFromLocation:topRightLocation] / 2.0f; // what we want is this CLLocationDistance y = sqrt(pow(hypotenuse, 2.0) - pow(x, 2.0)); NSLog(@"h² = x² + y²"); NSLog(@"y² = h² - x²"); NSLog(@"y = sqrt(h² - x²)"); NSLog(@"%.9f = sqrt(%.9f² - %.9f²)", y, hypotenuse, x);
]]><p>Some time we might have too much locations want to show to user, unfortunately, it may cause some performance issue if load alliOS - Handle UISearchBar keyboard show/hide issuehttp://jslim.net/blog/2013/06/28/ios-handle-uisearchbar-keyboard-show-slash-hide-issue/2013-06-28T05:10:00.000Z2024-02-21T10:41:37.613ZI have experienced that when you focus on UISearchBar, the keyboard occupied half of the screen. The question is, “Under what condition should the keyboard hide?”.
One of the solution is to follow the contact book, which is add an overlay button on top of it.
- (void)searchBarTextDidBeginEditing:(UISearchBar *)searchBar { // add the button to the main view UIButton *overlayButton = [[UIButton alloc] initWithFrame:self.view.frame];
// set the background to black and have some transparency overlayButton.backgroundColor = [UIColor colorWithWhite:0 alpha:0.3f];
// add an event listener to the button [overlayButton addTarget:self action:@selector(hideKeyboard:) forControlEvents:UIControlEventTouchUpInside];
// add to main view [self.view addSubview:overlayButton]; }
- (void)hideKeyboard:(UIButton *)sender { // hide the keyboard [self.searchBar resignFirstResponder]; // remove the overlay button [sender removeFromSuperview]; }
So now the keyboard will hide when you touched on the dark area.
Simple :)
]]><p>I have experienced that when you focus on UISearchBar, the keyboard occupied half of the screen. The question is, “Under what conditionRSA Decryption on iOShttp://jslim.net/blog/2013/06/24/rsa-decryption-on-ios/2013-06-24T11:12:00.000Z2024-02-21T10:41:37.613ZI’ve been googled for few days and struggling on “How to decrypt cipher text in iOS”, unfortunately there is no solution were found.
Then I decided to do it with C language rather than Objective-C, and I found a library for openssl that could be included to Xcode.
Step 1: Install the library
Download the library, unzip it then drag the lib and include folders to your xcode project. Make sure the Build Settings -> Header Search Paths you have set properly (i.e. “${SRCROOT}/Libraries/openssl/include”)
Step 2: Add private key
Just drag your private key in pem format to xcode project.
If your private key is in binary form, you may refer here.
Step 3: Create a custom class
Create a new class (subclass of NSObject), just named it Crypto
You can use my library RSA-objc, and the instructions is inside.
]]><p>I’ve been googled for few days and struggling on <strong>“How to decrypt cipher text in iOS”</strong>, unfortunately there is noShow chinese subtitle on VLC player in OS Xhttp://jslim.net/blog/2013/05/05/show-chinese-subtitle-on-vlc-player-in-os-x/2013-05-05T06:32:00.000Z2024-02-21T10:41:37.613ZI’ve facing an issue on display the chinese character in not readable form.
I googled and found this blog to show in windows platform.
First, open VLC and in top menu click on VLC -> Preferences…
Then
click on Subtitles & OSD tab
change the Default Encoding to Universal, Chinese (GB18030)
change the Font to GB18030Bitmap
Reopen the program and it should work. :)
]]><p>I’ve facing an issue on display the chinese character in not readable form.</p>
<p>I googled and found <aZendFramework 2 - Construct SQL with subqueryhttp://jslim.net/blog/2013/04/24/zendframework-2-construct-sql-with-subquery/2013-04-24T07:22:00.000Z2024-02-21T10:41:37.613ZA scenario here:
A Q & A website that allow user to ask question and put several tags to that question.
Database tables:
tag
1 2 3 4 5 6 7
+--------------+-------------+------+-----+---------+----------------+ | Field | Type | Null | Key | Default | Extra | +--------------+-------------+------+-----+---------+----------------+ | id | int(11) | NO | PRI | NULL | auto_increment | | title | varchar(30) | NO || NULL || | description | varchar(100)| NO || NULL || +--------------+-------------+------+-----+---------+----------------+
tag_rel
1 2 3 4 5 6 7
+--------------+-------------+------+-----+---------+----------------+ | Field | Type | Null | Key | Default | Extra | +--------------+-------------+------+-----+---------+----------------+ | id | int(11) | NO | PRI | NULL | auto_increment | | tag_id | varchar(30) | NO || NULL || | question_id | varchar(100)| NO || NULL || +--------------+-------------+------+-----+---------+----------------+
question
1 2 3 4 5 6
+--------------+-------------+------+-----+---------+----------------+ | Field | Type | Null | Key | Default | Extra | +--------------+-------------+------+-----+---------+----------------+ | id | int(11) | NO | PRI | NULL | auto_increment | | description | varchar(100)| NO || NULL || +--------------+-------------+------+-----+---------+----------------+
Now want to get those tags related to a tag with ID 100, the query could be
1 2 3 4 5 6 7 8 9 10 11
SELECT tag.* FROM tag INNERJOIN tag_rel ON tag.id = tag_rel.tag_id WHERE tag.id <>100 AND tag_rel.question_id IN ( SELECT tag_rel.question_id FROM tag INNERJOIN tag_rel ON tag.id = tag_rel.tag_id WHERE tag.id =100 )
Now want to construct this query in Zend Frameword 2
In your model table, says ./module/Application/src/Application/Model/TagTable.php
$select ->join( 'tag_rel', 'tag.id = tag_rel.tag_id', array( ) ) ->where(array('tag.id <> ?' => $id)) ->where->in('tag_rel.question_id', $subselect) ; // uncomment the next line to see your query // echo $select->getSqlString(); });
// don't use DISTINCT in sql due to performance issue // Get unique records $distincted_result = array(); foreach ($result_setas$rowset) { if (!in_array($rowset, $distincted_result)) { $distincted_result[] = $rowset; } } return$distincted_result; } ... }
The performance may be sux, in order to solve this, just index tag_rel.tag_id and tag_rel.question_id.
1 2
mysql >ALTERTABLE `tag_rel` ADD INDEX (`tag_id`); mysql >ALTERTABLE `tag_rel` ADD INDEX (`question_id`);
]]><p>A scenario here:</p>
<p>A <strong>Q & A</strong> website that allow user to ask question and put several <strong>tags</strong> toZendFramework 2 - Construct AND OR SQLhttp://jslim.net/blog/2013/04/23/zendframework-2-construct-and-or-sql/2013-04-23T10:32:00.000Z2024-02-21T10:41:37.613ZI believe that almost all the web applications have a function Search, thus you might need to construct a query like:
1 2 3 4
SELECT* FROM foo INNERJOIN bar ON foo.id = bar.foo_id WHERE (foo.attr_1 LIKE'%abc%'OR foo.attr_2 LIKE'%abc%') AND (bar.attr_1 LIKE'%xyz%'OR bar.attr_2 LIKE'%xyz%')
The OR is grouped together with AND, I’ll show how to construct this query in ZF2
In your model table, says ./module/Application/src/Application/Model/FooTable.php
]]><p>I believe that almost all the web applications have a function <strong>Search</strong>, thus you might need to construct a queryZendFramework 2 - Create a custom view helperhttp://jslim.net/blog/2013/04/19/zendframework-2-create-a-custom-view-helper/2013-04-19T11:02:00.000Z2024-02-21T10:41:37.613ZFor many situations, we need some helper functions to be used in view.
i.e. When you want to debug, probably you will write
Using <pre> to wrap it will be more readable, unfortunately you don’t want to every time write such a long line. Now, create a helper to be able to use in all views.
Create a new file ./module/Application/src/Application/View/Helper/God.php(Let’s call it God as this helper can do anything that you want provided you defined it as a function inside)
]]><p>For many situations, we need some helper functions to be used in view.</p>
<p>i.e. When you want to debug, probably you willUbuntu server allow login via ssh with keyhttp://jslim.net/blog/2013/04/08/ubuntu-server-allow-login-via-ssh-with-key/2013-04-08T09:47:00.000Z2024-02-21T10:41:37.613ZThe environment:
Ubuntu server 12.04 LTS is running on VMWare Fusion with IP address 192.168.1.101 as Host
Generating public/private rsa key pair. Enter file in which to save the key (/home/b/.ssh/id_rsa): Enter passphrase (empty for no passphrase): Enter same passphrase again: Your identification has been saved in /home/b/.ssh/id_rsa. Your public key has been saved in /home/b/.ssh/id_rsa.pub.
]]><p>The environment:</p>
<ul>
<li>Ubuntu server 12.04 LTS is running on VMWare Fusion with IP address 192.168.1.101 asCrawling images from a webpagehttp://jslim.net/blog/2013/04/08/crawling-images-from-a-webpage/2013-04-08T07:26:00.000Z2024-02-21T10:41:37.613ZFirst extract the url of images craw.py
1 2 3 4 5 6 7 8 9 10
import urllib2, re req = urllib2.Request('http://yourwebsite.com/path/to/webpage') website = urllib2.urlopen(req)
html = website.read()
# Read all png files imgs = re.findall('"((http)s?://.*?.png)"', text) for i in imgs: print i[0]
Then output the URLs to a text file
1
$ python craw.py > content.txt
Use shell script to download it craw.sh
1 2 3 4 5 6
#!/bin/bash file="./content.txt" while IFS= read -r line do wget "$line" done <"$file"
]]><p>First extract the url of images<br><strong>craw.py</strong></p>
<figure class="highlight py"><table><tr><td class="gutter"><pre><spanDjango - Redirect URL to facebook oAuthhttp://jslim.net/blog/2013/04/05/django-redirect-url-to-facebook-oauth/2013-04-05T04:11:00.000Z2024-02-21T10:41:37.613ZIn your views.py
1 2 3 4 5 6 7 8 9 10 11 12 13 14 15 16 17 18
from django.http import HttpResponse from projectname import settings from urllib import urlencode
]]><p>In your <strong>views.py</strong></p>
<figure class="highlight py"><table><tr><td class="gutter"><pre><spanPython: Make a GET request to get JSON datahttp://jslim.net/blog/2013/04/04/python-make-a-get-request-to-get-json-data/2013-04-04T08:04:00.000Z2024-02-21T10:41:37.613ZMake a HTTP request to get JSON content from website.
]]><p>Make a HTTP request to get JSON content from website.</p>
<p>Create a file <strong>json_helper.py</strong></p>
<figure class="highlightCreate Facebook page app using Django with Nginxhttp://jslim.net/blog/2013/04/01/create-facebook-page-app-using-django-with-nginx/2013-04-01T13:31:00.000Z2024-02-21T10:41:37.613ZThis is continue from previous post.
Enable SSL
As we know that Facebook app required SSL, so first we must self-sign a certificate
defprocess_request(self, request): if self.enabled andnot request.is_secure(): for path in self.paths: if request.get_full_path().startswith(path): request_url = request.build_absolute_uri(request.get_full_path()) secure_url = request_url.replace('http://', 'https://') return HttpResponsePermanentRedirect(secure_url) returnNone
In /home/username/public_html/projectname/projectname/settings.py
1 2 3 4 5 6 7 8 9 10 11 12 13 14 15
MIDDLEWARE_CLASSES = ( ... # the line below if not comment out, 403 error will occur and I still haven't figure it out # 'django.middleware.csrf.CsrfViewMiddleware', ... 'middleware.SecureRequiredMiddleware', ) ... # HTTPS MIDDLEWARE CONFIG HTTPS_SUPPORT = True SECURE_REQUIRE_PATHS = ( '/', '/admin/', # you can add in more path here if you want the path to use https )
from django.template.loader import get_template from django.template import Context from django.http import HttpResponse import datetime
defindex(request): now = datetime.datetime.now() t = get_template('index.html') # pass a dynamic value to the view html = t.render(Context({'special_date': now})) return HttpResponse(html)
In /home/username/public_html/projectname/newapp/urls.py
1 2 3 4 5 6
from django.conf.urls import patterns, url from newapp import views
First, add the template dir to /home/username/public_html/projectname/projectname/settings.py
1 2 3 4 5 6 7
import os.path ... TEMPLATE_DIRS = ( ... # in case that it is run on windows, so have to change to forward slash no matter how os.path.join(os.path.dirname(__file__), 'newapp/templates'.replace('\\', '/')), )
Create a directory to keep all templates related to newapp
]]><p>This is continue from <a href="/blog/2013/03/29/setup-django-slash-mysql-in-ubuntu-server-in-vmware-fusion/">previous post</a>.</p>
<h2Setup Django/mysql in Ubuntu server in VMWare Fusionhttp://jslim.net/blog/2013/03/29/setup-django-slash-mysql-in-ubuntu-server-in-vmware-fusion/2013-03-29T09:00:00.000Z2024-02-21T10:41:37.613ZBasically the goal is To create a web application that run on VMWare using Python/Django with MySql, and able to accessed by the host OS.
Note: This is tested on Ubuntu Server 12.04 LTS, the host OS is Mac OS X mountain lion.
Configure your guess OS which the web server is to be run later
Assumed that the instance is clean (which doesn’t install anything other than the OS)
mysql-server & python-mysqldb is required to run Django with MySql
nginx is a reverse proxy server that used to redirect the HTTP Request from port 80(default port) to port 8000(Django default port, you can change to any port number)
$ mysql -u root -p Enter password: Welcome to the MySQL monitor. Commands end with ; or \g. Your MySQL connection id is 1 Server version: 5.5.29-0ubuntu0.12.04.2 (Ubuntu)
Copyright (c) 2000, 2012, Oracle and/or its affilliates. All rights reserved.
Oracle is a registered trademark of Oracle Corporation and/or its affilliates. Other names may be trademarks of their respective owners.
Type 'help;' or '\h' for help. Type '\c' to clear the current input statement.
$ mysql -u root -p django_db Enter password: Welcome to the MySQL monitor. Commands end with ; or \g. Your MySQL connection id is 1 Server version: 5.5.29-0ubuntu0.12.04.2 (Ubuntu)
Copyright (c) 2000, 2012, Oracle and/or its affilliates. All rights reserved.
Oracle is a registered trademark of Oracle Corporation and/or its affilliates. Other names may be trademarks of their respective owners.
Type 'help;' or '\h' for help. Type '\c' to clear the current input statement.
root@localhost [(django_db)]> desc newapp_user; +--------------+-------------+------+-----+---------+----------------+ | Field | Type | Null | Key | Default | Extra | +--------------+-------------+------+-----+---------+----------------+ | id | int(11) | NO | PRI | NULL | auto_increment | | first_name | varchar(30) | NO || NULL || | last_name | varchar(30) | NO || NULL || | created_date | datetime | NO || NULL || +--------------+-------------+------+-----+---------+----------------+ 4 rows in set (0.00 sec)
root@localhost [(none)]> exit
Now configure Nginx to the django project
1
$ sudo vi /etc/nginx/sites-available/django.conf # create a new file
]]><p>Basically the goal is <strong>To create a web application that run on VMWare using Python/Django with MySql, and able to accessed by theiOS - Create UITableView with custom cell programmaticallyhttp://jslim.net/blog/2013/03/22/ios-create-uitableview-with-custom-cell-programmatically/2013-03-22T10:59:00.000Z2024-02-21T10:41:37.613ZPersonally, I don’t like to use Xcode’s interface builder. I felt that everything programmatically will be easier to debug.
This post is share about create table view and custom table cell.
// must set delegate & dataSource, otherwise the the table will be empty and not responsive tableView.delegate = self; tableView.dataSource = self;
tableView.backgroundColor = [UIColor cyanColor];
// add to canvas [self.view addSubview:tableView]; }
#pragma mark - UITableViewDataSource // number of section(s), now I assume there is only 1 section - (NSInteger)numberOfSectionsInTableView:(UITableView *)theTableView { return1; }
// number of row in the section, I assume there is only 1 row - (NSInteger)tableView:(UITableView *)theTableView numberOfRowsInSection:(NSInteger)section { return1; }
// the cell will be returned to the tableView - (UITableViewCell *)tableView:(UITableView *)theTableView cellForRowAtIndexPath:(NSIndexPath *)indexPath { staticNSString *cellIdentifier = @"HistoryCell"; // Similar to UITableViewCell, but JSCustomCell *cell = (JSCustomCell *)[theTableView dequeueReusableCellWithIdentifier:cellIdentifier]; if (cell == nil) { cell = [[JSCustomCell alloc] initWithStyle:UITableViewCellStyleDefault reuseIdentifier:cellIdentifier]; } // Just want to test, so I hardcode the data cell.descriptionLabel.text = @"Testing"; return cell; }
#pragma mark - UITableViewDelegate // when user tap the row, what action you want to perform - (void)tableView:(UITableView *)theTableView didSelectRowAtIndexPath:(NSIndexPath *)indexPath { NSLog(@"selected %d row", indexPath.row); }
@end
Simple? Basically is all the same, the only different is you have to configure those controls programmatically.
Have fun :)
]]><p>Personally, I don’t like to use Xcode’s interface builder. I felt that everything programmatically will be easier to debug.</p>
<p>ThisNSInvalidArgumentException caused by UITableViewCellhttp://jslim.net/blog/2013/03/02/nsinvalidargumentexception-caused-by-uitableviewcell/2013-03-02T10:36:00.000Z2024-02-21T10:41:37.613ZI keep hitting an error like this
1 2 3 4 5
2013-03-0218:34:52.488 StoreSearch[84541:c07] -[UITableViewCell nameLabel]: unrecognized selector sent to instance 0x6a7d880 2013-03-0218:34:52.489 StoreSearch[84541:c07] *** Terminating app due to uncaught exception 'NSInvalidArgumentException', reason: '-[UITableViewCell nameLabel]: unrecognized selector sent to instance 0x6a7d880' *** First throw call stack: (0x14ab0520xeabd0a0x14acced0x1411f000x1411ce20x37170xb4e0f0xb55890xa0dfd0xaf8510x5a3220x14ace720x1d6e92d0x1d788270x1cfefa70x1d00ea60x1d005800x147f9ce0x14166700x13e24f60x13e1db40x13e1ccb0x13948790x139493e0x1ba9b0x20bd0x1fe5) terminate called throwing an exception(lldb)
This took me few hours to figure out the problem. The problem is just make use of wrong cell identifier.
]]><p>I keep hitting an error like this</p>
<figure class="highlight x86asm"><table><tr><td class="gutter"><pre><spanRestrict Git commit message to certain patternhttp://jslim.net/blog/2013/02/26/restrict-git-commit-message-to-certain-pattern/2013-02-26T11:21:00.000Z2024-02-21T10:41:37.613ZFor certain reason, some time you want your commit message to follow a standard pattern.
i.e. PJK-001: my message
Want to have a project code and assignment code there.
Now, open up your project git directory.
i.e. /path/to/your/project/.git/hooks/
and edit commit-msg file (if doesn’t exist, create it)
# Match with a specified pattern match = re.match(r'PJK-(\d+):\ ', message)
ifmatchisNone: print'Your commit has been rejected!' print'Commit message must begin with \'PJK-(\d+): \'' print'i.e. PJK-12: this is a commit message' sys.exit(1)
Simple right? But don’t remember to change it to executable and no .py extension
]]><p>For certain reason, some time you want your commit message to follow a standard pattern.</p>
<p>i.e. PJK-001: my message</p>
<p>Want toSQL - SELECT SUM joined with another tablehttp://jslim.net/blog/2013/02/06/sql-select-sum-joined-with-another-table/2013-02-06T07:44:00.000Z2024-02-21T10:41:37.613ZI had always face a scenerio like this:
SELECT id, first_name, last_name, total FROMuser u JOIN ( SELECT user_id, SUM(qty) as total FROM transaction GROUPBY user_id ) AS t ON u.id = t.user_id ORDERBY total DESC
]]><p>I had always face a scenerio like this:</p>
<p>There are 2 tables</p>
<figure class="highlight stylus"><table><tr><tdVim - Set indentation based on file typehttp://jslim.net/blog/2013/02/05/vim-set-indentation-based-on-file-type/2013-02-05T09:13:00.000Z2024-02-21T10:41:37.613ZLet say now you want your .js(JavaScript) file to 2 space indent.
Create a file named javascript.vim(NOT js.vim)
1
$ touch ~/.vim/ftplugin/javascript.vim
Add the content below to ~/.vim/ftplugin/javascript.vim
1 2 3 4 5 6 7 8
" Auto expand tabs to spaces (use space rather than tab) setlocal expandtab setlocalshiftwidth=2 setlocal tabstop=2
" Auto indent after a { setlocal autoindent setlocal smartindent
Use setlocal rather than set because you only want it to apply to .js files.
]]><p>Let say now you want your <strong>.js</strong> <em>(JavaScript)</em> file to 2 space indent.</p>
<p>Create a file namedMy practice Git Modelhttp://jslim.net/blog/2013/02/05/my-practice-git-model/2013-02-05T07:57:00.000Z2024-02-21T10:41:37.613ZThanks to this post. It get me more understand in Git.
# Branch out `module1` from `develop` $ git checkout -b module1 develop # Make some changes $ mkdir new_module $ cd new_module $ touch file1 file2 file3 $ cd .. # Add & Commit $ git add new_module $ git commit -a -m "- added new module" # Show all branches you have $ git branch # Switch to `develop` $ git checkout develop # Merge with branch `module1` $ git merge --no-ff module1 # Delete `module1` branch $ git branch -d module1 # push to remote server $ git push origin develop
4. Everything tested fine, merge to master branch
1 2 3 4 5 6 7 8
# Switch to `master` $ git checkout master
# Merge with branch `develop` $ git merge --no-ff develop
# Push to remote server $ git push origin master
If you work on only a single branch, consider a situation here:
Now you have assigned a new module, you work on the new module. Suddenly, the life copy got some bugs that need you to be fix urgently, but now you’re working on the new module which is not yet complete.
Imagine the situation above happened, it may take you a lot of time to handle this. Thus use the branching model to avoid this situation happen.
]]><p>Thanks to <a href="http://nvie.com/posts/a-successful-git-branching-model/">this</a> post. It get me more understand inEnable display_errors in MAMPhttp://jslim.net/blog/2013/01/30/enable-display-errors-in-mamp/2013-01-30T08:50:00.000Z2024-02-21T10:41:37.613ZAs we all know that to enable display_errors was an easy task. Unfortunately I’ve made more than 10 attempts to configure this.
Initially I was edit /Applications/MAMP/conf/php5.4.4/php.ini, it doesn’t solve my problem. Then I’ve tried to edit all php.ini in each php version. Sadly, it failed again.
Finally, I echo out phpInfo() to see it’s attributes, and the value of display_errors was Off. The path for php.ini was located in /Applications/MAMP/bin/php/php5.4.4/conf/php.ini. :|
Damn!
]]><p>As we all know that to enable <code>display_errors</code> was an easy task. Unfortunately I’ve made more than 10 attempts to configureUnknown error when setting up virtual host in MAMPhttp://jslim.net/blog/2013/01/29/unknown-error-when-setting-up-virtual-host-in-mamp/2013-01-29T07:49:00.000Z2024-02-21T10:41:37.613ZI’m struggling for half day just to setup virtual host in MAMP.
# Virtual hosts Include /Applications/MAMP/conf/apache/extra/httpd-vhosts.conf
to uncomment the httpd-vhosts.conf
In /etc/hosts, add a line below
1
127.0.0.1www-yourproject.com
I’ve done all these setting, but the MAMP still not able to start.
At the end, I figured out that the error was occurred in
1 2 3 4 5 6
<Directory "/path/to/project"> OptionsAll AllowOverrideAll Orderallow,deny allow from all </Directory>
this portion. It look correct and no mistake at all.
After struggling for half day, I re-type that portion of code, finally it works.
Damnnnn, it was those special characters error which we cannot see.
May be I’m too lucky to meet such a situation :)
]]><p>I’m struggling for half day just to setup virtual host iniOS: Hide keyboard when the user tapped else wherehttp://jslim.net/blog/2013/01/20/ios-hide-keyboard-when-the-user-tapped-else-where/2013-01-20T10:00:00.000Z2024-02-21T10:41:37.613ZIn certain circumstances (i.e. The table row to edit.), we do want the keyboard to be hide in order to improve user experience
- (void)hideKeyboard:(UIGestureRecognizer *)gestureRecognizer { CGPoint point = [gestureRecognizer locationInView:self.tableView]; NSIndexPath *indexPath = [self.tableView indexPathForRowAtPoint:point]; // Let say you are editing first section first row if (indexPath != nil && indexPath.section == 0 && indexPath.row == 0) { return; } [self.firstRowTextField resignFirstResponder]; }
In this case we are talking about the first section first row contain a UITextField which allows user to edit.
You want the keyboard to keep appear if the user tap back the row which they’re editing, so just return and end the function. Otherwise, the keyboard will be hide (i.e. make the firstRowTextField lost focus)
UITapGestureRecognizer is like an event listener to listen for Tap event, if the Tap event occurred, hideKeyboard will be triggered and passed itself as an argument. The hideKeyboard will then act accordingly.
]]><p>In certain circumstances (i.e. The table row to edit.), we do want the keyboard to be hide in order to improve user experience</p>
<p>InUITableViewController doesn't show content with static cellhttp://jslim.net/blog/2013/01/20/uitableviewcontroller-doesnt-show-content-with-static-cell/2013-01-20T08:32:00.000Z2024-02-21T10:41:37.613ZI’ve been struggle for some time just because of the tableView doesn’t show any content to me.
The situation is, I’m trying to create a tableView with some sections and static cells, and it served as a rootViewController of a navigationController.
Finally I solved the problem by commenting out the following line in tableViewController.m
- (NSInteger)numberOfSectionsInTableView:(UITableView *)tableView { #warning Potentially incomplete method implementation. // Return the number of sections. return0; }
- (NSInteger)tableView:(UITableView *)tableView numberOfRowsInSection:(NSInteger)section { #warning Incomplete method implementation. // Return the number of rows in the section. return0; }
These lines are auto-generated by Xcode which I don’t need it.
When you faced a problem and doesn’t found any solution in google, don’t panic, just continue to try again and again, the problem will be solved. :)
]]><p>I’ve been struggle for some time just because of the tableView doesn’t show any content to me.</p>
<p>The situation is, I’m trying toRSA encryption in iOS and decrypt it using PHPhttp://jslim.net/blog/2013/01/05/rsa-encryption-in-ios-and-decrypt-it-using-php/2013-01-05T05:20:00.000Z2024-02-21T10:41:37.613ZI’ve been suffer for few weeks on RSA encryption in iOS. Now I would like to share the way of doing this.
RSA *rsa = [[RSA alloc] init]; if (rsa != nil) { // just post the string to server NSLog(@"%@", [rsa encryptToString:@"This is plaintext"]); } else { NSLog(@"Error"); }
The iOS part is done. Now let’s decrypt in PHP. Before that, let’s download phpseclib for decryption.
]]><p>I’ve been suffer for few weeks on RSA encryption in iOS. Now I would like to share the way of doing this.</p>
<p>First, generate aAjax change dropdown list value with jQueryhttp://jslim.net/blog/2012/12/28/ajax-change-dropdown-list-value-with-jquery/2012-12-28T04:29:00.000Z2024-02-21T10:41:37.613ZA typical example for this is Country and State/Province.
You may have seen some website that provide such a dropdown list. When you change the Country, the State will be reloaded.
]]><p>A typical example for this is <strong>Country</strong> and <strong>State/Province</strong>.</p>
<p>You may have seen some website thatGenerate a random string with JavaScripthttp://jslim.net/blog/2012/12/26/generate-a-random-string-with-javascript/2012-12-26T11:24:00.000Z2024-02-21T10:41:37.613ZIn order to generate a random string, we must first specify length of string and character set
1
2
3
4
5
6
7
8
9
10
11
12
13
14
15
16
functiongenerateRandom(lengthOfString, charset) { // The scope of the character if(charset == null) charset = 'ABCDEFGHIJKLMNOPQRSTUVWXYZabcdefghijklmnopqrstuvwxyz1234567890';
var rand = '';
while(lengthOfString > 0) { /* since the index of char is start from 0, so no need to +1 on the random number we want the range from 0 - lengthOfString */ rand += charset.charAt(Math.floor(Math.random() * charset.length)); lengthOfString--; } return rand; }
]]><p>In order to generate a random string, we must first specify <strong>length of string</strong> and <strong>characterRemove Macbuntu from Ubuntu 12.10http://jslim.net/blog/2012/12/22/remove-macbuntu-from-ubuntu-12-dot-10/2012-12-22T00:23:00.000Z2024-02-21T10:41:37.613ZAbout a month ago, I follow the instruction from here installed some components to make my desktop like OS X.
Unfortunately, I realize that the Cairo-Dock is damn annoying. When I want to click on it, it un-focus; when I don’t want to use it, it focus again. wtf!!!
Thus I decided to remove it.
1 2 3 4 5 6 7 8 9 10 11 12 13 14 15 16 17 18
# change the left dock icon back to ubuntu icon $ wget -O ubuntu-logo.zip http://goo.gl/mU42p $ sudo unzip ubuntu-logo.zip -d /usr/share/unity/6/ # It will ask to replace file, Type "A" and Press enter $ rm ubuntu-logo.zip # Uninstall Mac cursor $ cd /usr/share/icons/mac-cursors $ ./uninstall-mac-cursors.sh # Enable back the crash report $ cd $ sudo sed -i "s/enabled=0/enabled=1/g"'/etc/default/apport' # Finally, remove the cairo-dock $ sudo apt-get purge cairo-dock cairo-dock-plug-ins && sudo apt-get autoremove
Lastly, change back to Ubuntu original theme. Search for appearance
]]><p>About a month ago, I follow the instruction from <aiOS: UITabelView - didSelectRowAtIndexPath is not calledhttp://jslim.net/blog/2012/12/21/ios-uitabelview-didselectrowatindexpath-is-not-called/2012-12-21T07:03:00.000Z2024-02-21T10:41:37.613ZI had come across a problem which didSelectRowAtIndexPath doesn’t execute when I tap the cell.
I forgot to remove willSelectRowAtIndexPath in ViewController.
]]><p>I had come across a problem which didSelectRowAtIndexPath doesn’t execute when I tap the cell.</p>
<figure class="highlightCrawling sequantial images with shell scripthttp://jslim.net/blog/2012/12/19/crawling-sequantial-images-with-shell-script/2012-12-19T14:43:00.000Z2024-02-21T10:41:37.613ZLet say you want to download from http://www.domain.com/images/, and you know that the images name is from 001 to 100
Lets write a shell script
1 2 3 4 5 6 7
#!/bin/bash max=100 for i in `seq 1 $max` do url=`printf"http://www.domain.com/images/%03d.jpg"$i` wget $url done
First declare a maximum number for the images’ name
Write a for loop to iterate through from 1 _(as the images’ name is start from 1)_to the maximum
The command inside backquote (`) basically is refer to sub-command which will pass the output to the url. In this case is using printf to format the image name with trailing **00** in front if it then store in url variable
Finally use wget to download the images
]]><p>Let say you want to download from <strong><a href="http://www.domain.com/images/">http://www.domain.com/images/</a></strong>, and youHow $_POST store array elements in PHPhttp://jslim.net/blog/2012/12/08/how-$-post-store-array-elements-in-php/2012-12-08T02:17:00.000Z2024-02-21T10:41:37.613ZSometime we need an array form elements like this
]]><p>Sometime we need an array form elements like this</p>
<figure class="highlight html"><table><tr><td class="gutter"><pre><spanOS X failed bundle installhttp://jslim.net/blog/2012/12/08/os-x-failed-bundle-install/2012-12-08T02:10:00.000Z2024-02-21T10:41:37.613ZWhen I try to setup octopress in OS X, I run bundle install, it always come out an error like:
$ bundle install Fetching gem metadata from http://rubygems.org/....... Fetching gem metadata from http://rubygems.org/.. /Users/jslim/.rvm/gems/ruby-1.9.3-p327@global/gems/bundler-1.2.3/lib/bundler.rb:263: warning: Insecure world writable dir /usr/local/bin inPATH, mode 040777 Using rake (0.9.2.2) InstallingRedCloth (4.2.9) with native extensions Gem::Installer::ExtensionBuildError: ERROR: Failed to build gem native extension.
/Users/jslim/.rvm/rubies/ruby-1.9.3-p327/bin/ruby extconf.rb checking for main() in-lc...*** extconf.rb failed *** Could not create Makefile due to some reason, probably lack of necessary libraries and/or headers. Check the mkmf.log file for more details. You may need configuration options.
Provided configuration options: --with-opt-dir --without-opt-dir --with-opt-include --without-opt-include=${opt-dir}/include --with-opt-lib --without-opt-lib=${opt-dir}/lib --with-make-prog --without-make-prog --srcdir=. --curdir --ruby=/Users/jslim/.rvm/rubies/ruby-1.9.3-p327/bin/ruby --with-redcloth_scan-dir --without-redcloth_scan-dir --with-redcloth_scan-include --without-redcloth_scan-include=${redcloth_scan-dir}/include --with-redcloth_scan-lib --without-redcloth_scan-lib=${redcloth_scan-dir}/lib --with-clib --without-clib /Users/jslim/.rvm/rubies/ruby-1.9.3-p327/lib/ruby/1.9.1/mkmf.rb:369:in `try_do': The compiler failed to generate an executable file. (RuntimeError) You have to install development tools first. from /Users/jslim/.rvm/rubies/ruby-1.9.3-p327/lib/ruby/1.9.1/mkmf.rb:449:in `try_link0' from /Users/jslim/.rvm/rubies/ruby-1.9.3-p327/lib/ruby/1.9.1/mkmf.rb:464:in `try_link' from /Users/jslim/.rvm/rubies/ruby-1.9.3-p327/lib/ruby/1.9.1/mkmf.rb:607:in `try_func' from /Users/jslim/.rvm/rubies/ruby-1.9.3-p327/lib/ruby/1.9.1/mkmf.rb:833:in `block in have_library' from /Users/jslim/.rvm/rubies/ruby-1.9.3-p327/lib/ruby/1.9.1/mkmf.rb:778:in `block in checking_for' from /Users/jslim/.rvm/rubies/ruby-1.9.3-p327/lib/ruby/1.9.1/mkmf.rb:272:in `block (2 levels) in postpone' from /Users/jslim/.rvm/rubies/ruby-1.9.3-p327/lib/ruby/1.9.1/mkmf.rb:242:in `open' from /Users/jslim/.rvm/rubies/ruby-1.9.3-p327/lib/ruby/1.9.1/mkmf.rb:272:in `block in postpone' from /Users/jslim/.rvm/rubies/ruby-1.9.3-p327/lib/ruby/1.9.1/mkmf.rb:242:in `open' from /Users/jslim/.rvm/rubies/ruby-1.9.3-p327/lib/ruby/1.9.1/mkmf.rb:268:in `postpone' from /Users/jslim/.rvm/rubies/ruby-1.9.3-p327/lib/ruby/1.9.1/mkmf.rb:777:in `checking_for' from /Users/jslim/.rvm/rubies/ruby-1.9.3-p327/lib/ruby/1.9.1/mkmf.rb:828:in `have_library' from extconf.rb:5:in `<main>'
Gem files will remain installed in/Users/jslim/.rvm/gems/ruby-1.9.3-p327/gems/RedCloth-4.2.9for inspection. Results logged to /Users/jslim/.rvm/gems/ruby-1.9.3-p327/gems/RedCloth-4.2.9/ext/redcloth_scan/gem_make.out An error occurred while installing RedCloth (4.2.9), and Bundler cannot continue. Make sure that `gem install RedCloth-v '4.2.9'` succeeds before bundling.
]]><p>When I try to setup octopress in OS X, I run <code>bundle install</code>, it always come out an error like:</p>
<figure class="highlightls command in OS Xhttp://jslim.net/blog/2012/12/08/ls-command-in-os-x/2012-12-08T02:06:00.000Z2024-02-21T10:41:37.613Zls by default in OS X has no --group-directories-first
]]><p><code>ls</code> by default in OS X has no <code>--group-directories-first</code></p>
<p>Open up your terminal</p>
<figureDelete Linux partition from dual-boot (Windows 7 & Linux)http://jslim.net/blog/2012/11/30/delete-linux-partition-from-dual-boot-windows-7-and-linux/2012-11-30T12:35:00.000Z2024-02-21T10:41:37.613ZFirst time I did this by just delete the partition via Disk Management on Windows 7. What is the consequence?
It turn up totally cannot boot into any OSes. That is be cause the GRUB bootloader is removed together. This take me half day to figure it out, and struggling me.
Here is the step on how to safely remove the Linux.
Using Windows 7 boot disc
Select a language, a time, a currency, a keyboard or an input method, and then click Next.
Choose Repair your computer.
Choose the option that you want to repair.
You’ll see some thing like this, then select Command Prompt.
Type some command in cmd
1
2
bootrec.exe /fixmbr bootrec.exe /fixboot
Then reboot your machine. It should auto-boot into Windows 7 without letting you to select OSes.
Delete and extend partition
Now click on start menu and search for Computer Management
Click on Disk Management
Right-click the partition that you want to delete (i.e. Linux partition in this case). Then select Delete Volume…
You’ll get a Free Space. Now right-click the Free Space and Delete Partition…
Now you get an Unallocated space. Right-click the drive before the Unallocated space (i.e. D-drive in this case). Select Extend Volume…
Finally, your drive has more space ^^
]]><p>First time I did this by just delete the partition via <a href="http://www.softwareok.com/?seite=faq-Win-7&faq=15">Disk Management</a>Switch Fedora 17 to classic modehttp://jslim.net/blog/2012/11/27/switch-fedora-17-to-classic-mode/2012-11-27T11:31:00.000Z2024-02-21T10:41:37.613ZAlthough the OS that I like the most is Ubuntu 11.04. Unfortunately, a lot of new packages or drivers were not supported. Thus, I give myself to try on other distro — Fedora 17
]]><p>Although the OS that I like the most is <a href="http://old-releases.ubuntu.com/releases/natty/">Ubuntu 11.04</a>. Unfortunately, a lotSetup Subversion server with HTTP on Ubuntu 11.04http://jslim.net/blog/2012/11/25/setup-subversion-server-with-http-on-ubuntu-11-dot-04/2012-11-25T11:43:00.000Z2024-02-21T10:41:37.613ZInstall Apache server and subversion
NOTE: -c option should only be used on the first time when you create a user as the user doesn’t exists. -m option is to specify the MD5 encryption on the password.
# Assign userto a project [proj_name:/path/to/proj] @group1 = rw # Have read-writeaccess @group2 = r # Only have readaccess, cannot commit the changes user7 = rw # A standalone user who doesn't belongs to any group
NOTE: alias (@) is used to indicate it is a group, the alias must put as a prefix
Testing
1
$ svn co http://localhost/svn/project_name project_name
Caution: For create user group and assign to specific project, it doesn’t work correctly, I still discovering. If you know what I’m wrong, please email to jslim89@gmail.com
]]><h3 id="Install-Apache-server-and-subversion"><a href="#Install-Apache-server-and-subversion" class="headerlink" title="Install ApacheEmbed GVIM into Eclipse with Eclim on Ubuntuhttp://jslim.net/blog/2012/11/24/embed-gvim-into-eclipse-with-eclim-on-ubuntu/2012-11-24T07:55:00.000Z2024-02-21T10:41:37.613ZEclim allowed us to embed Vim into Eclipse.
Install JDK and Eclipse. NOTE: Installation of Eclipse is same as Installation of JDK. Just have to append export ECLIPSE_HOME='/opt/eclipse' after the export JAVA_HOME line and append :${ECLIPSE_HOME} to the end of export PATH.
]]><p><a href="http://eclim.org/">Eclim</a> allowed us to embed <a href="http://www.vim.org/">Vim</a> into <aJDK installation on Ubuntuhttp://jslim.net/blog/2012/11/22/jdk-installation-on-ubuntu/2012-11-22T14:25:00.000Z2024-02-21T10:41:37.613ZThere may have many ways to install Java on Ubuntu. However, in this example I’ll show the manual way which is download the JDK from the official website.
There are few steps here:
Extract it and move to /opt directory.
1 2
$ tar -zxvf jdk_<version>.tar.gz $ sudo mv jdk_<version> /opt/# NOTE: /opt is a directory like `Program file` in Windows
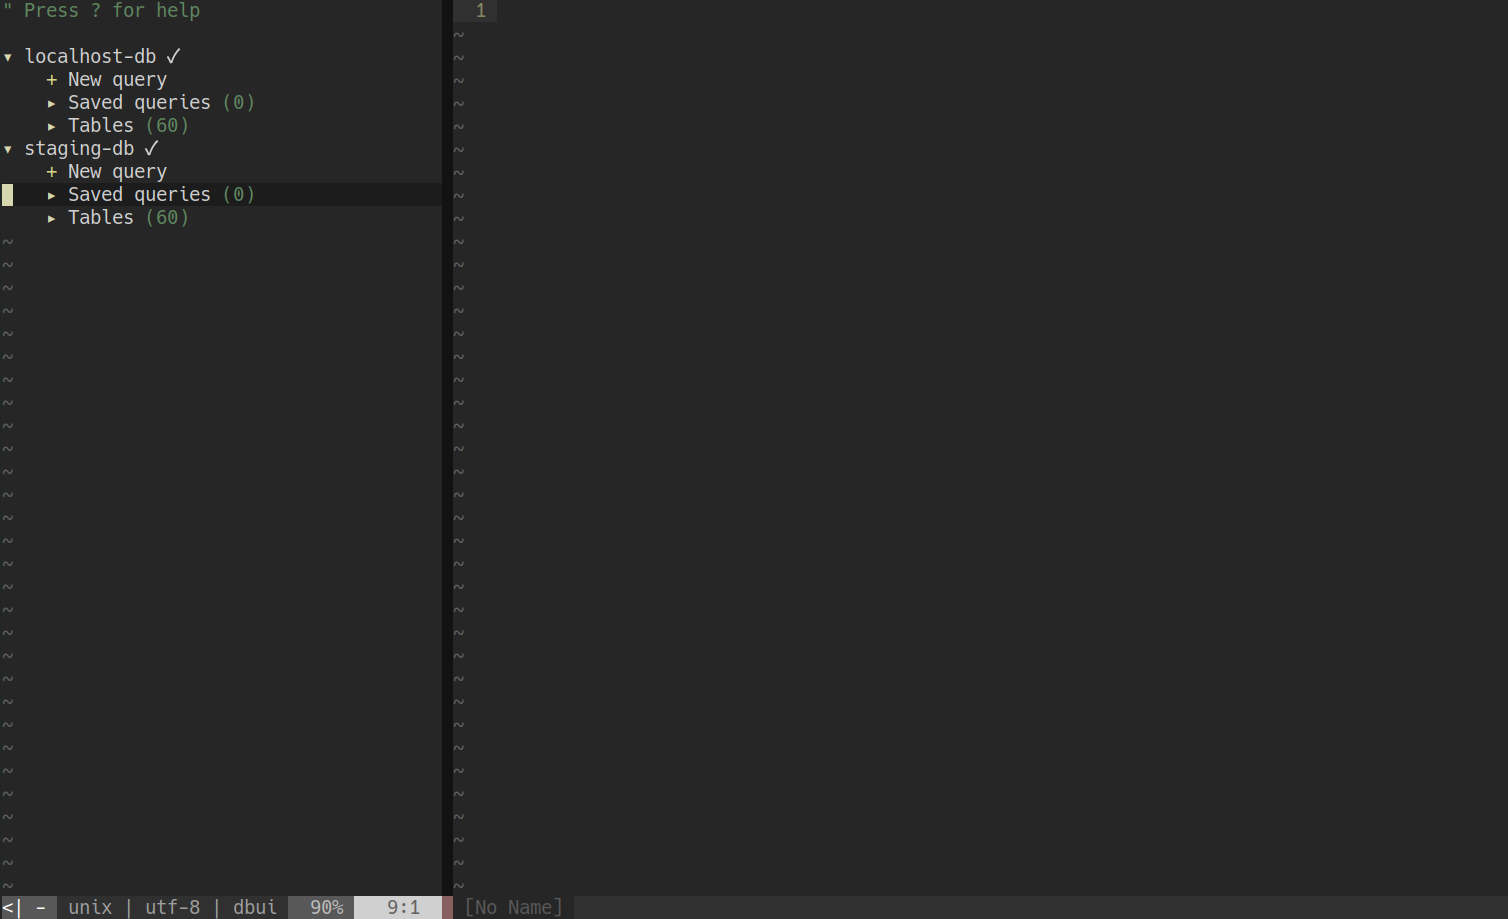


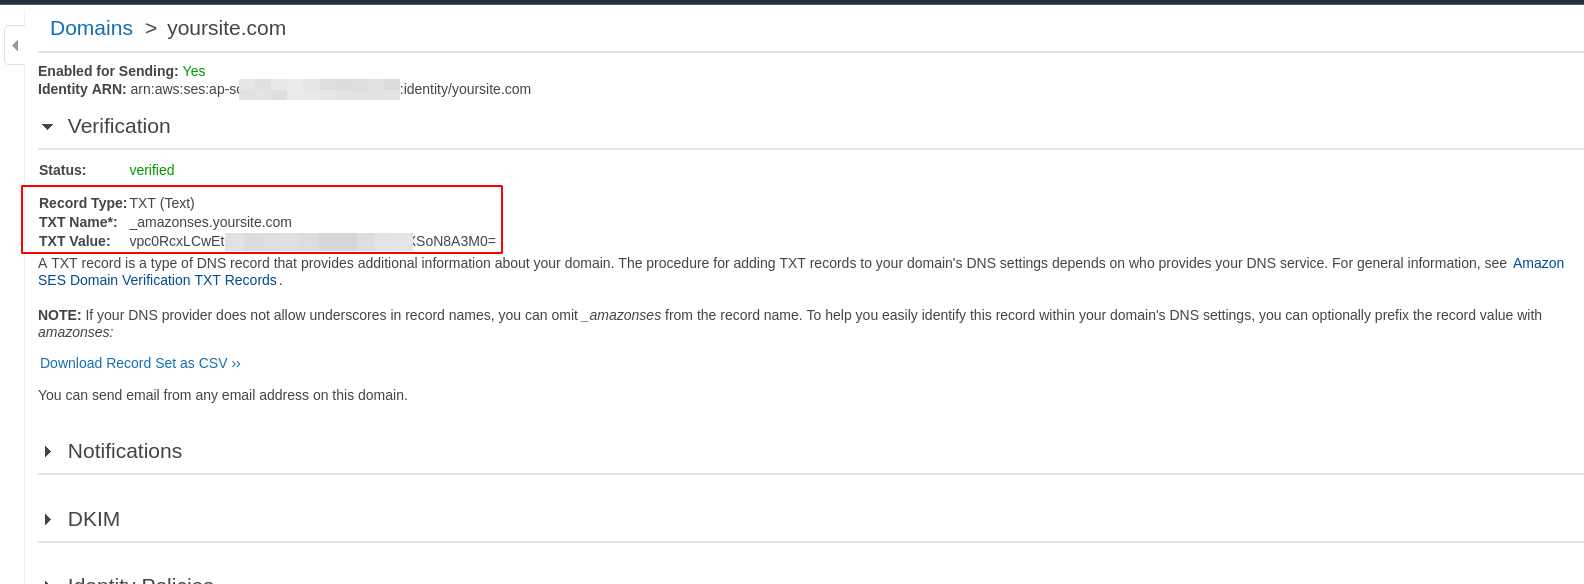
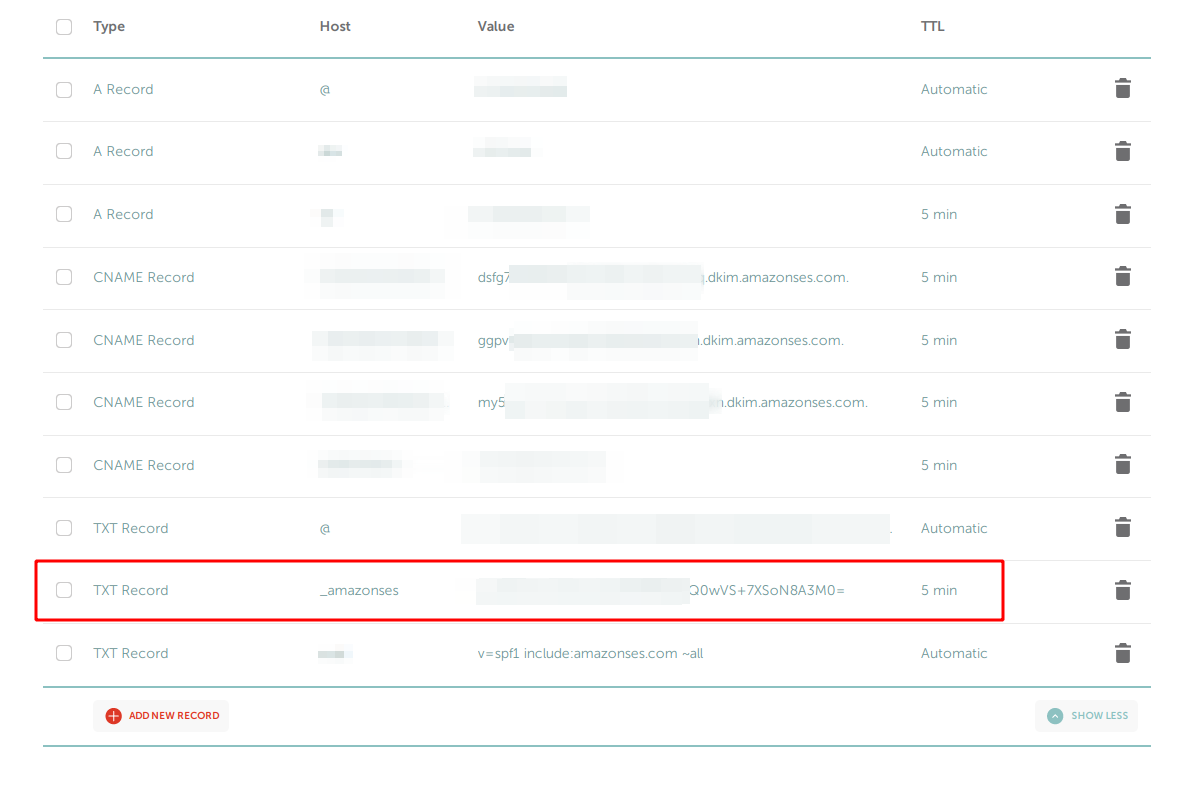
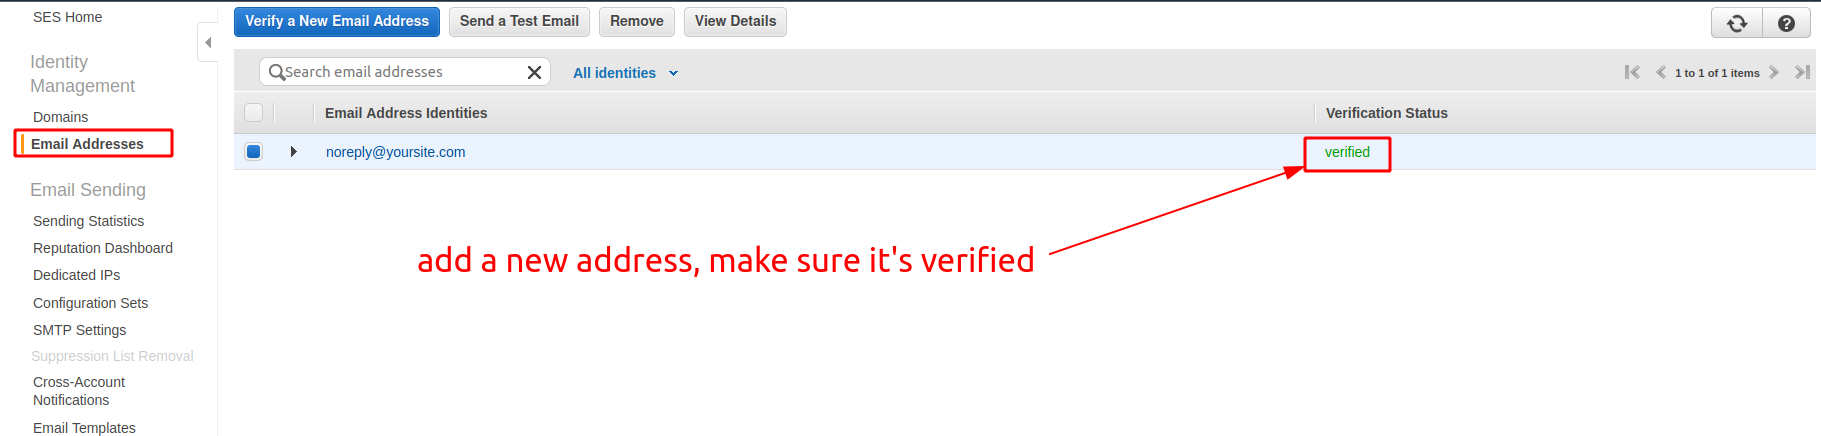
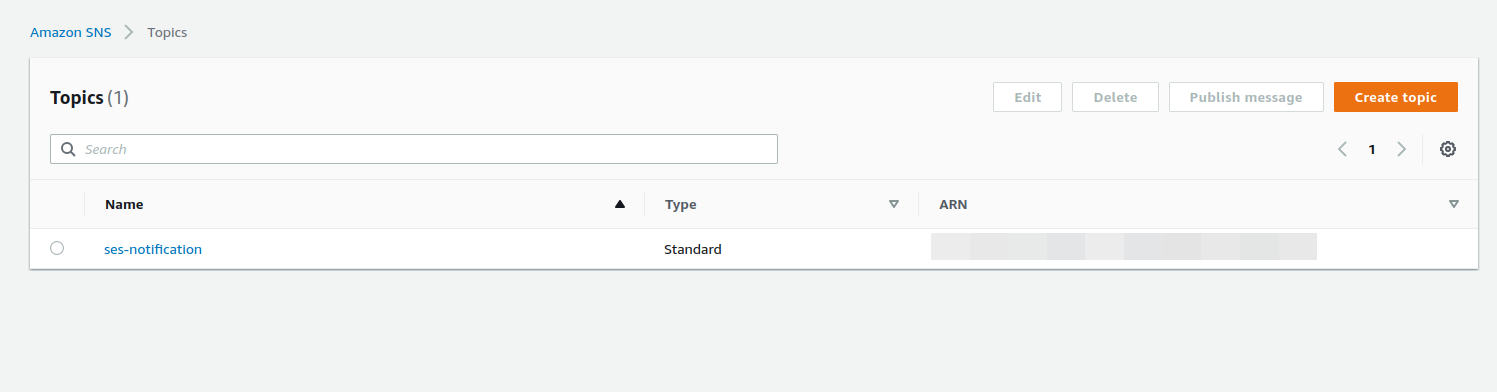
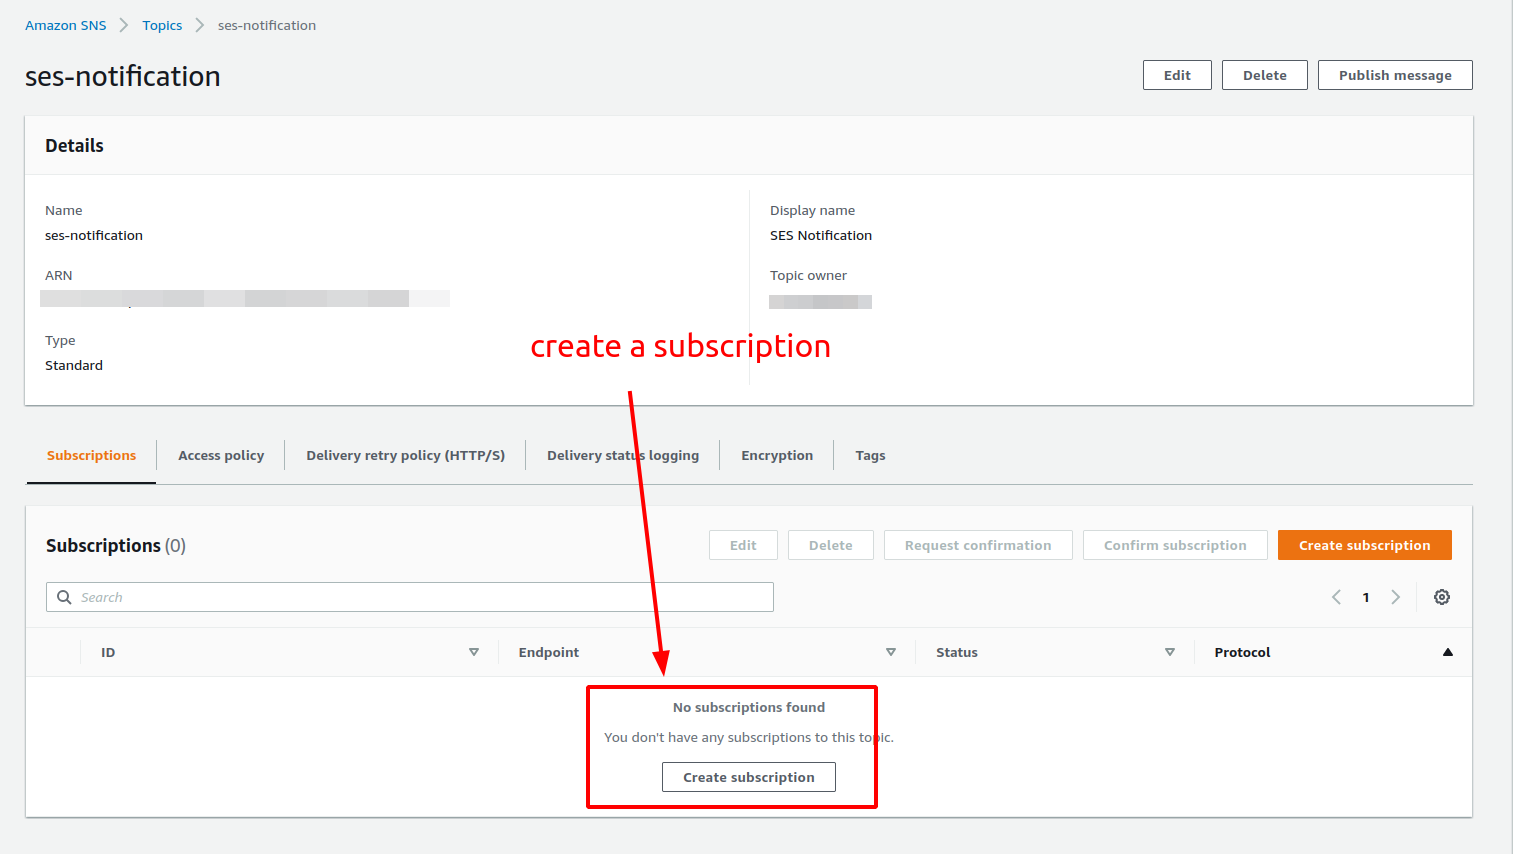
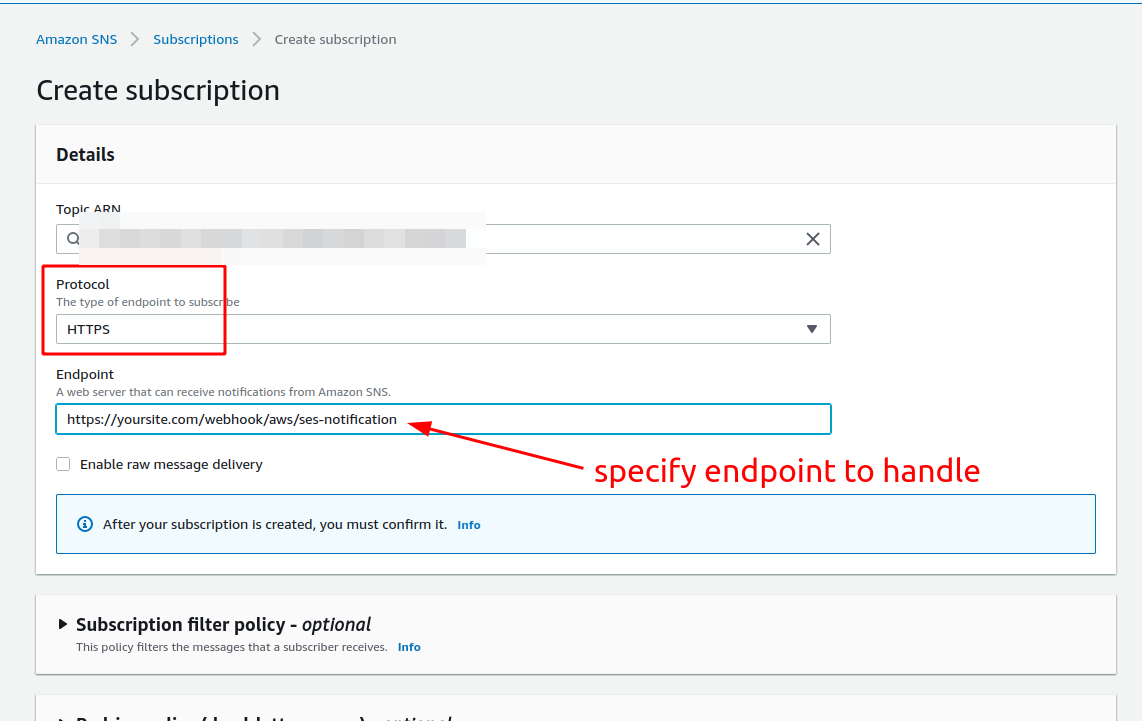
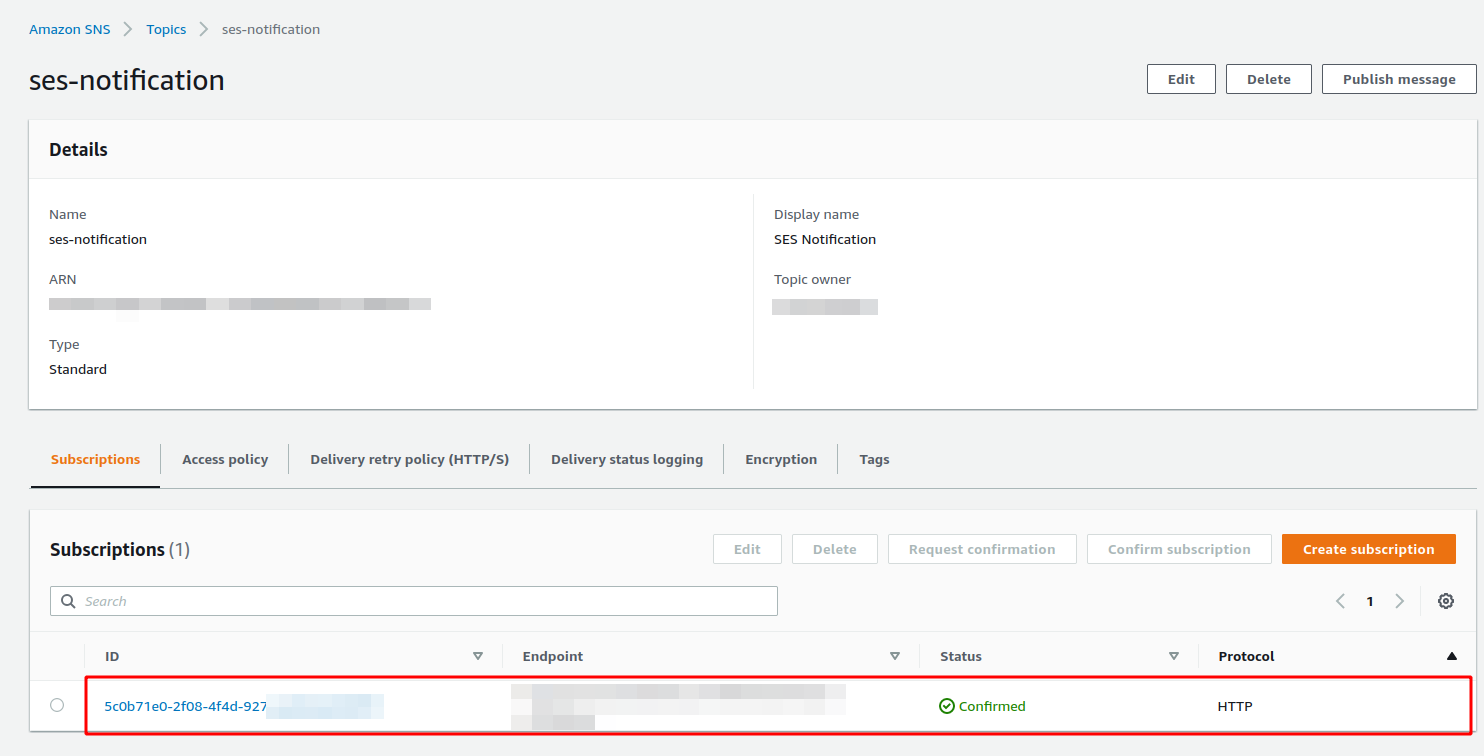
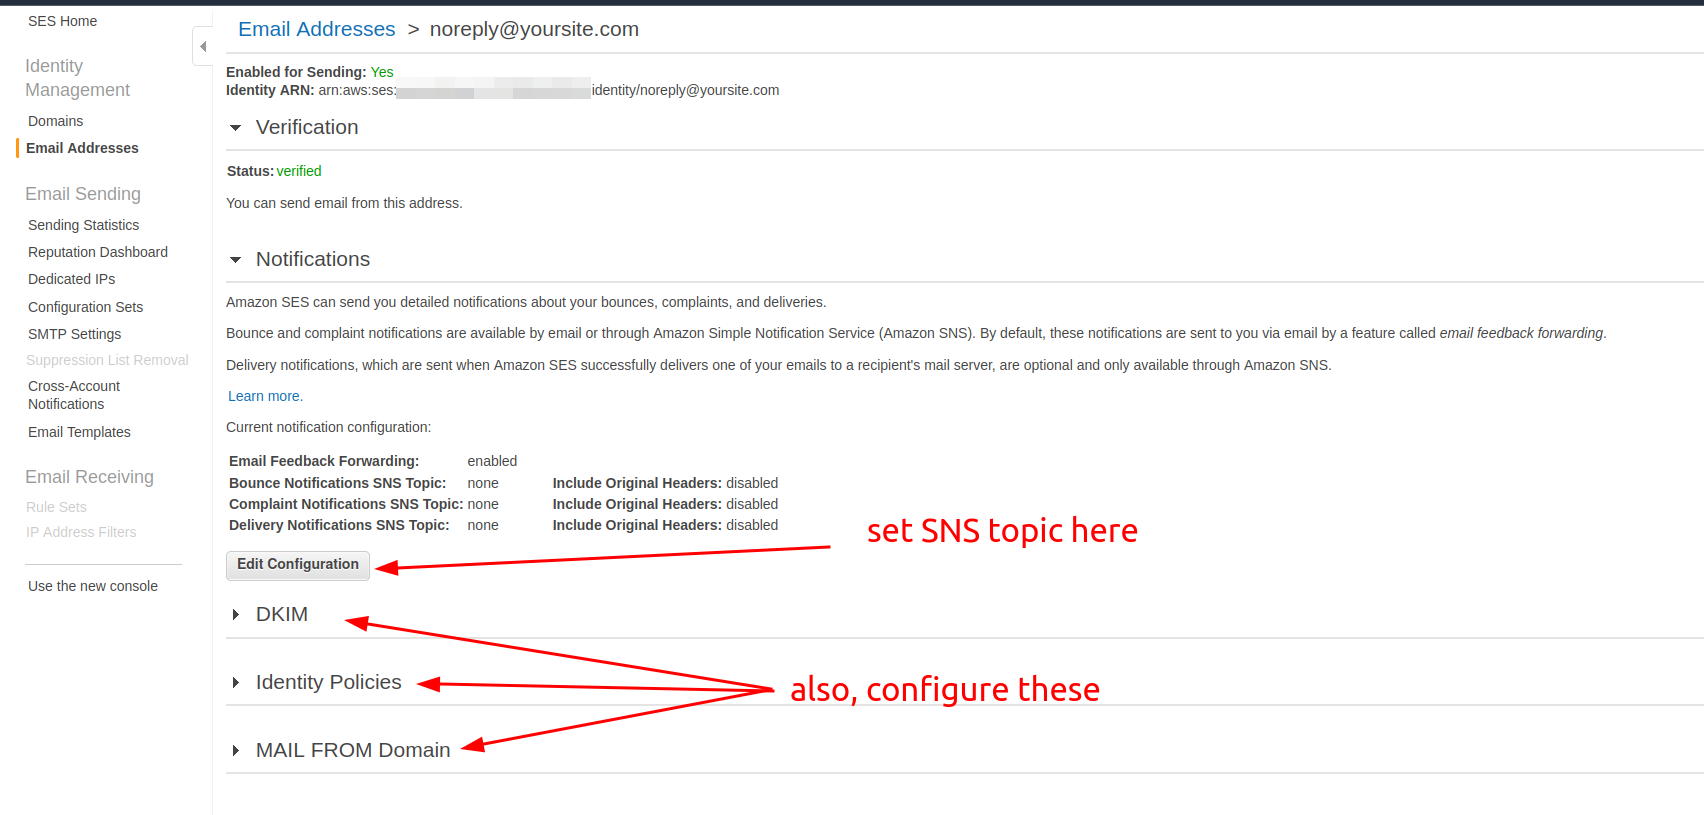
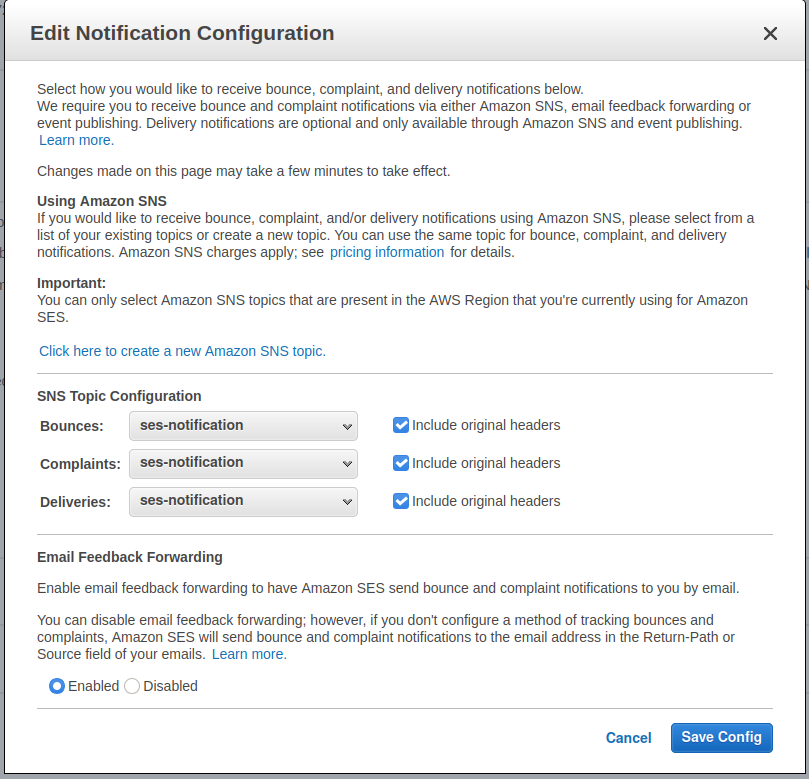
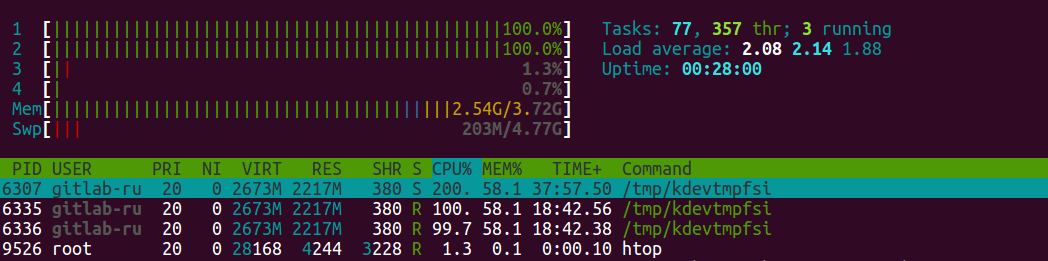
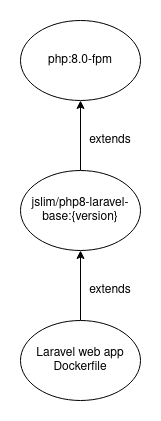
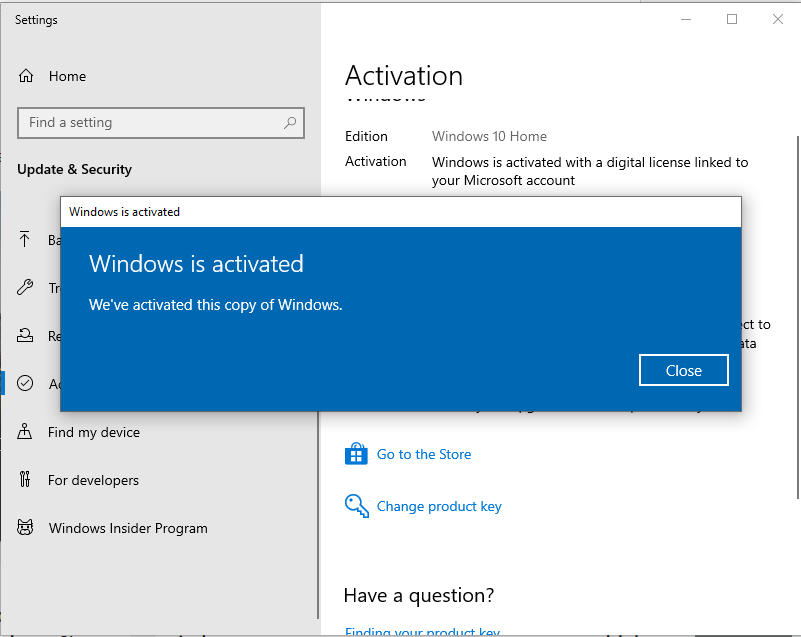
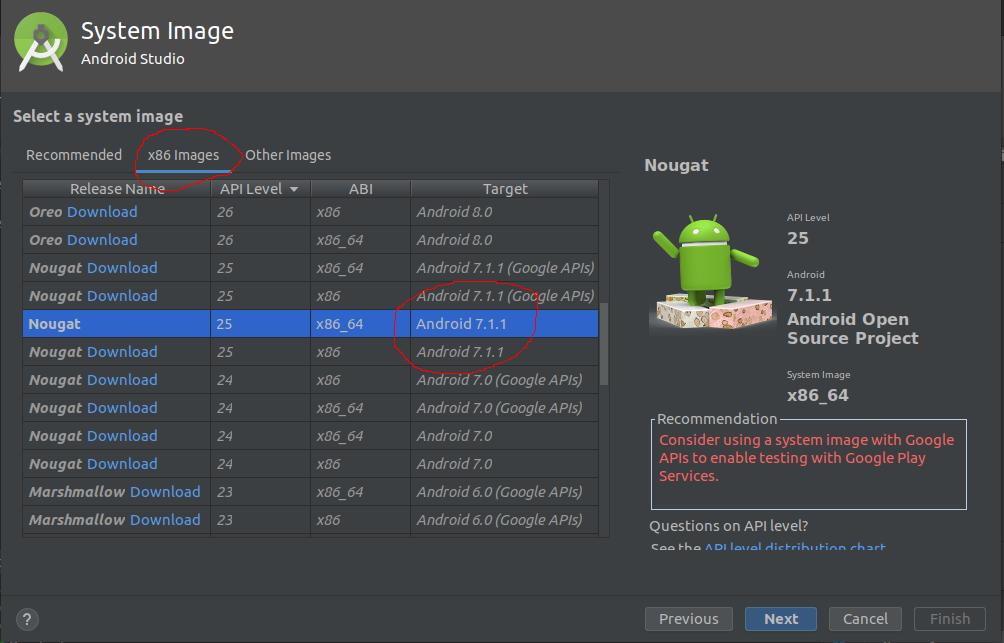
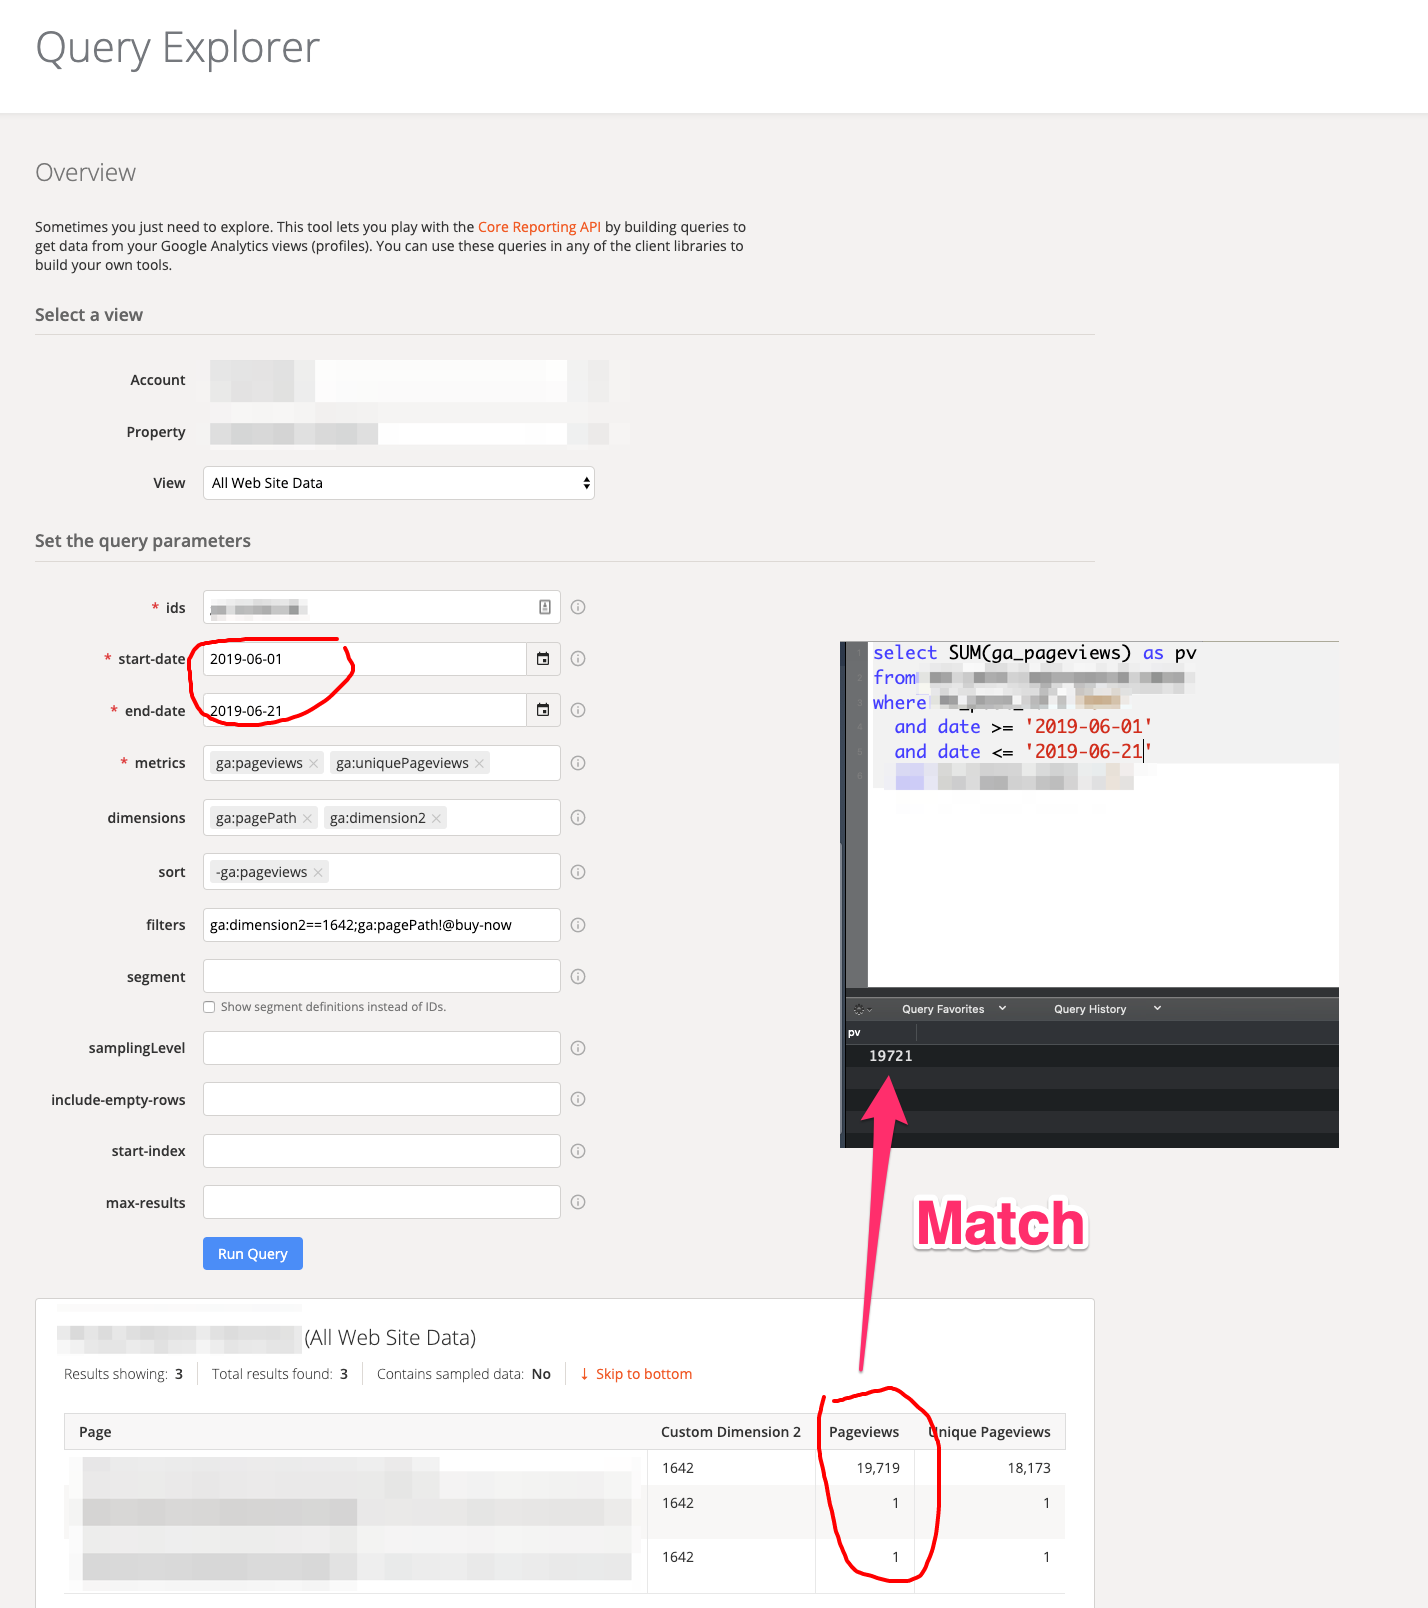
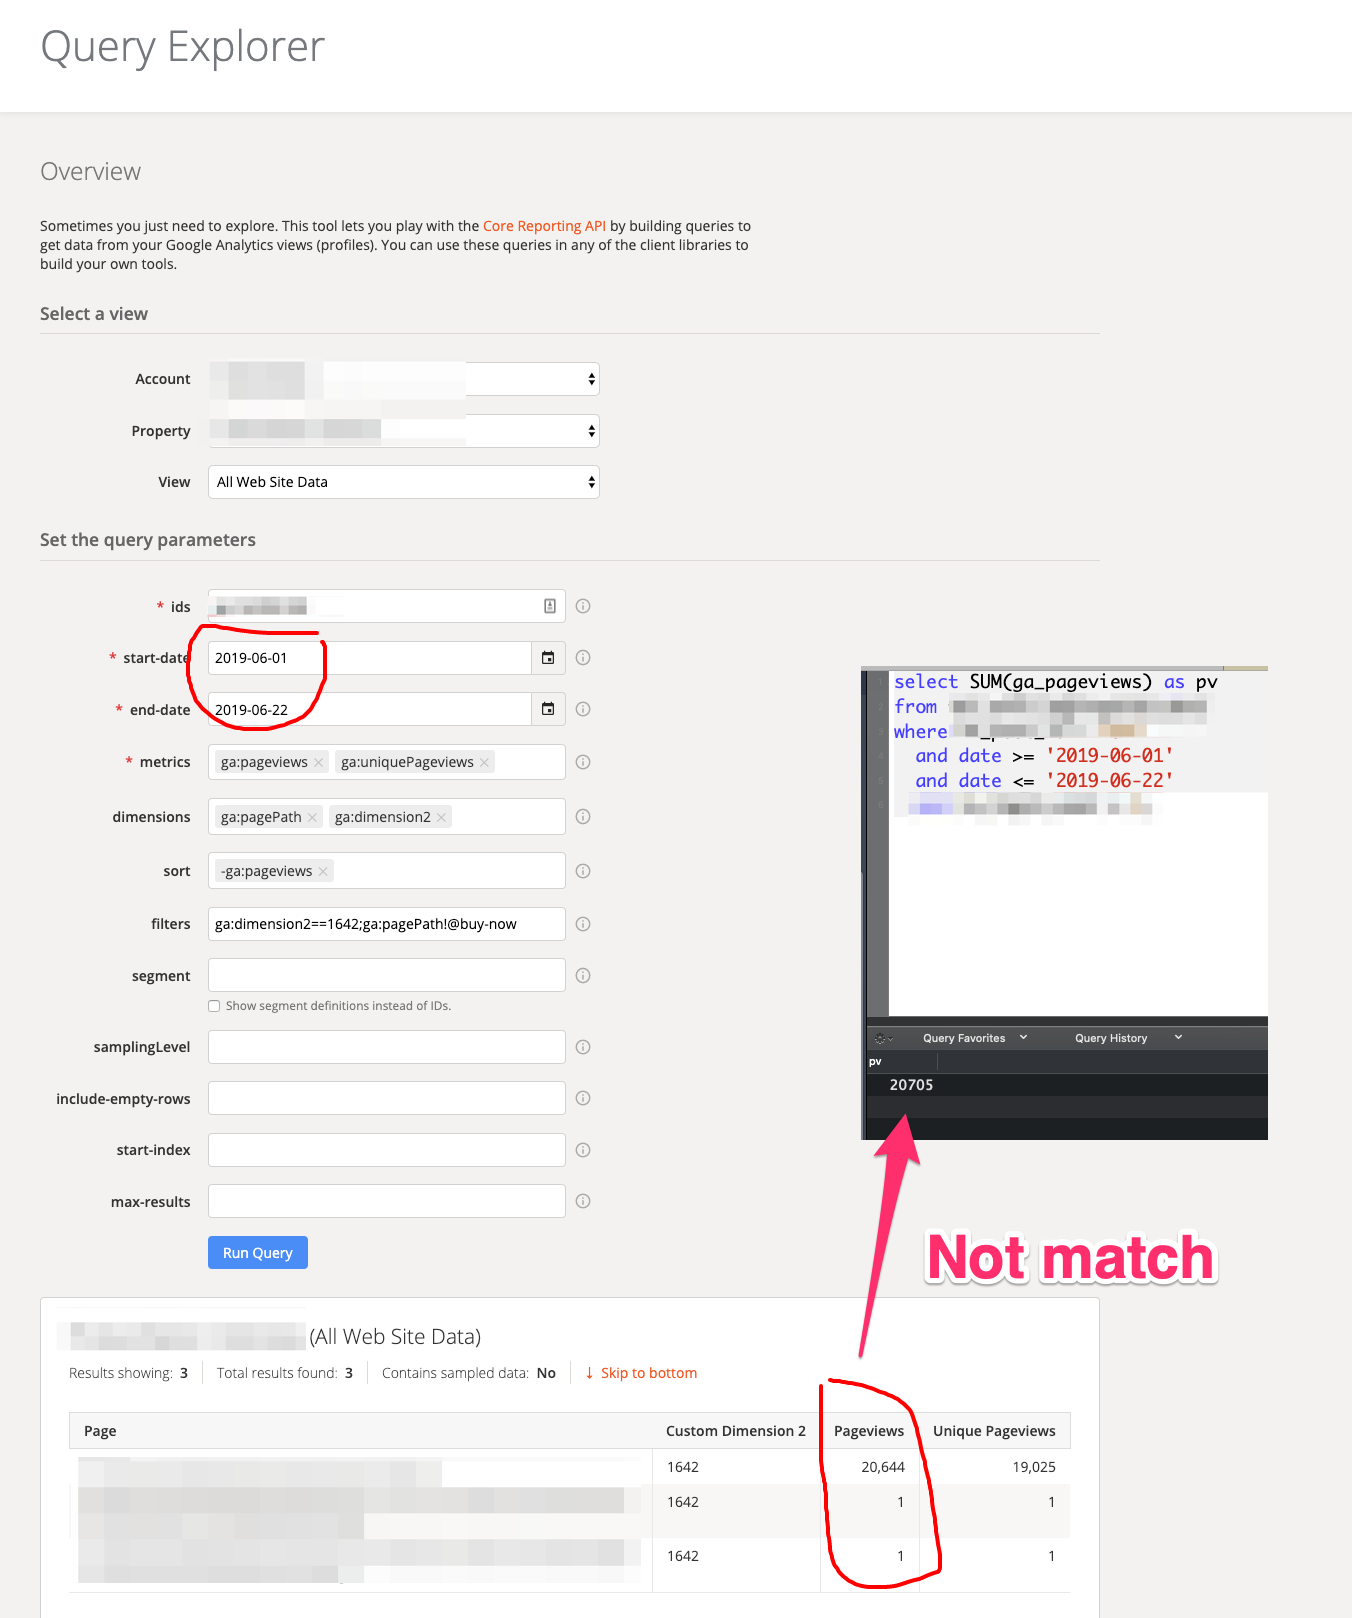
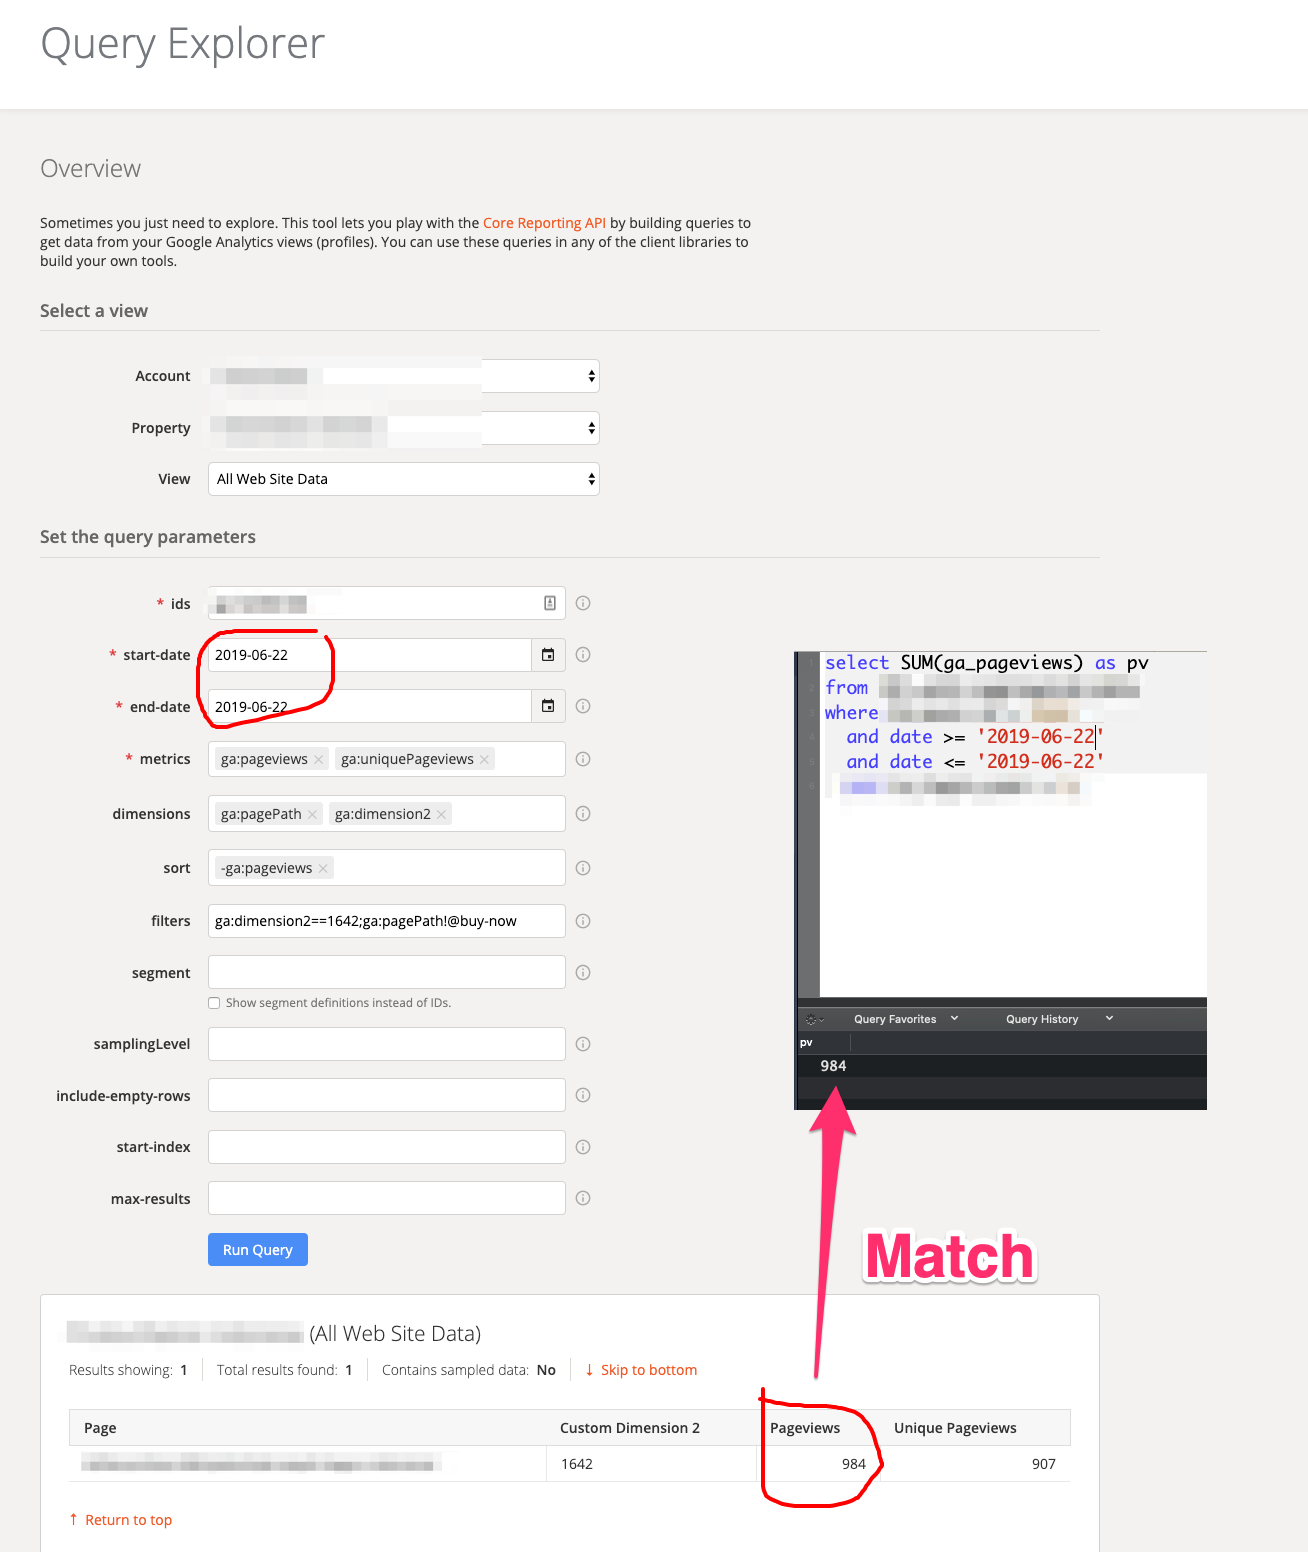
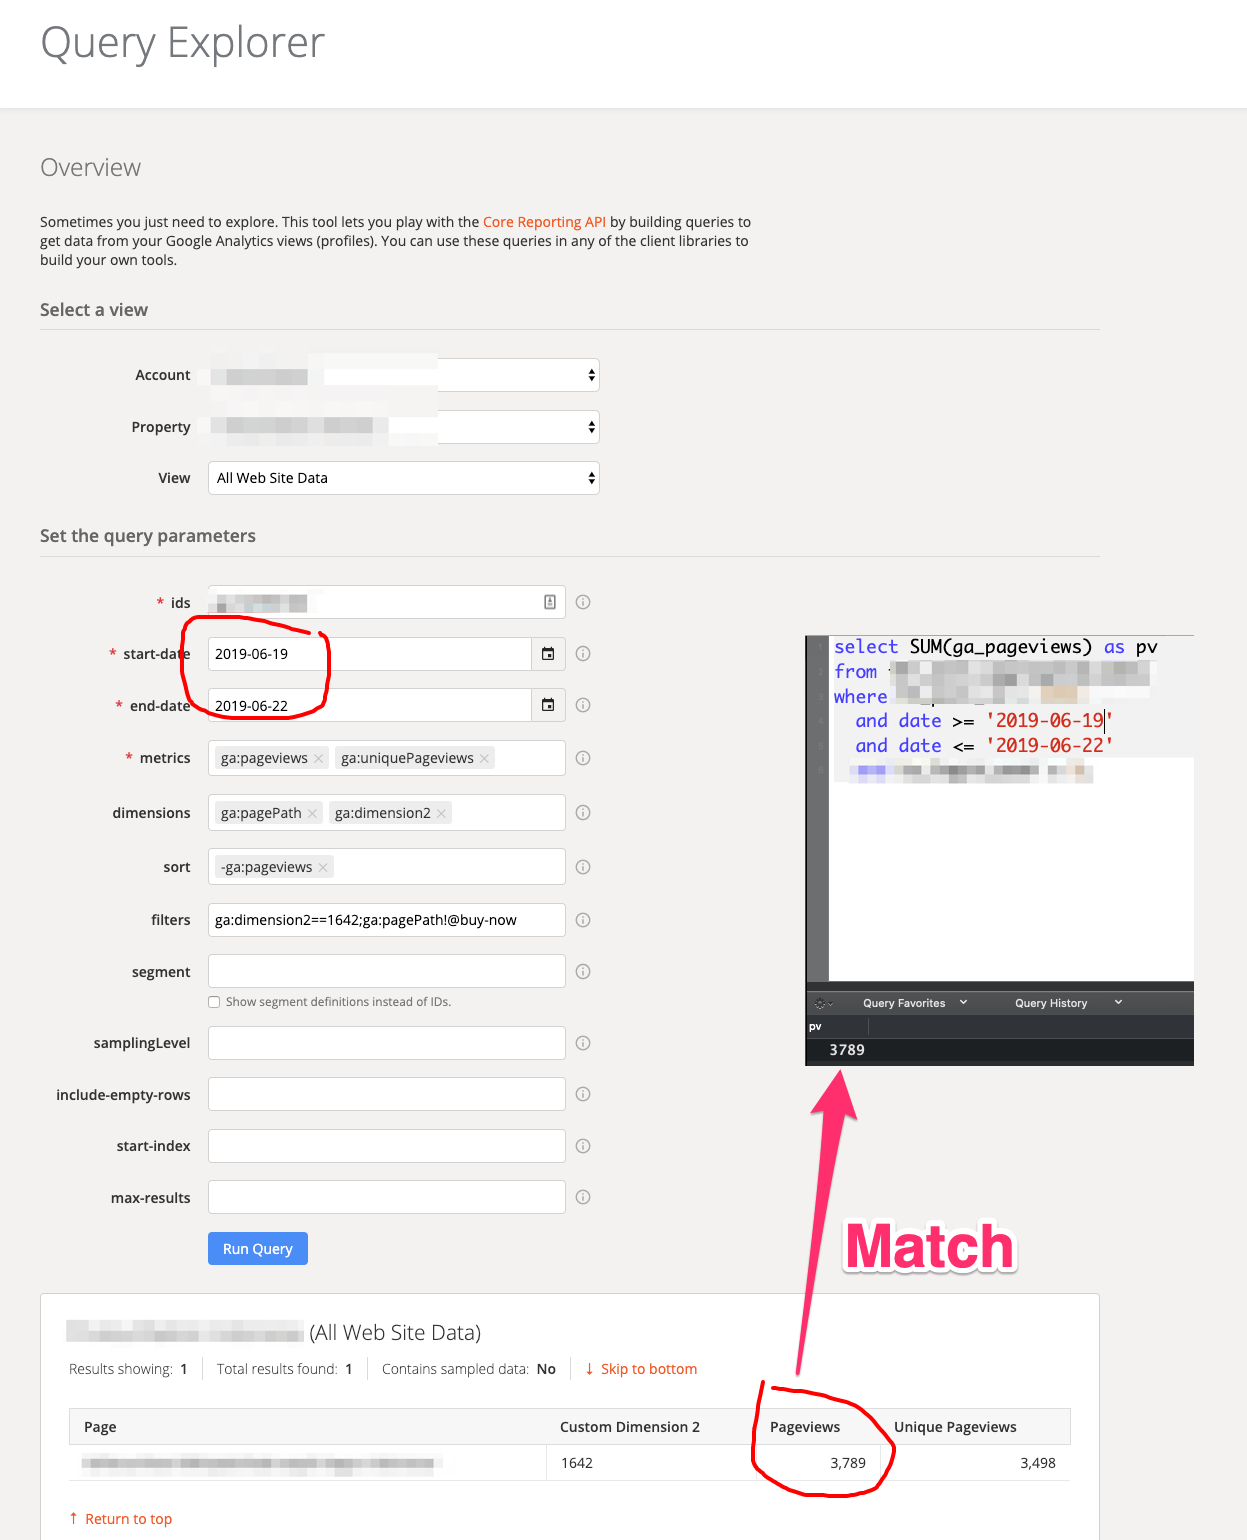
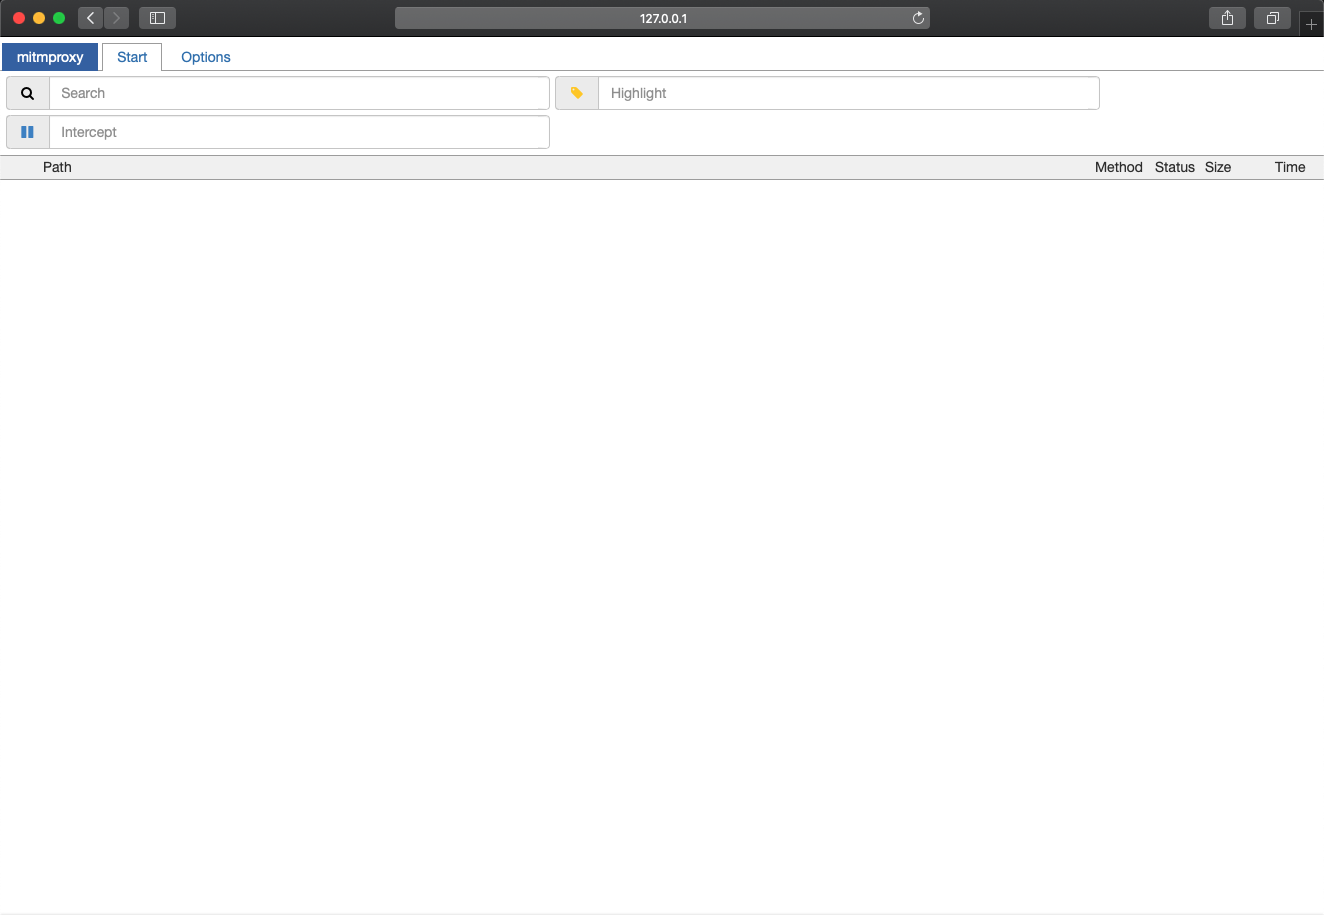
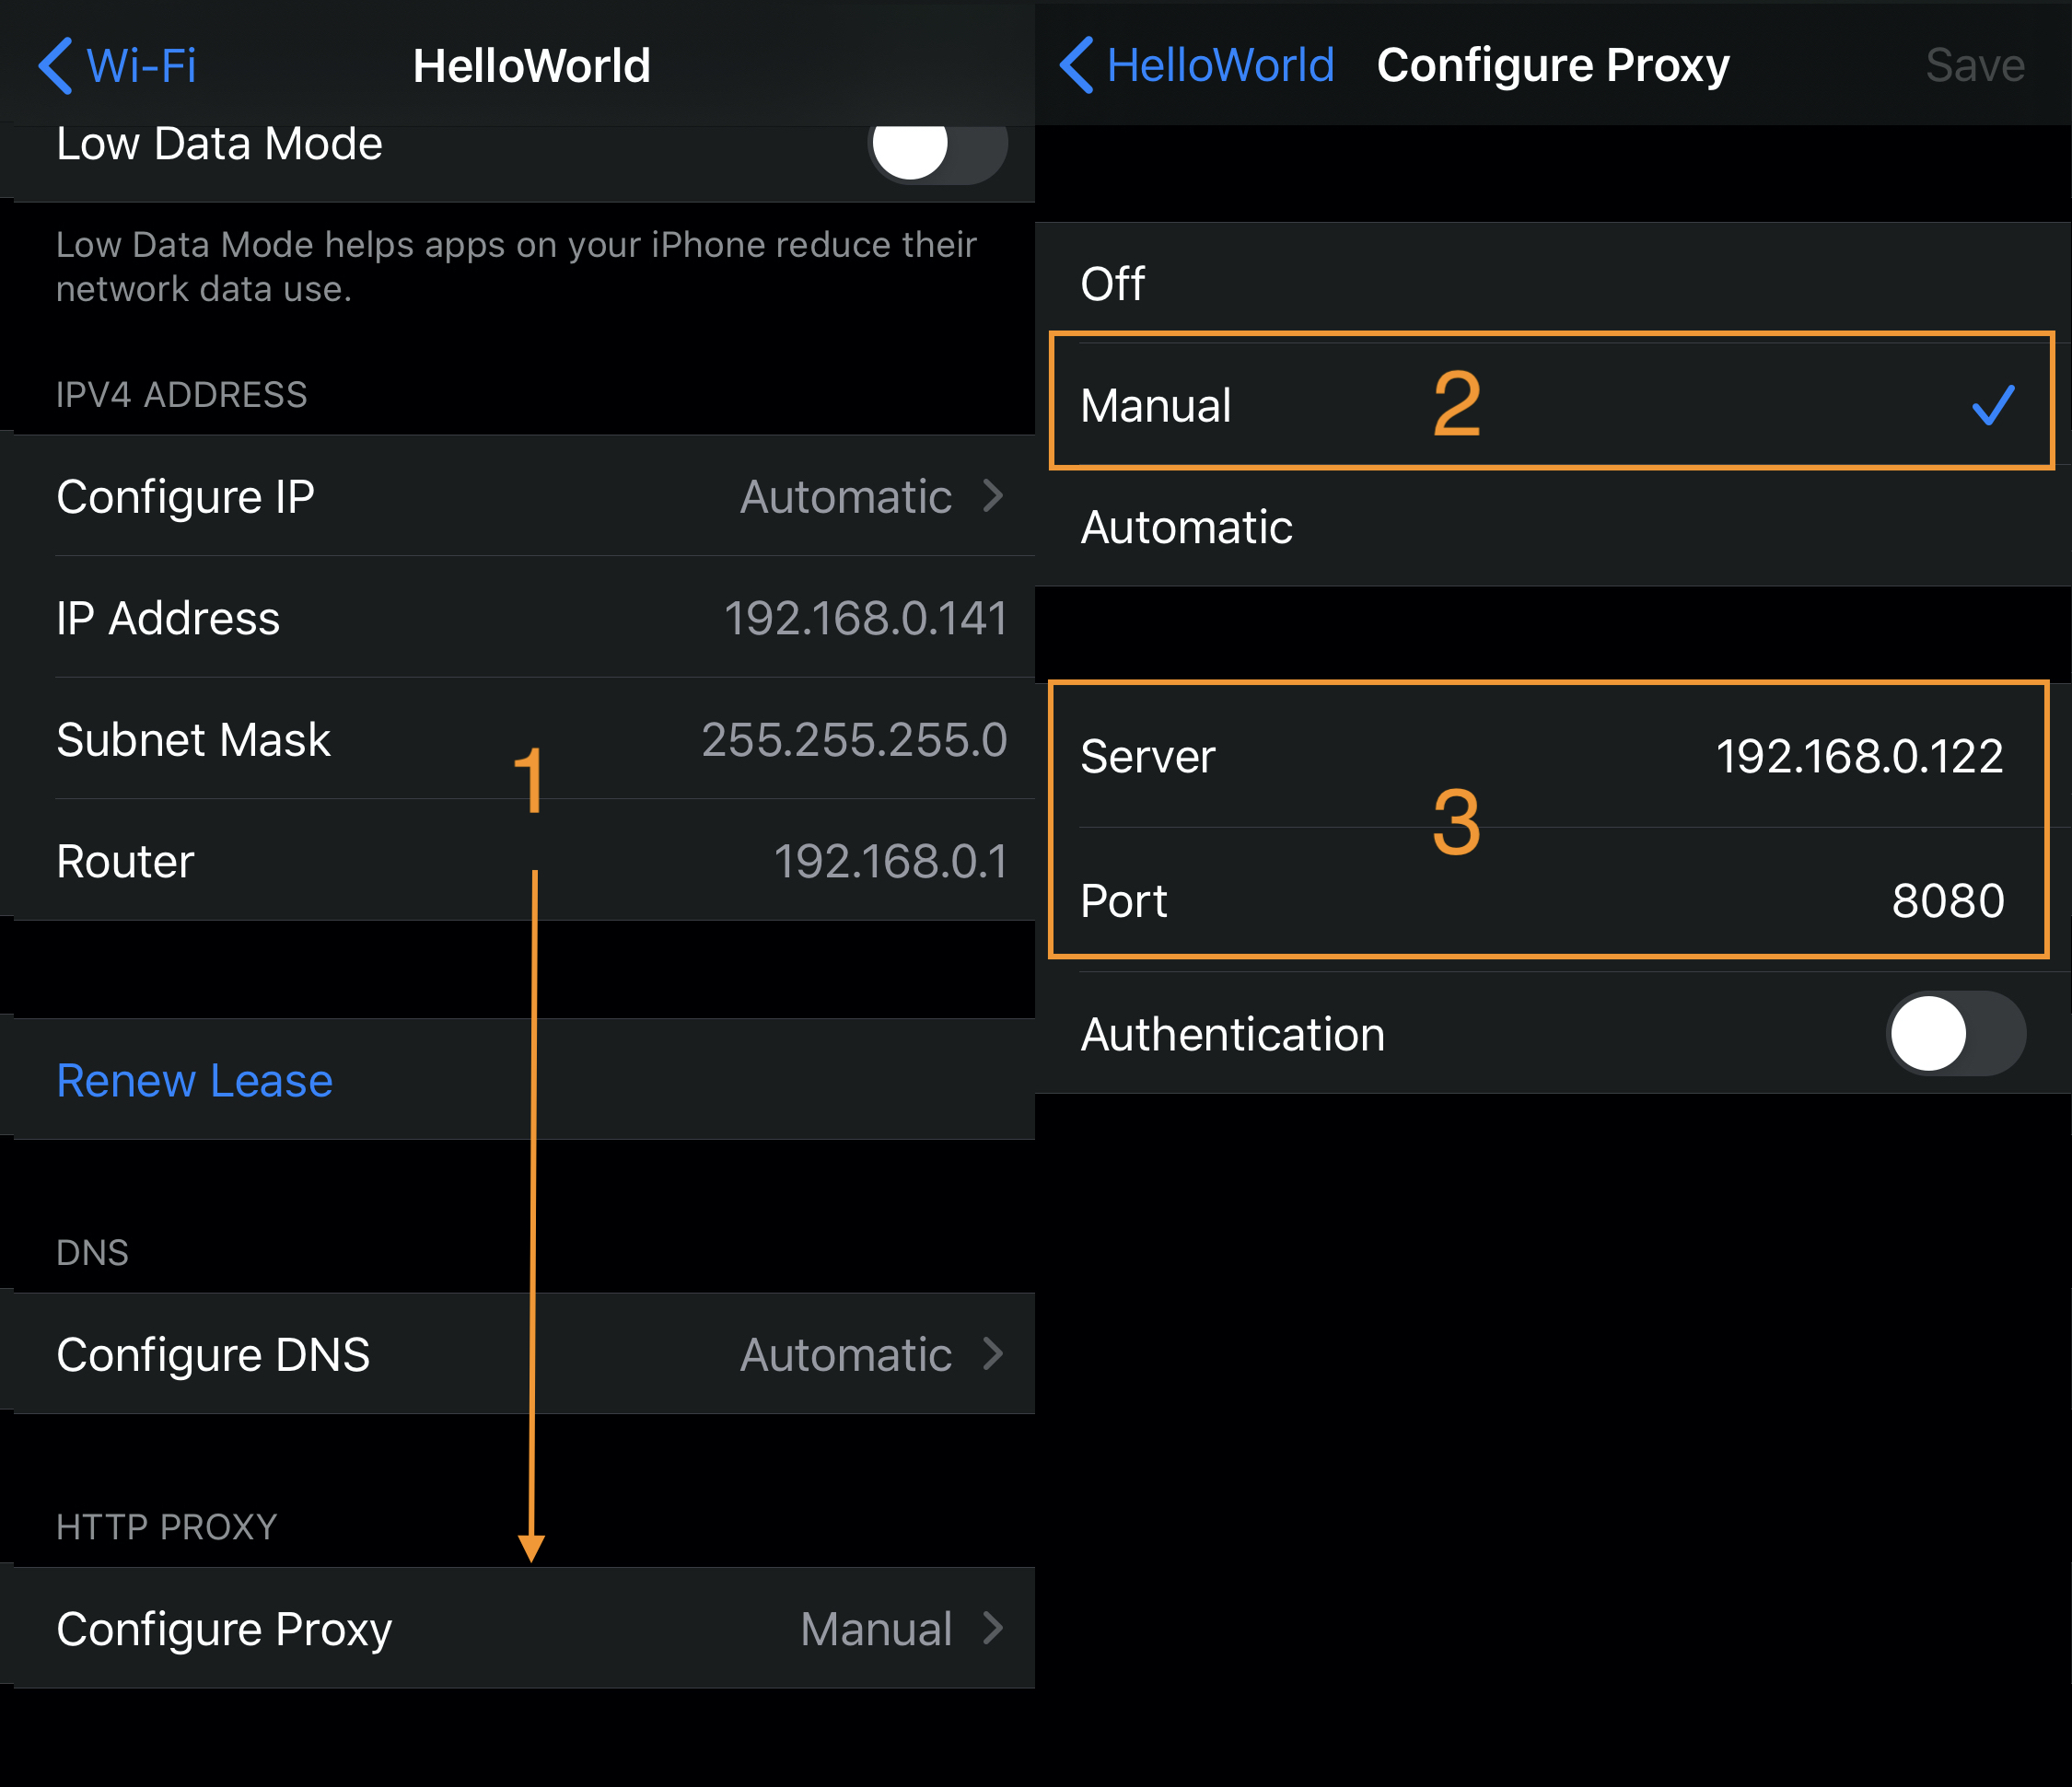
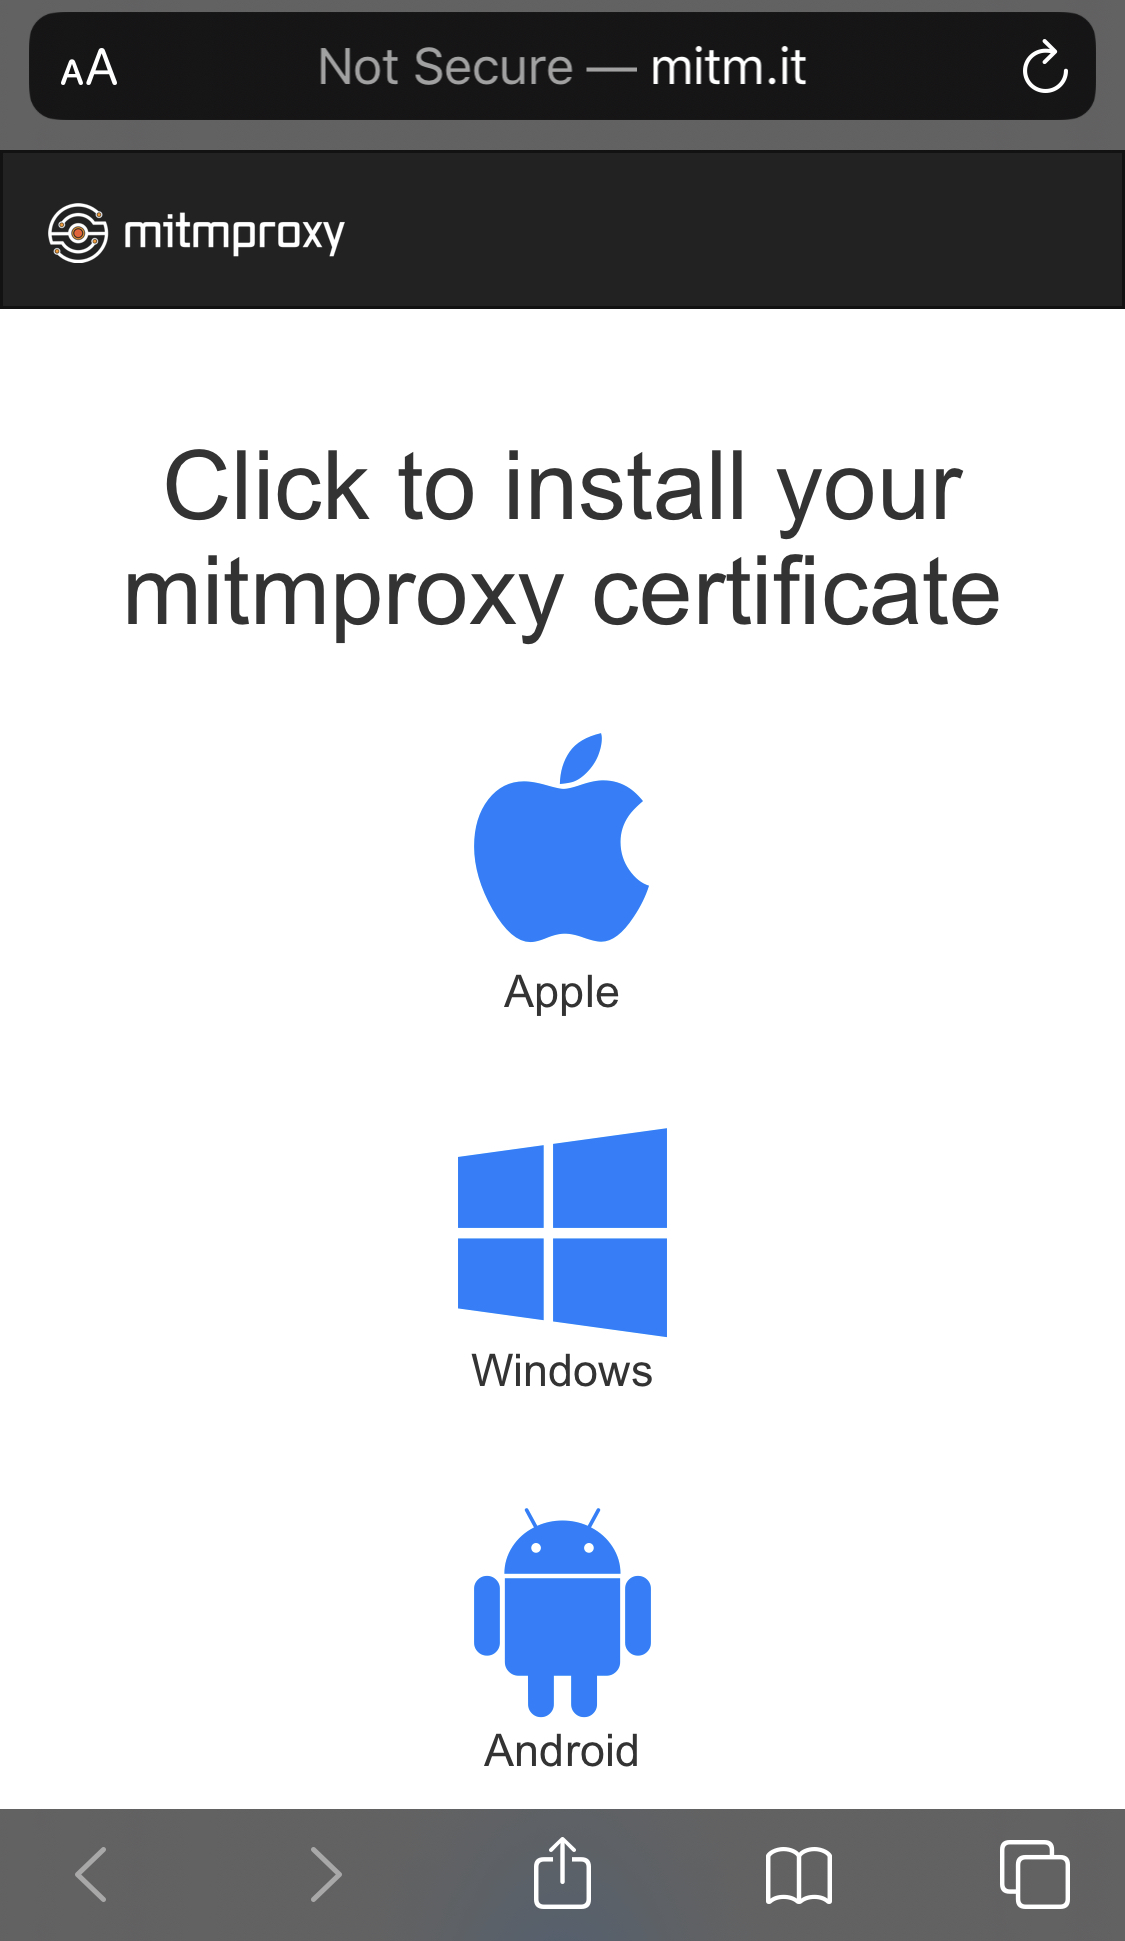
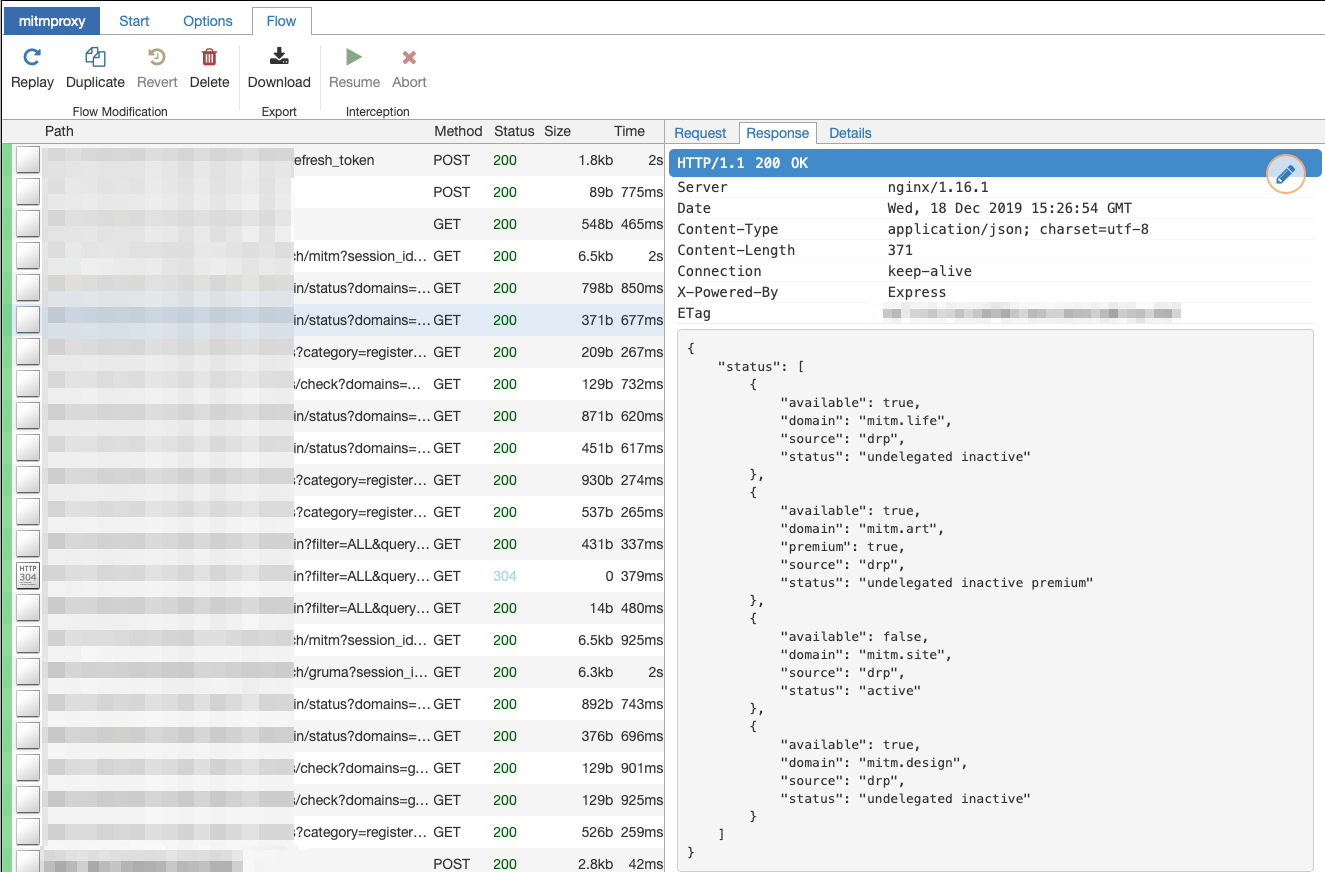
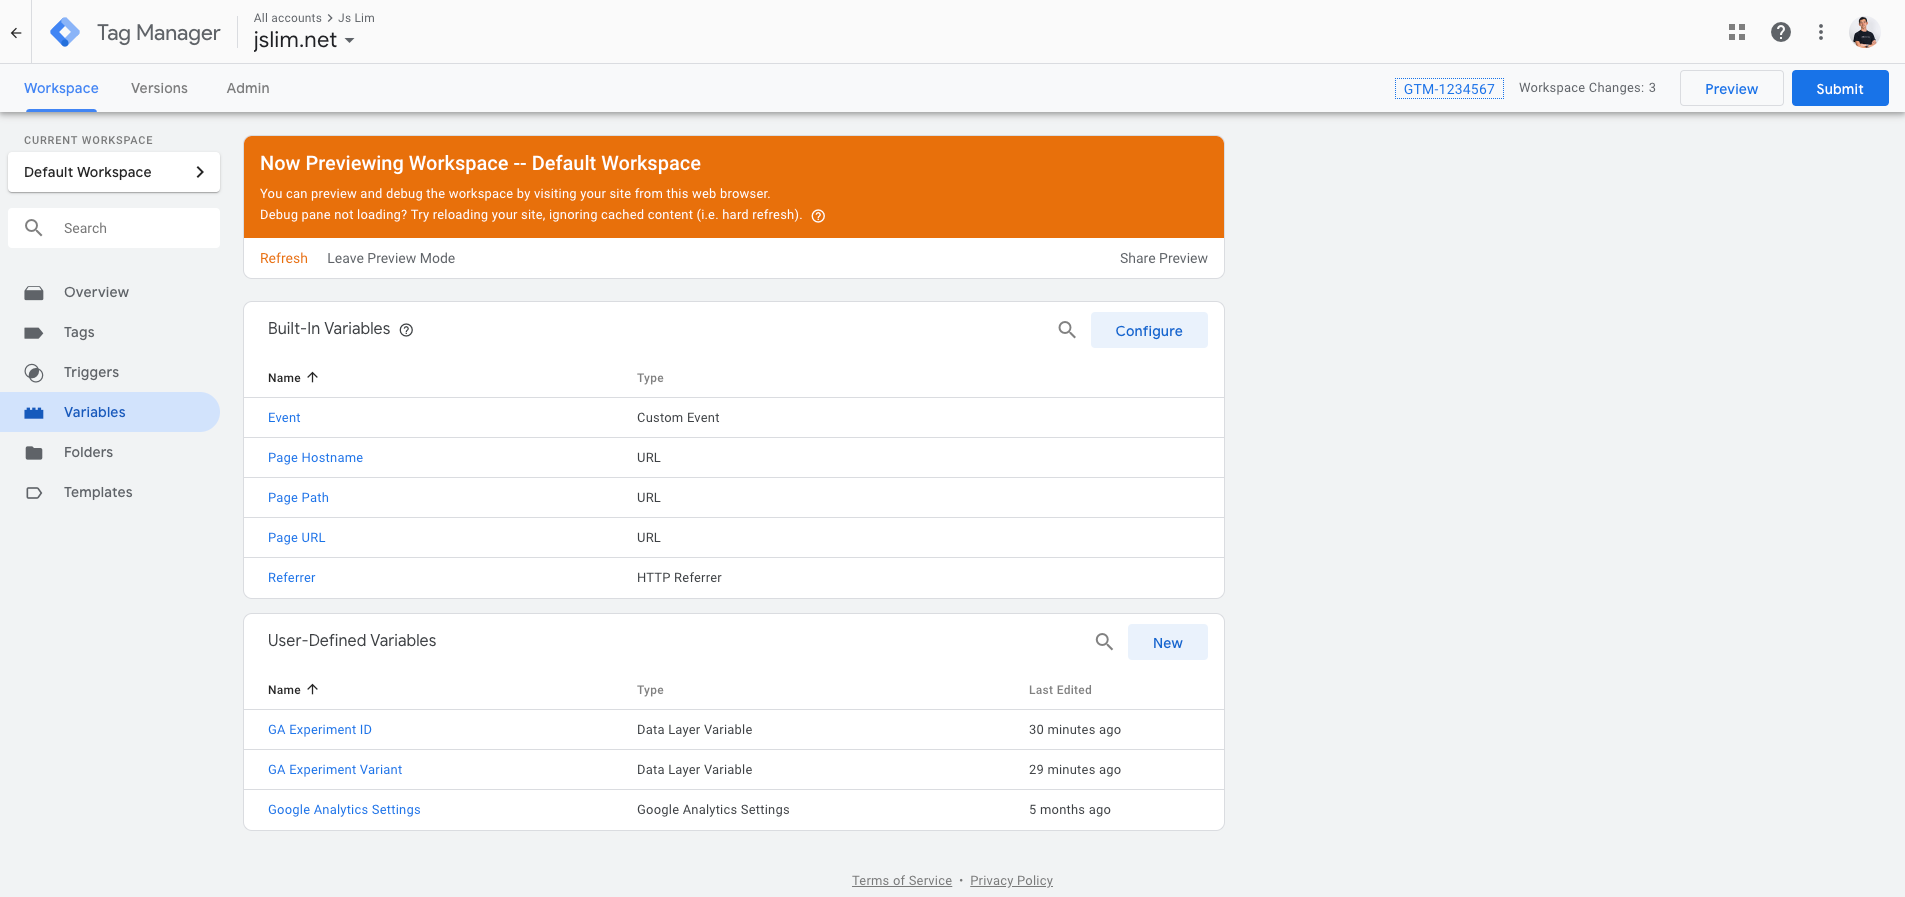
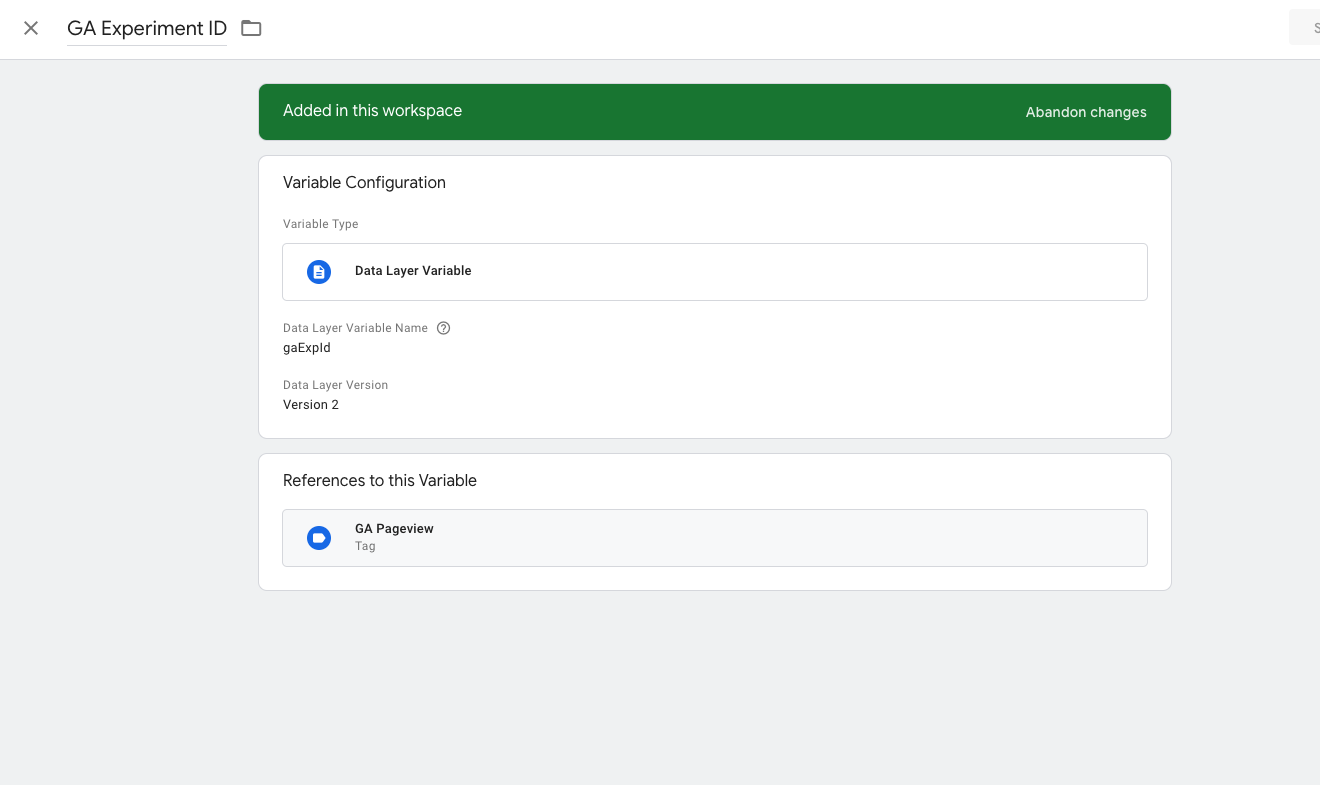
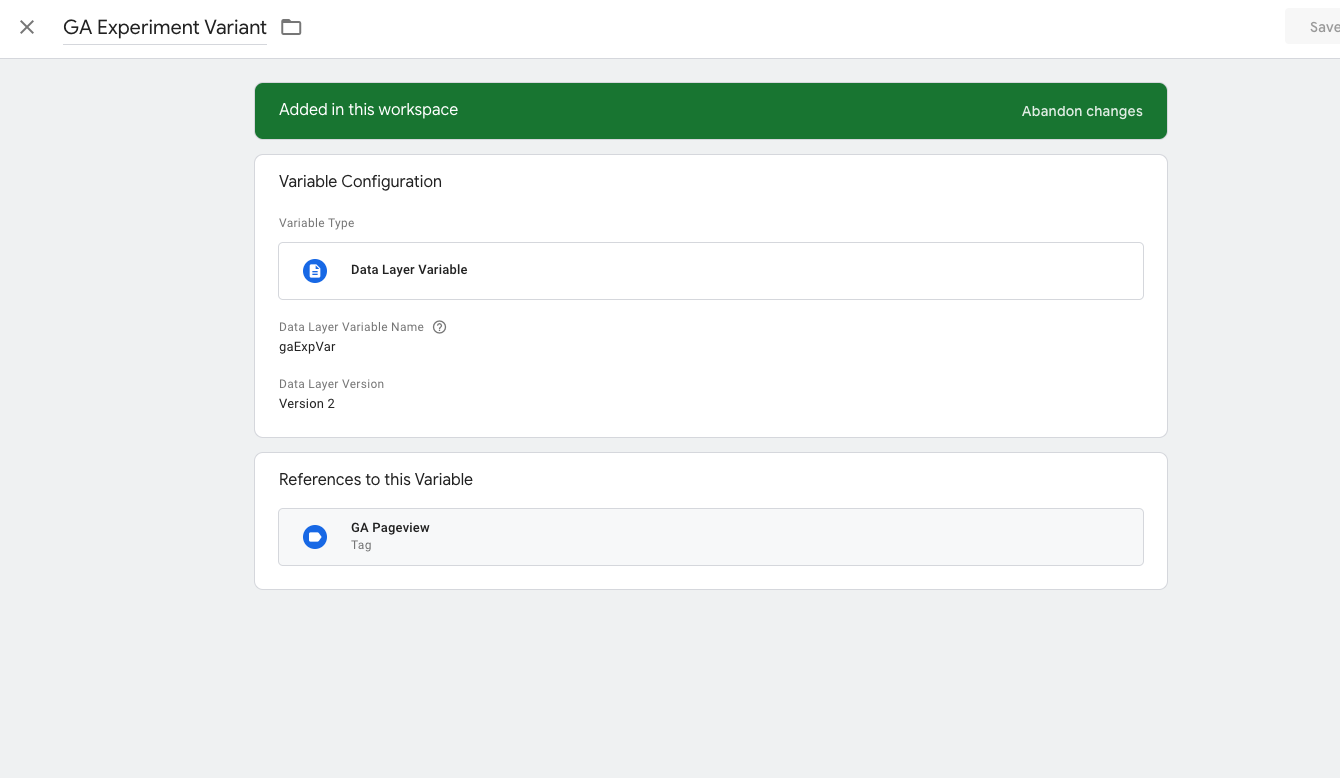
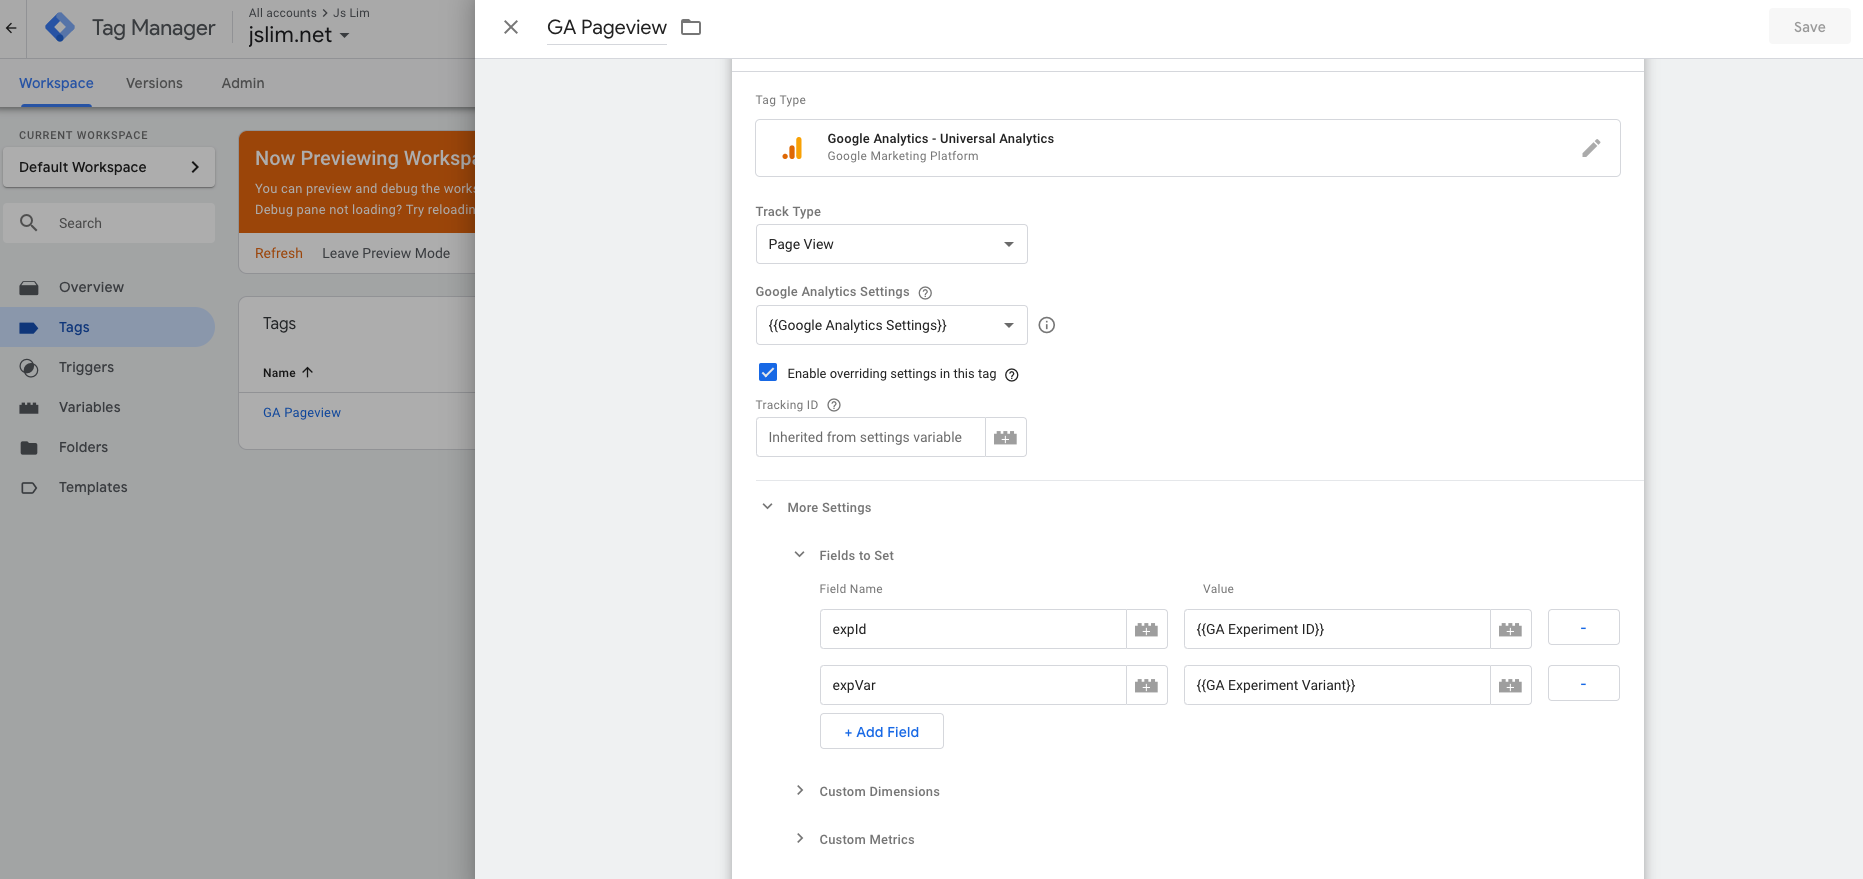
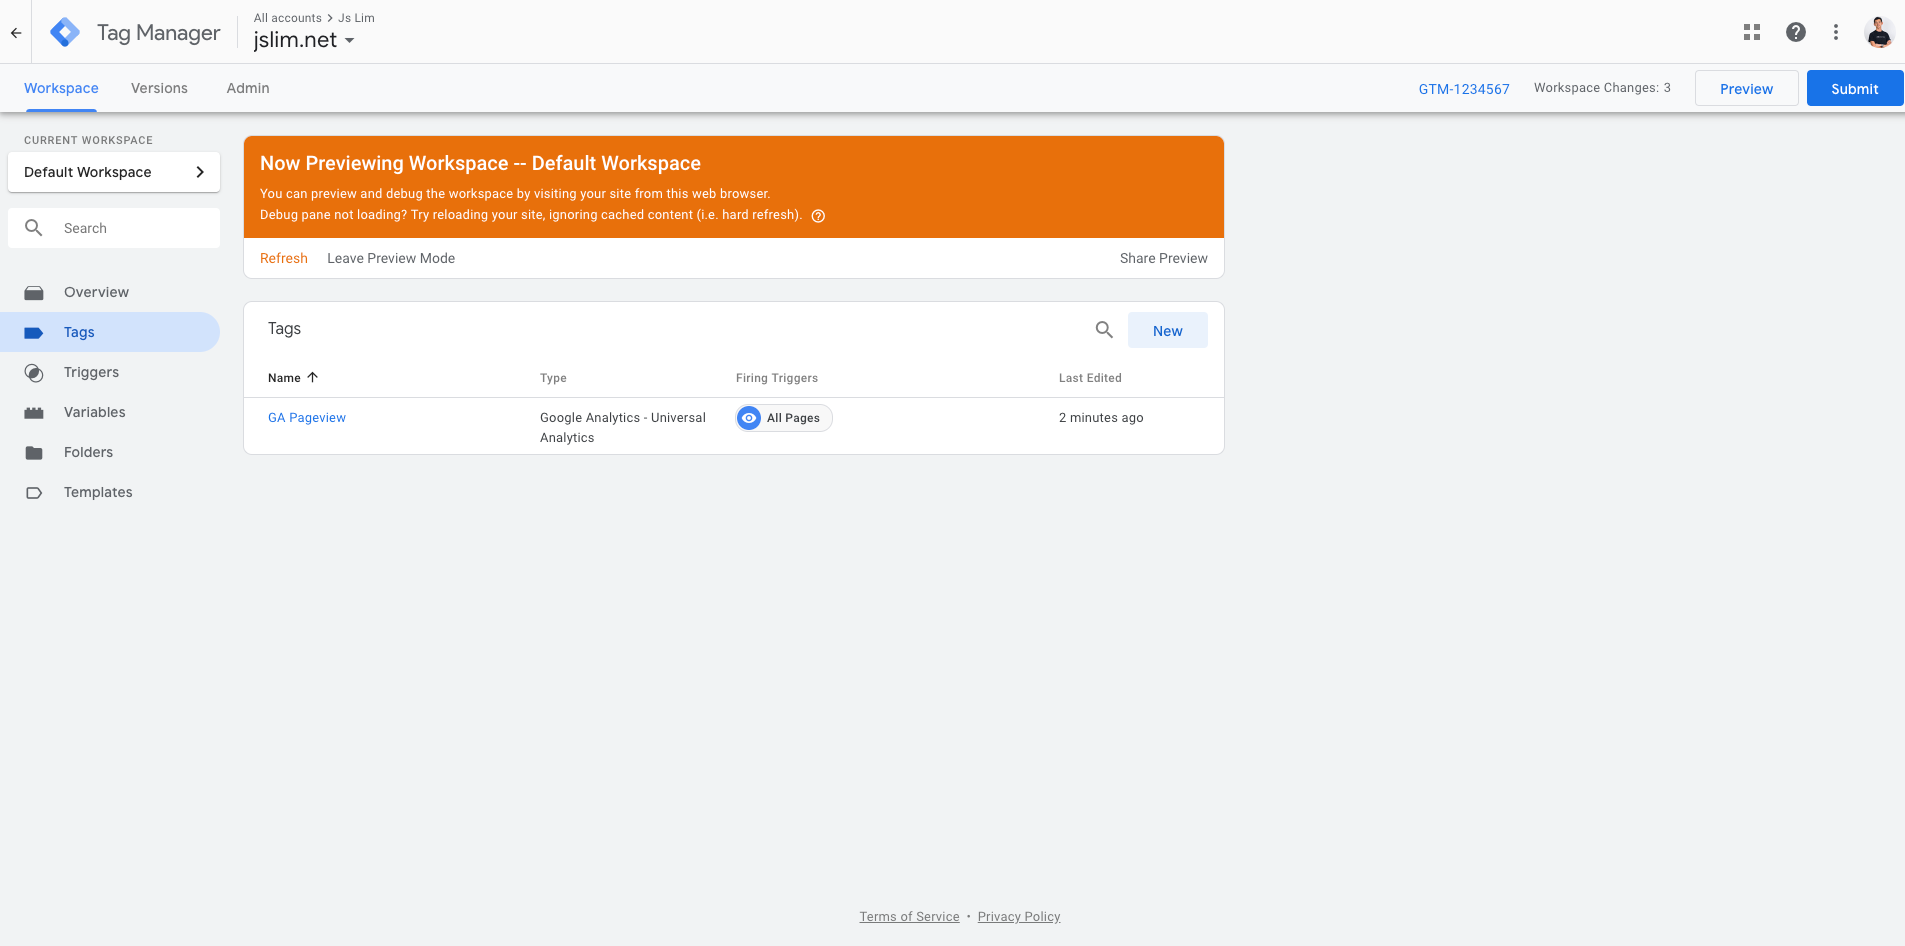
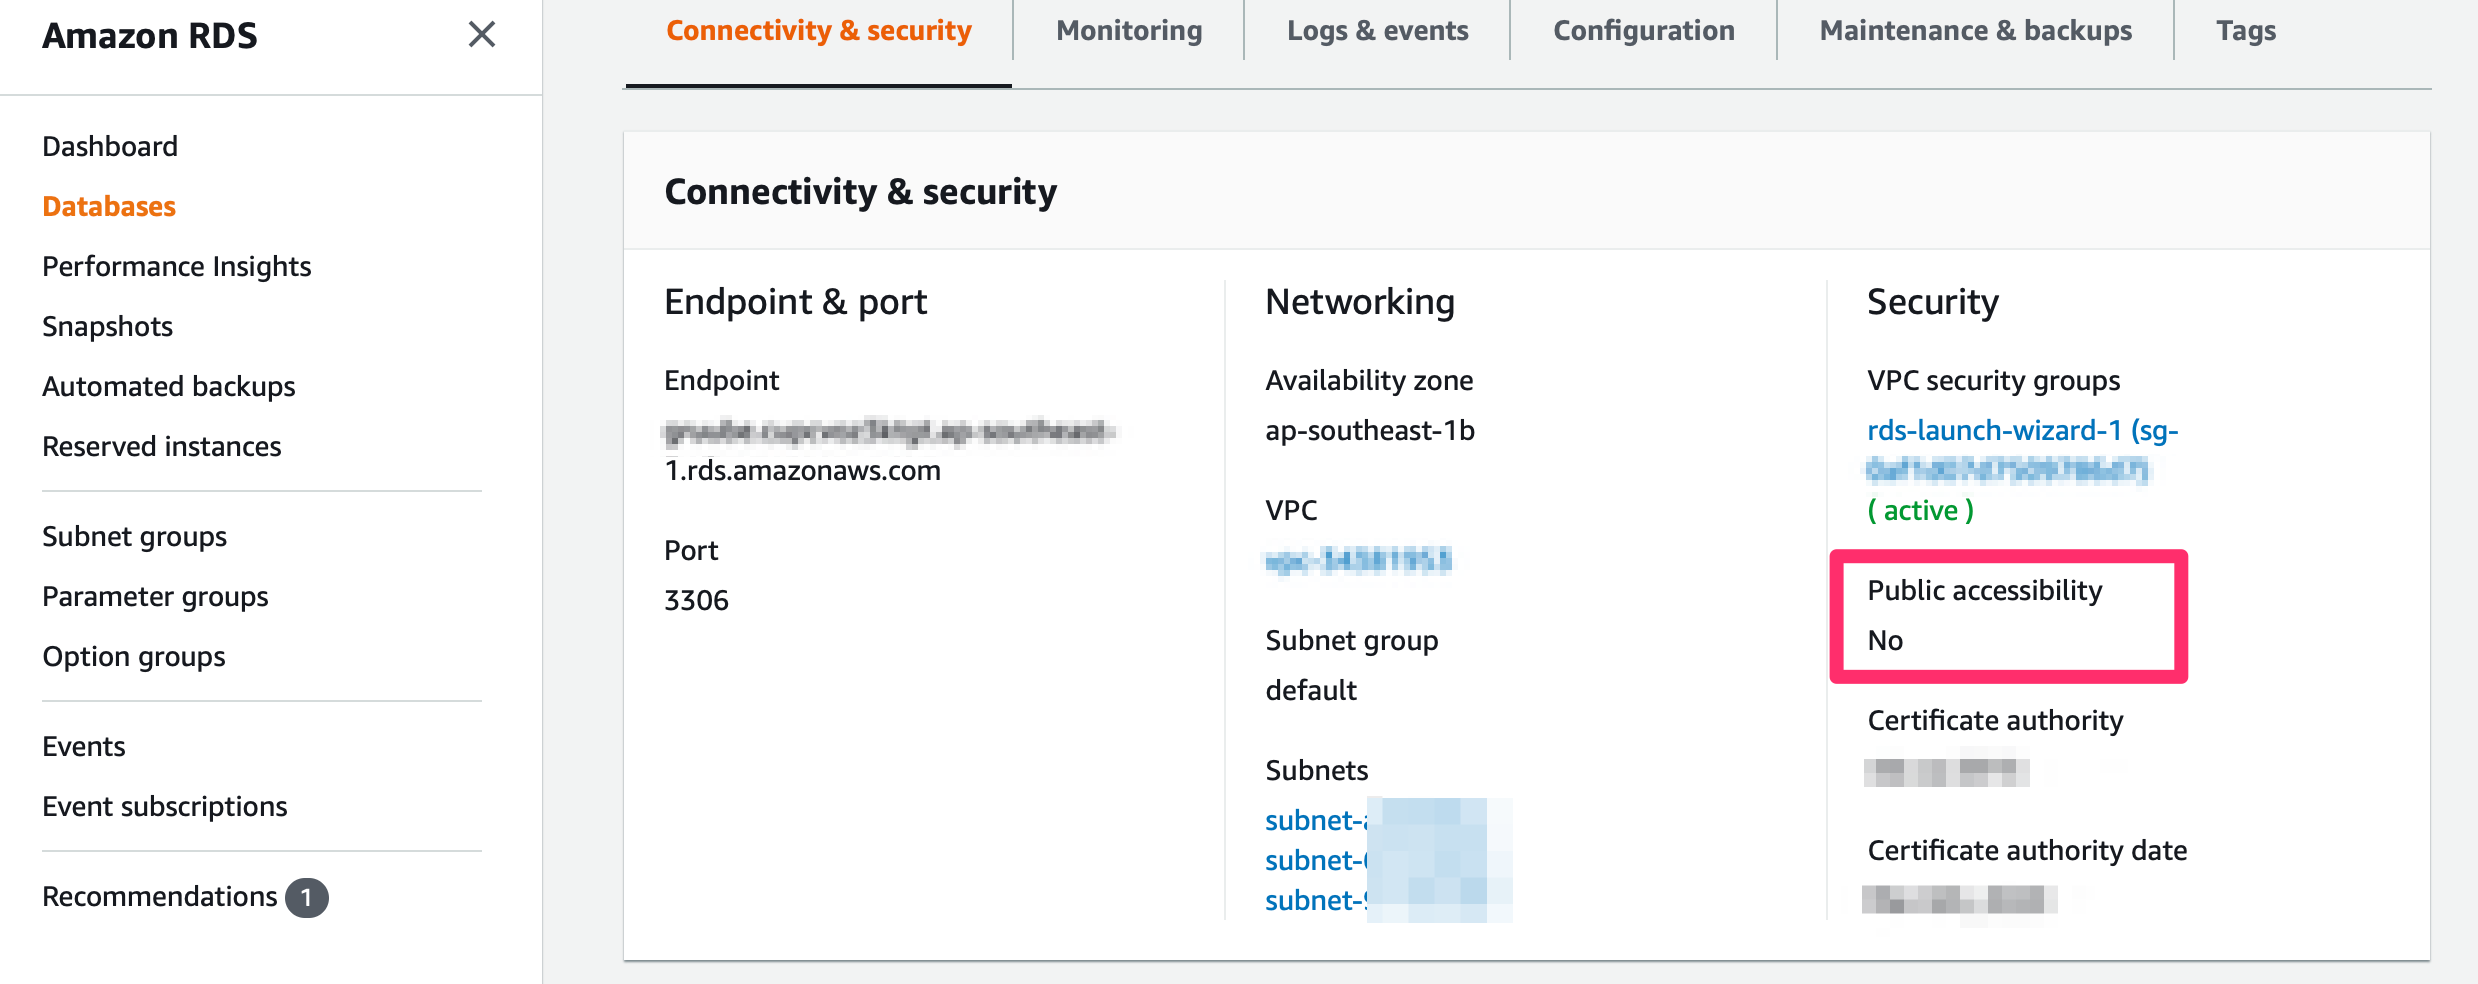
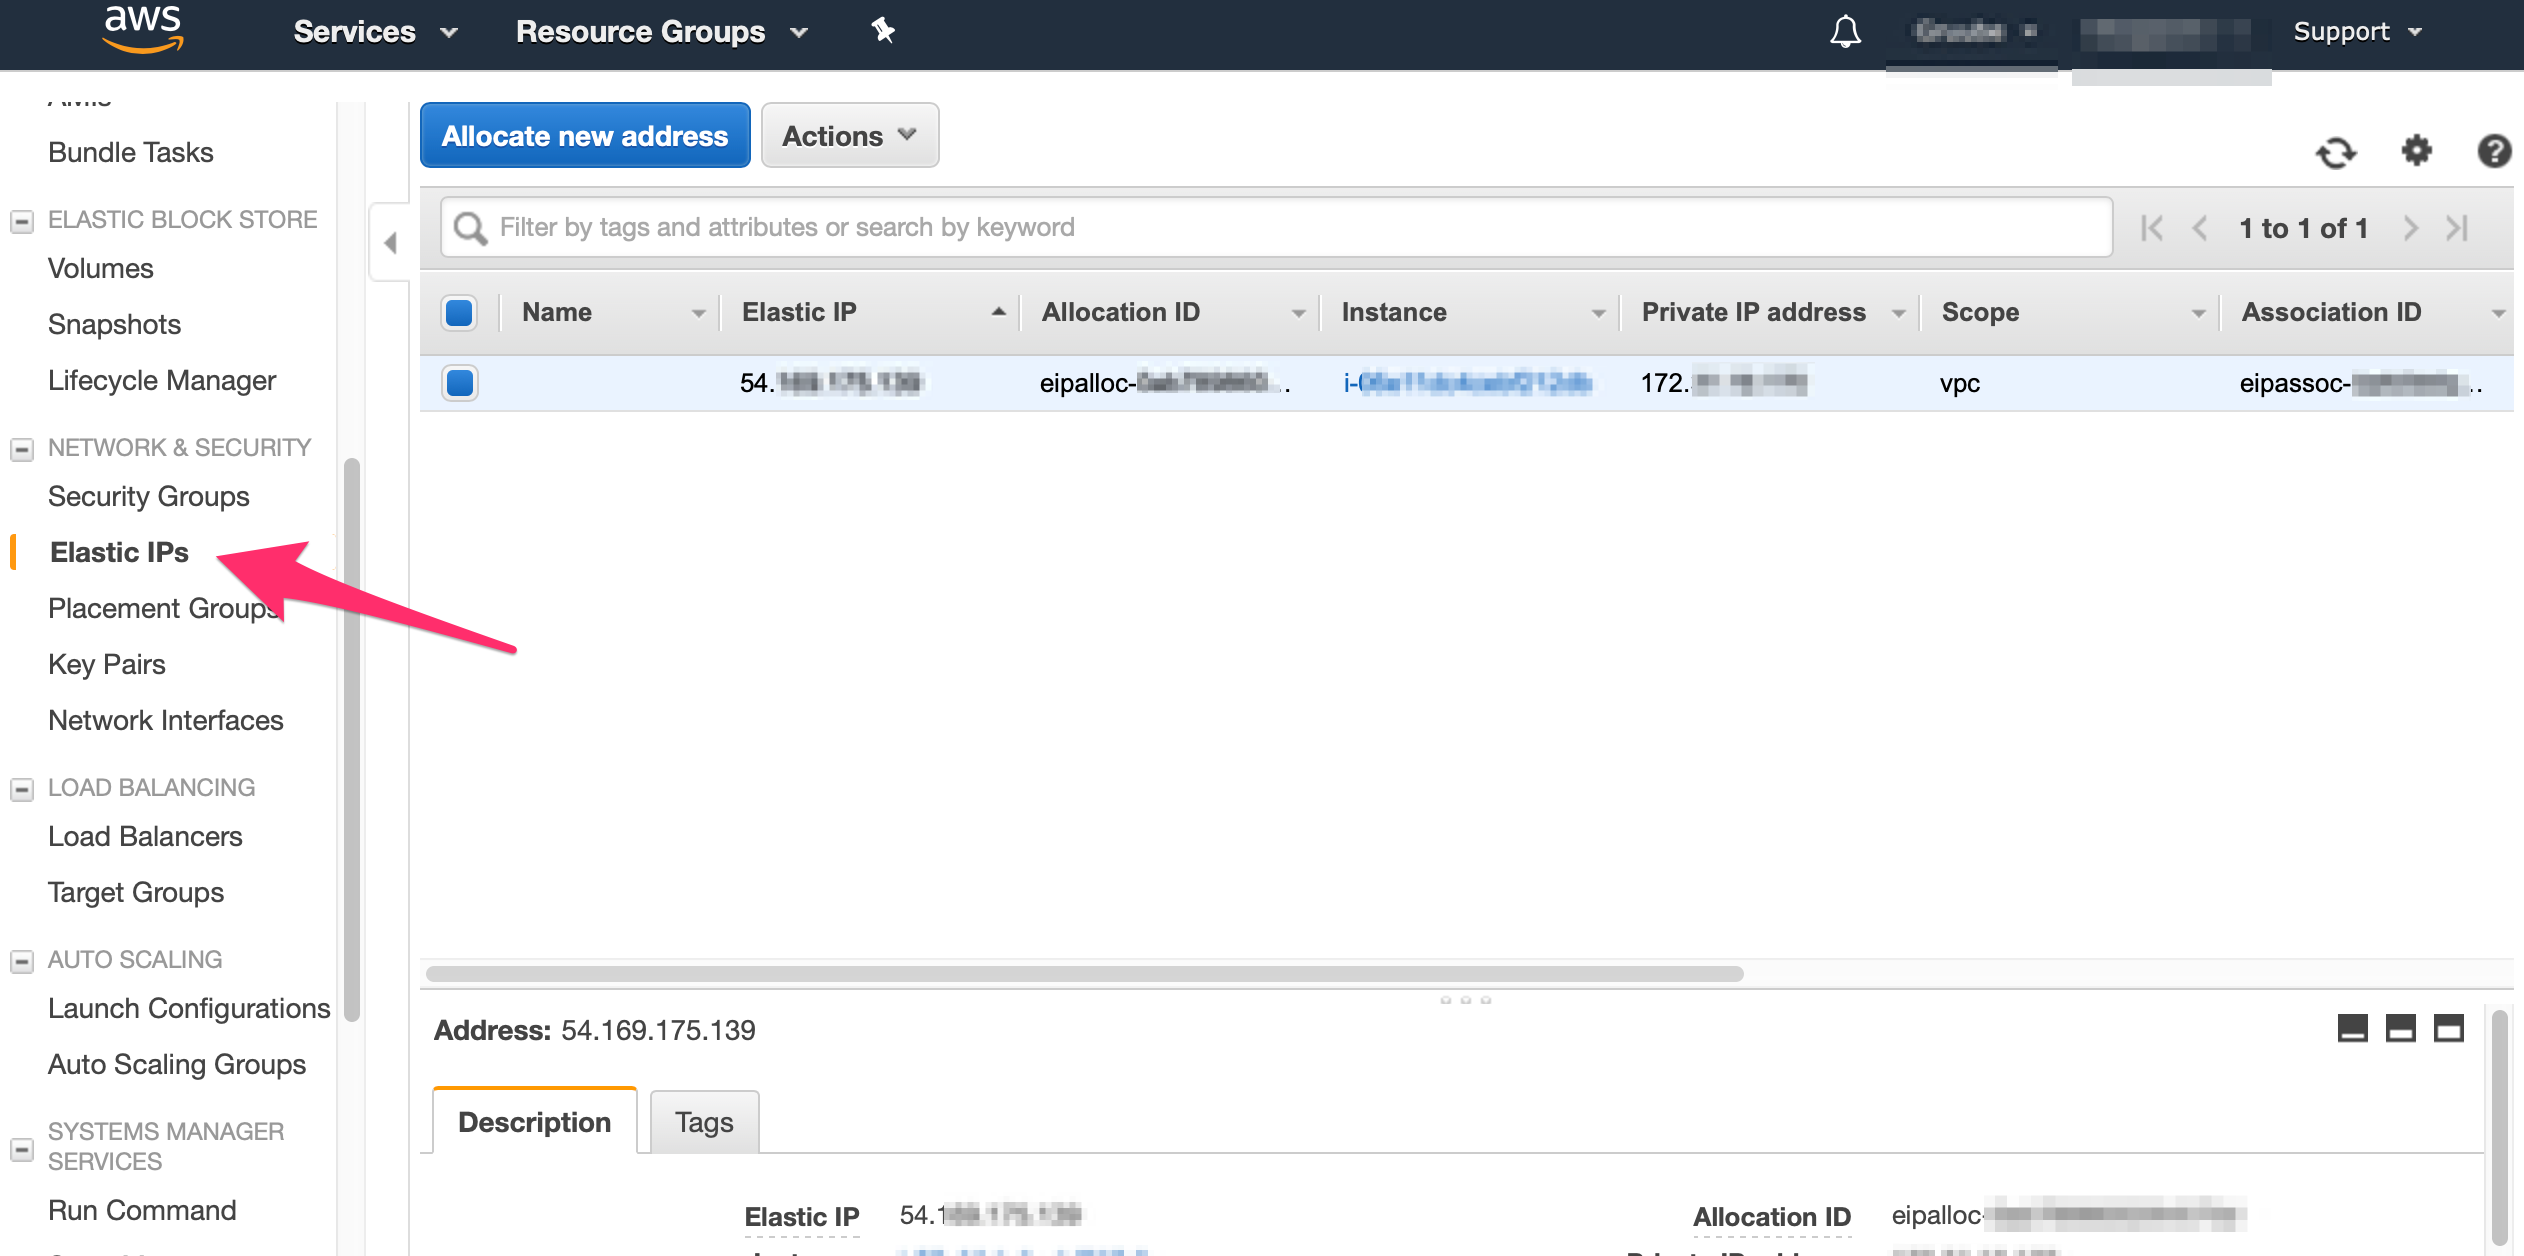
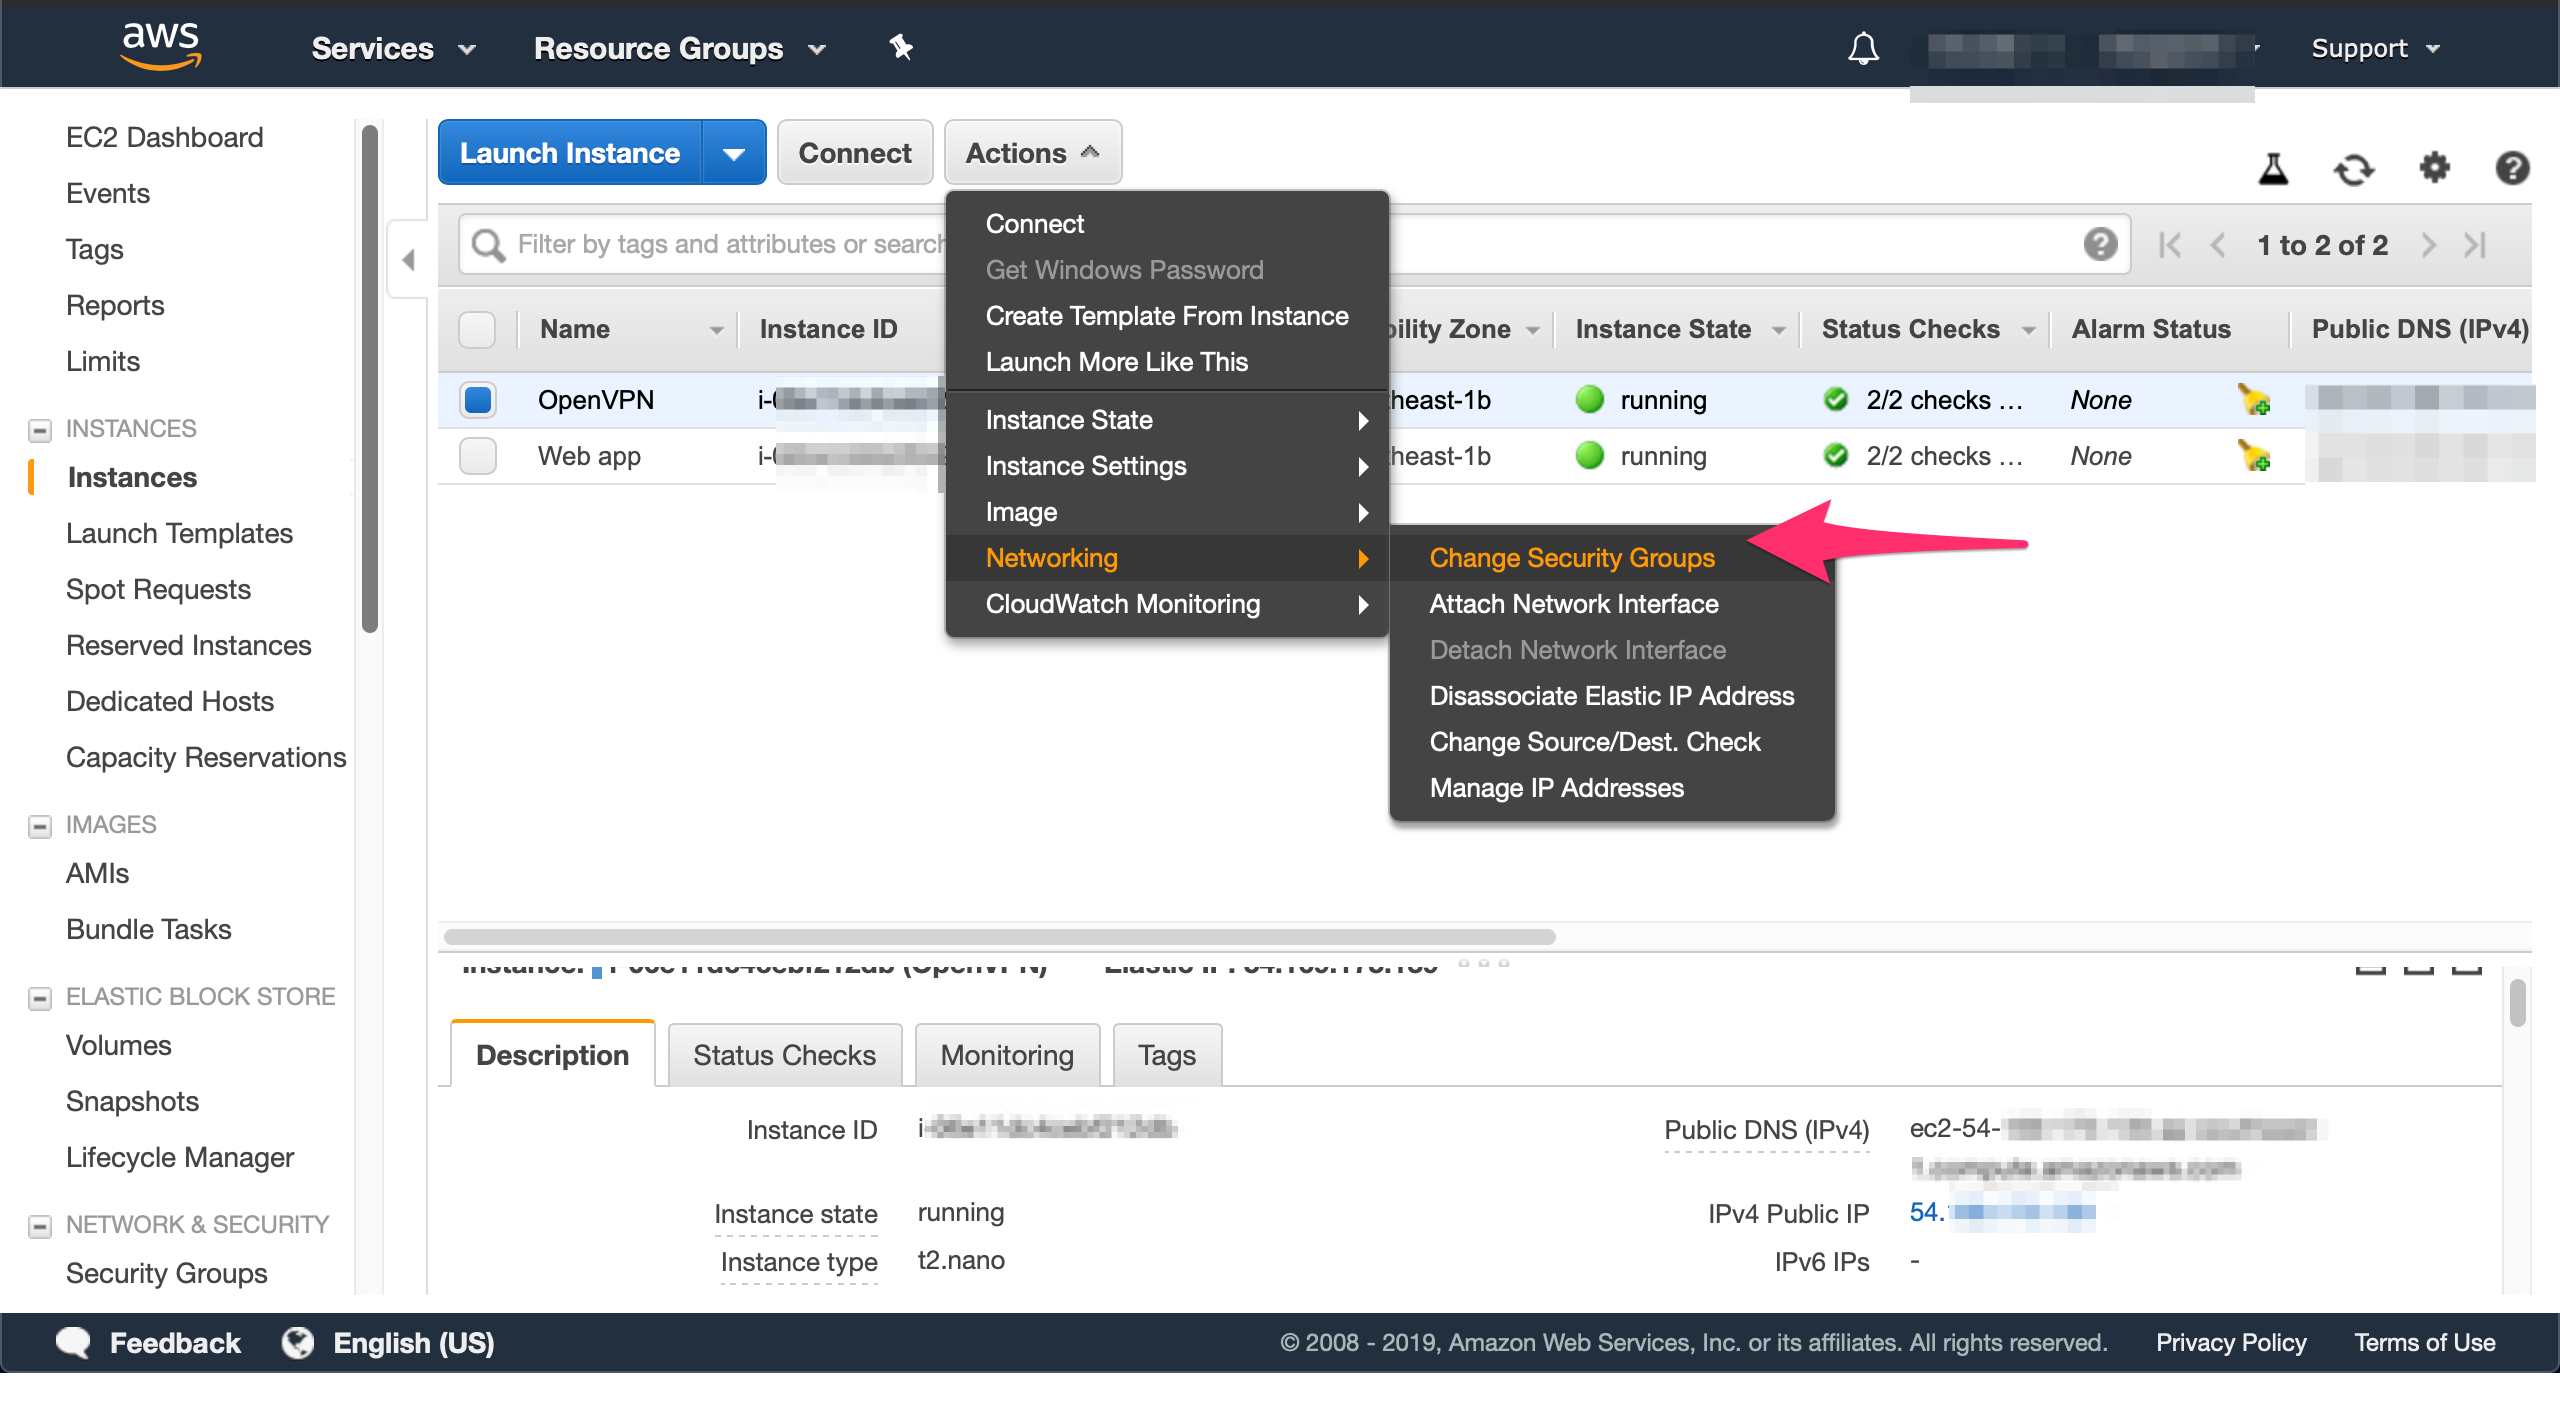
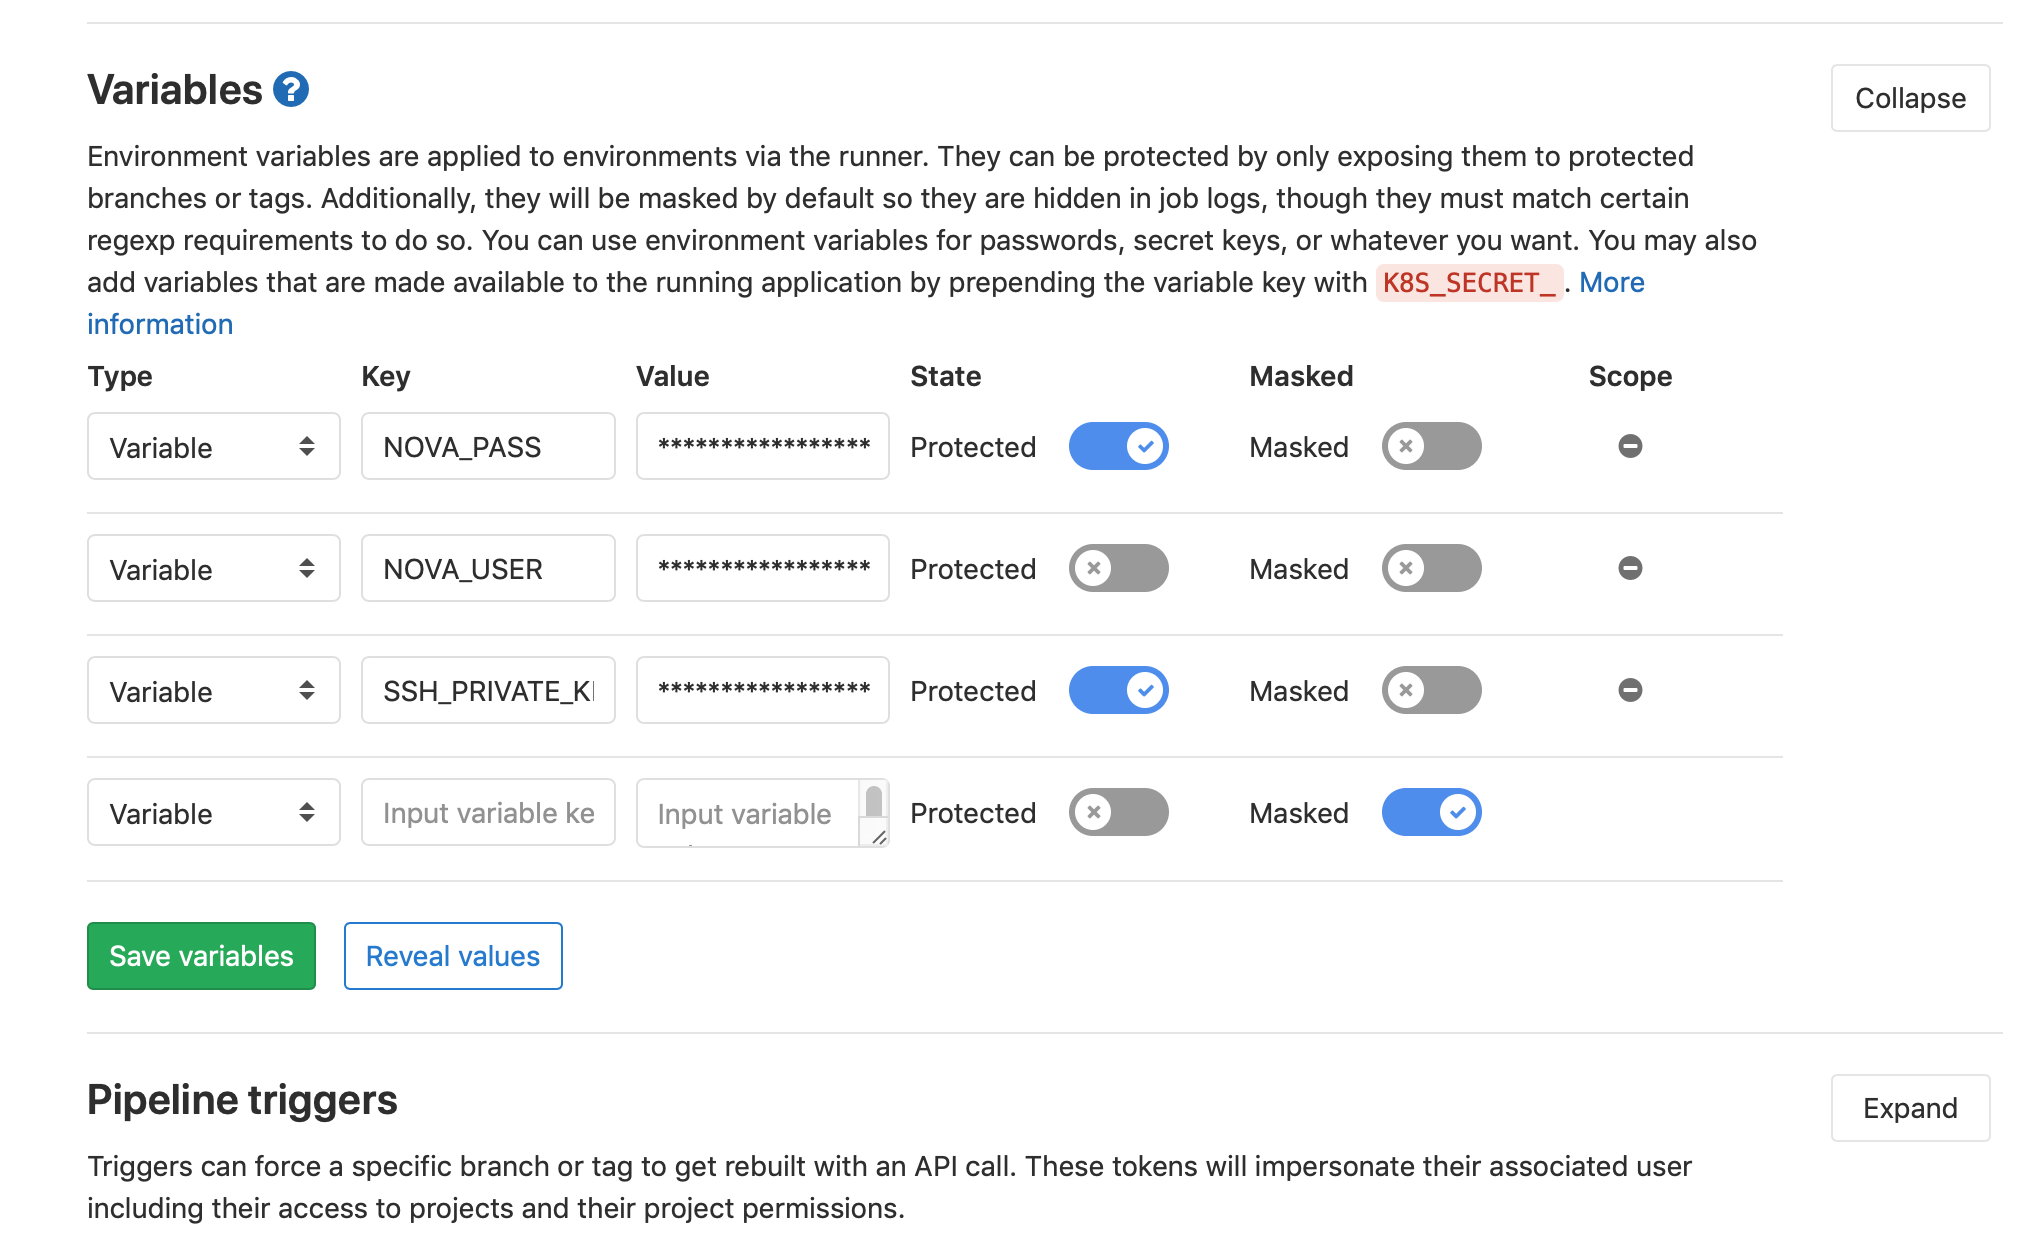
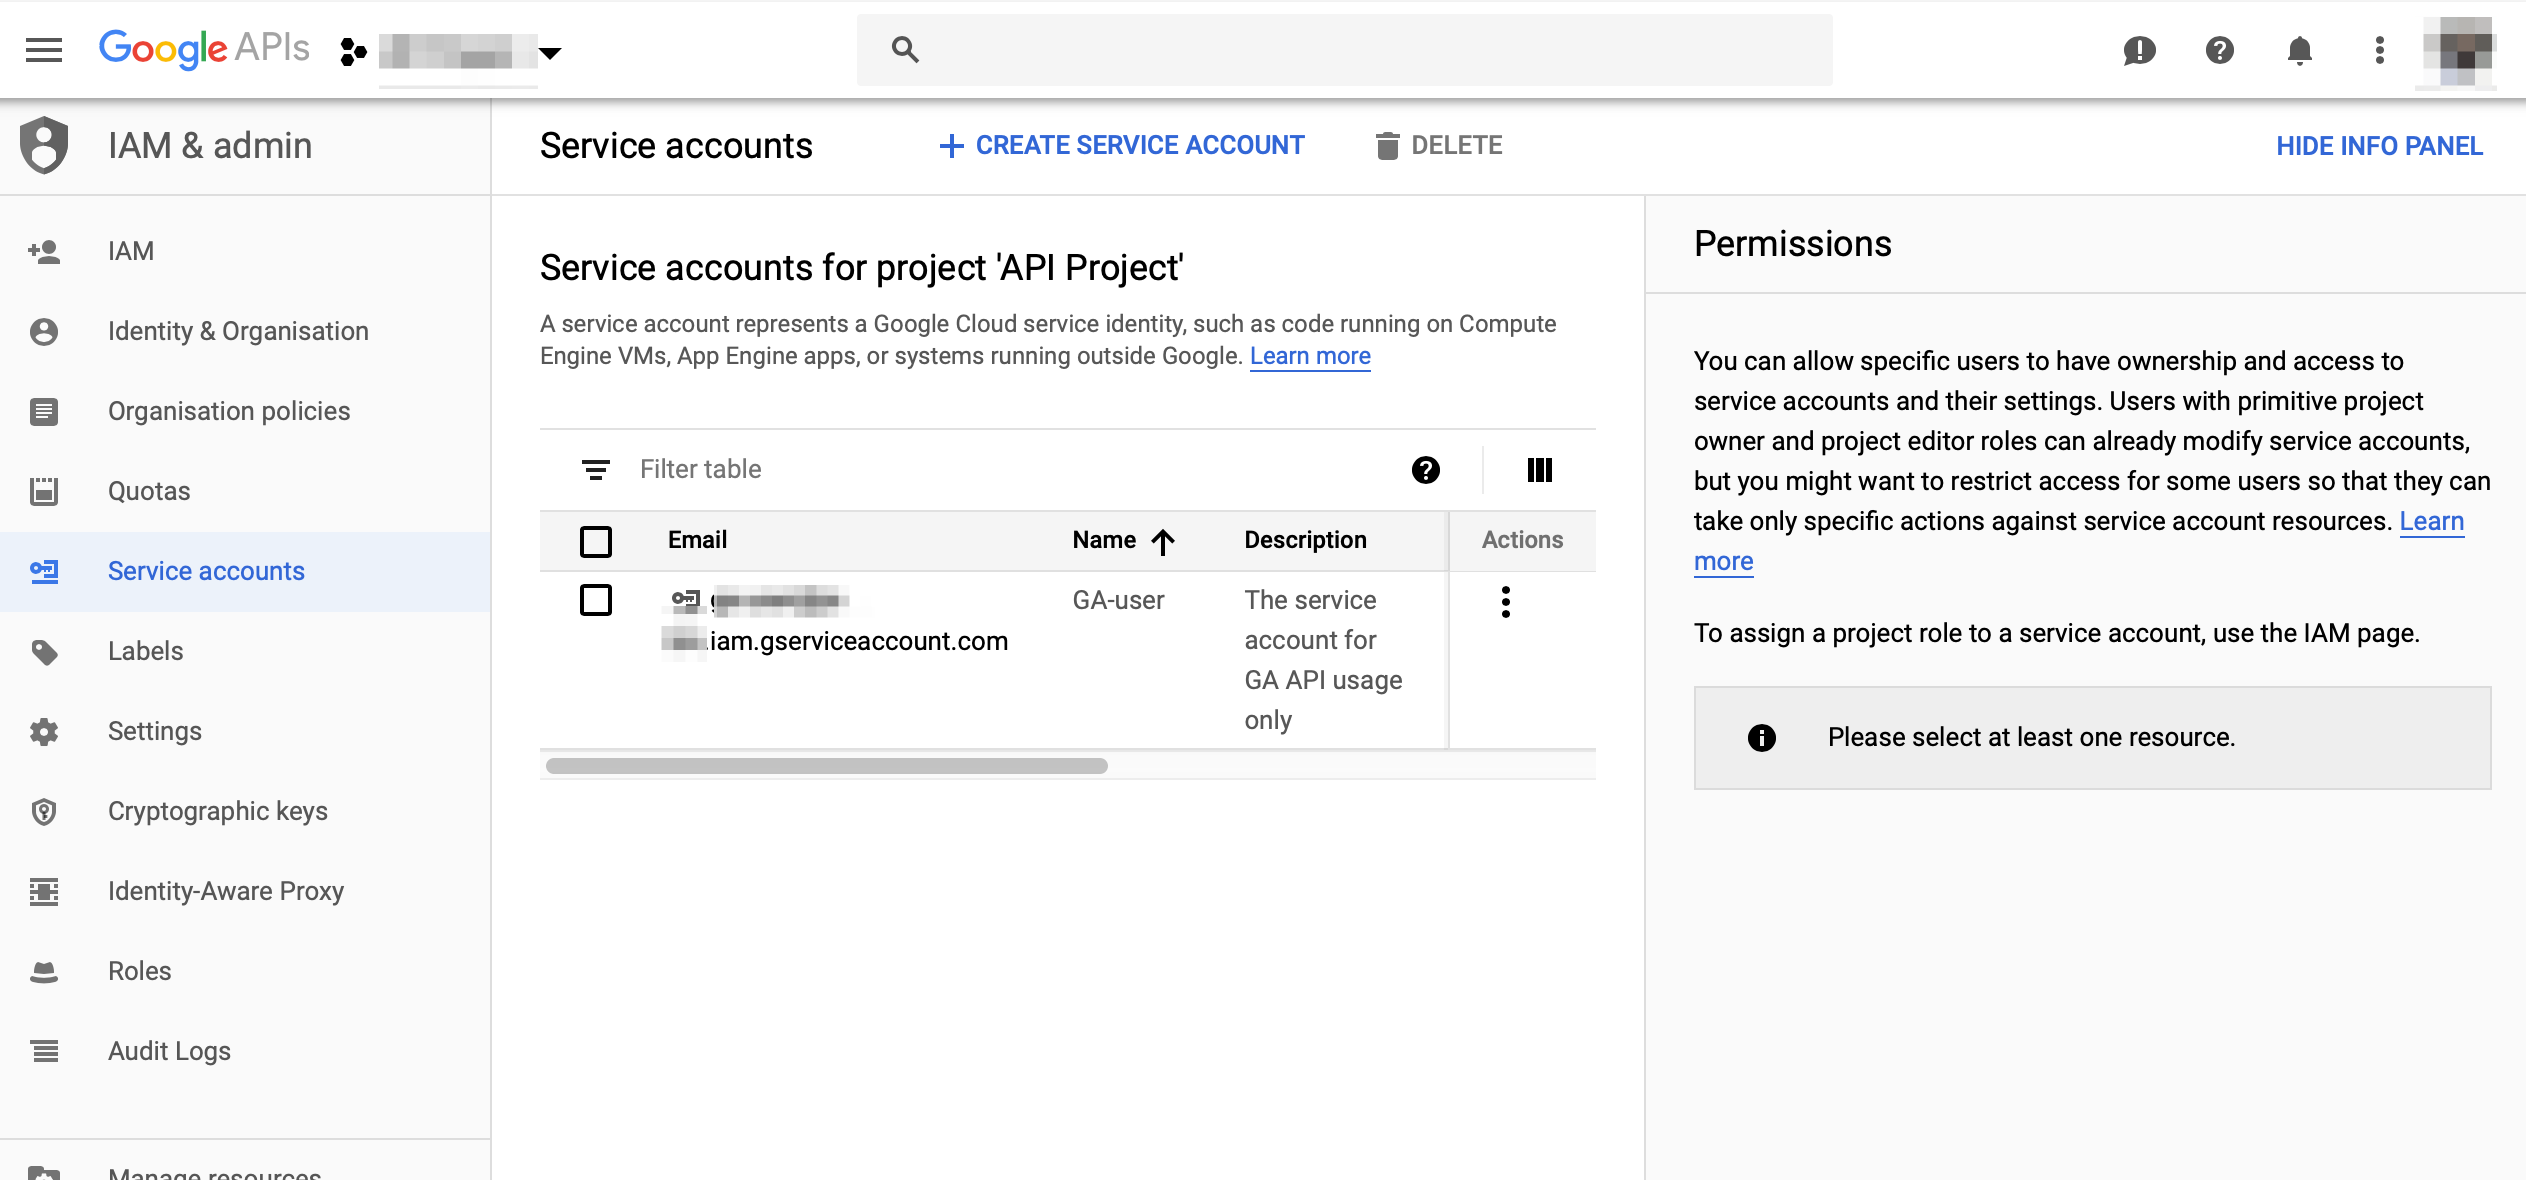
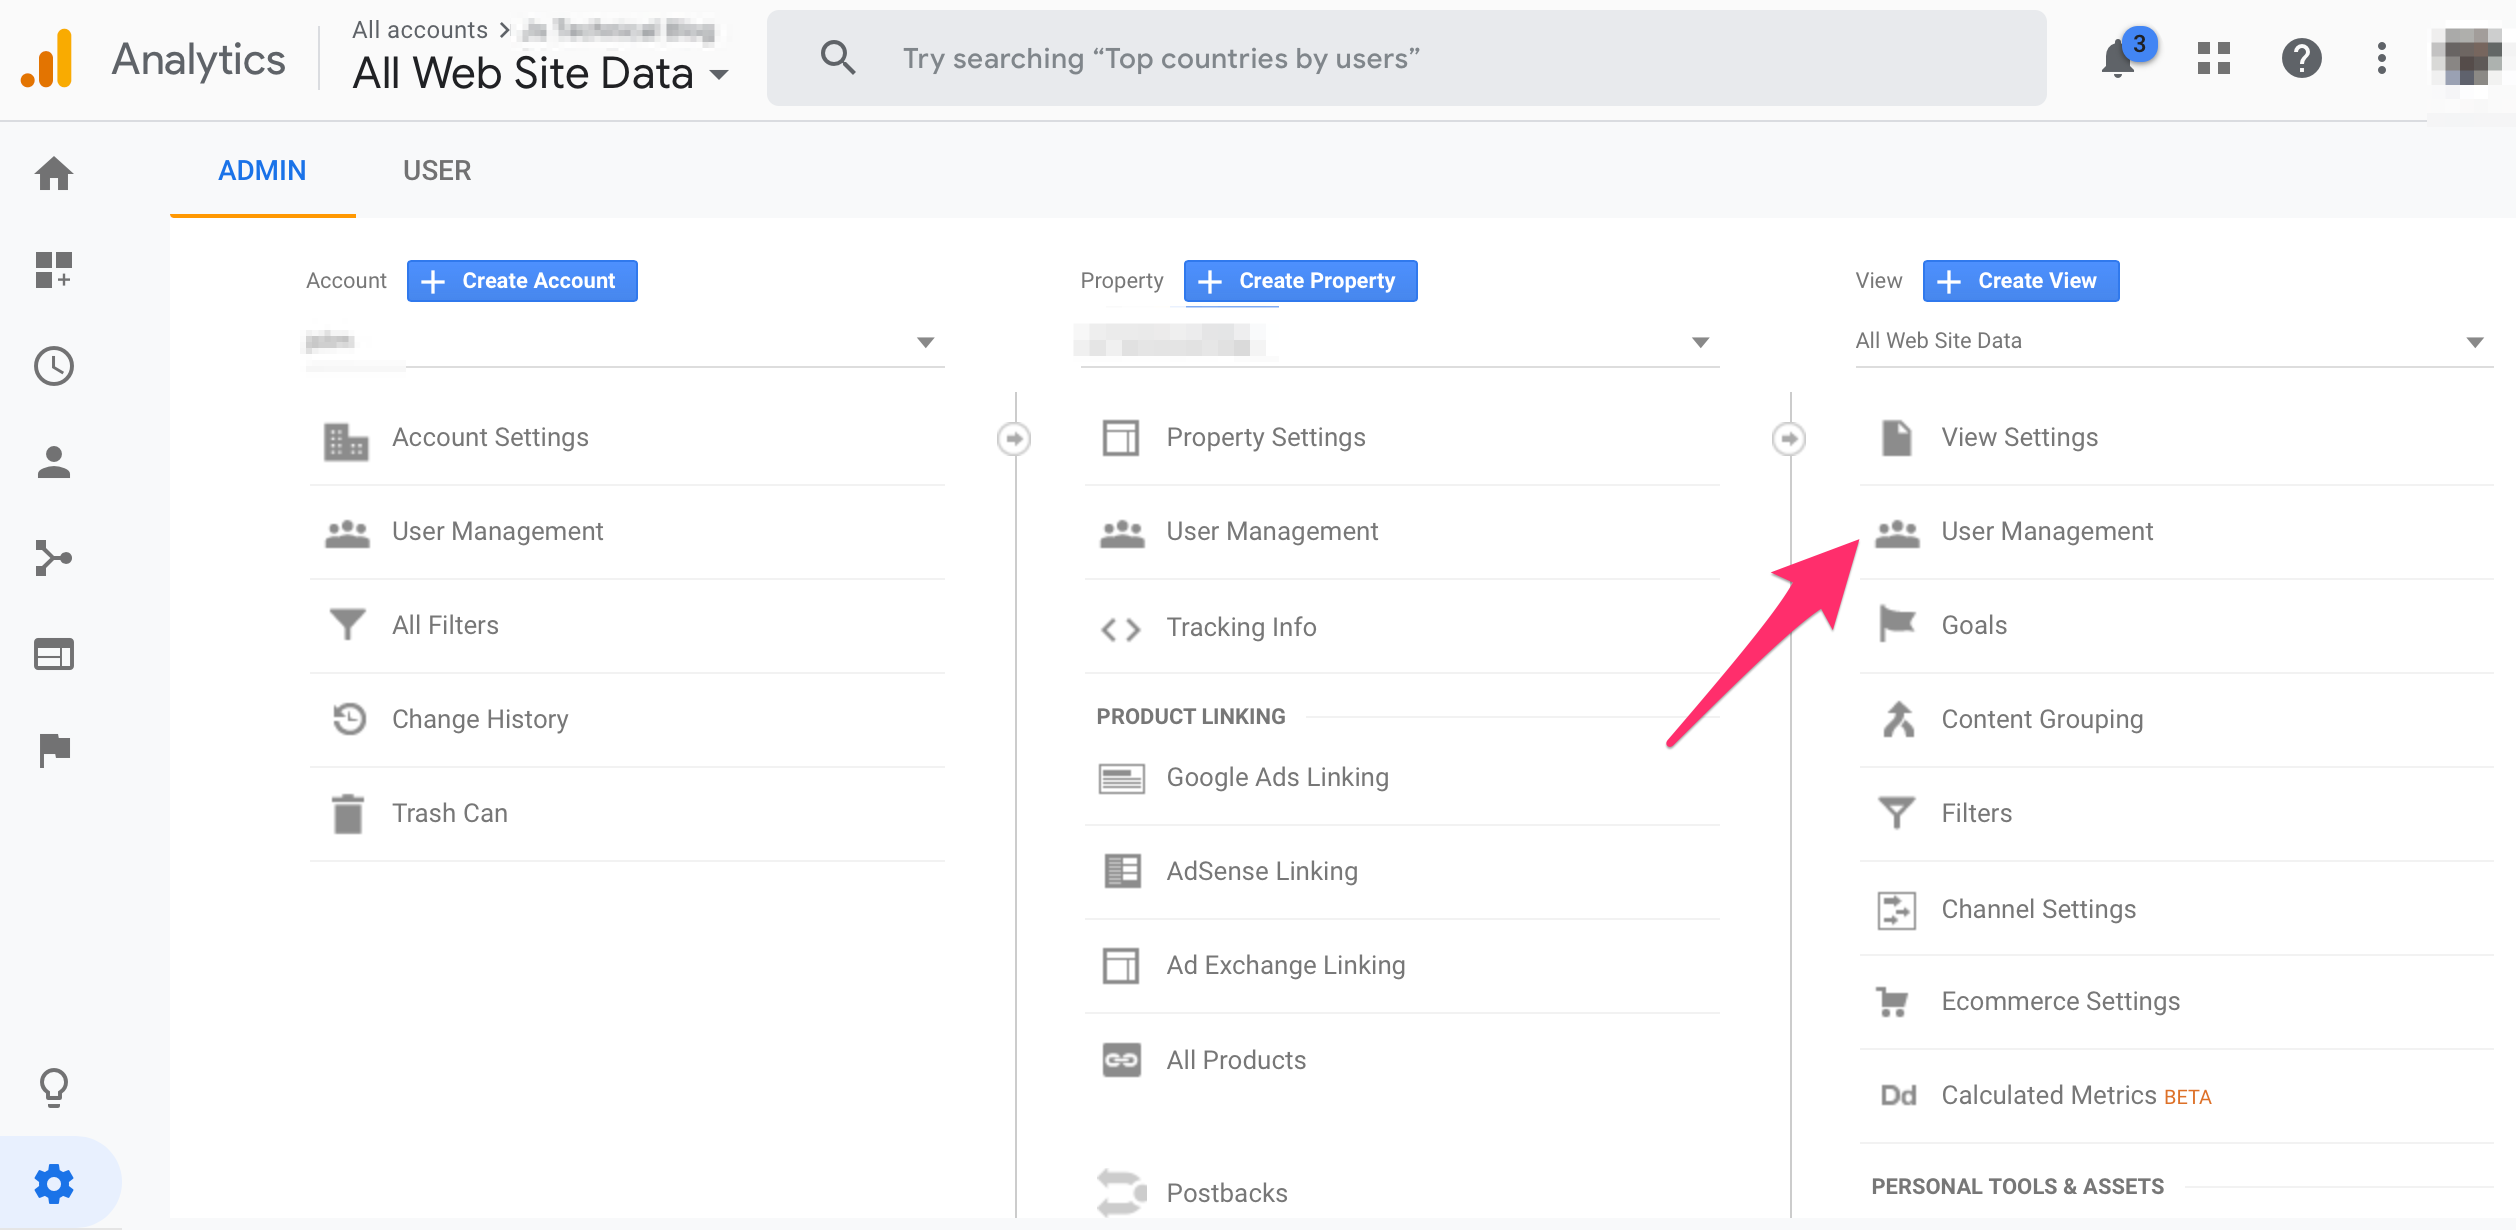
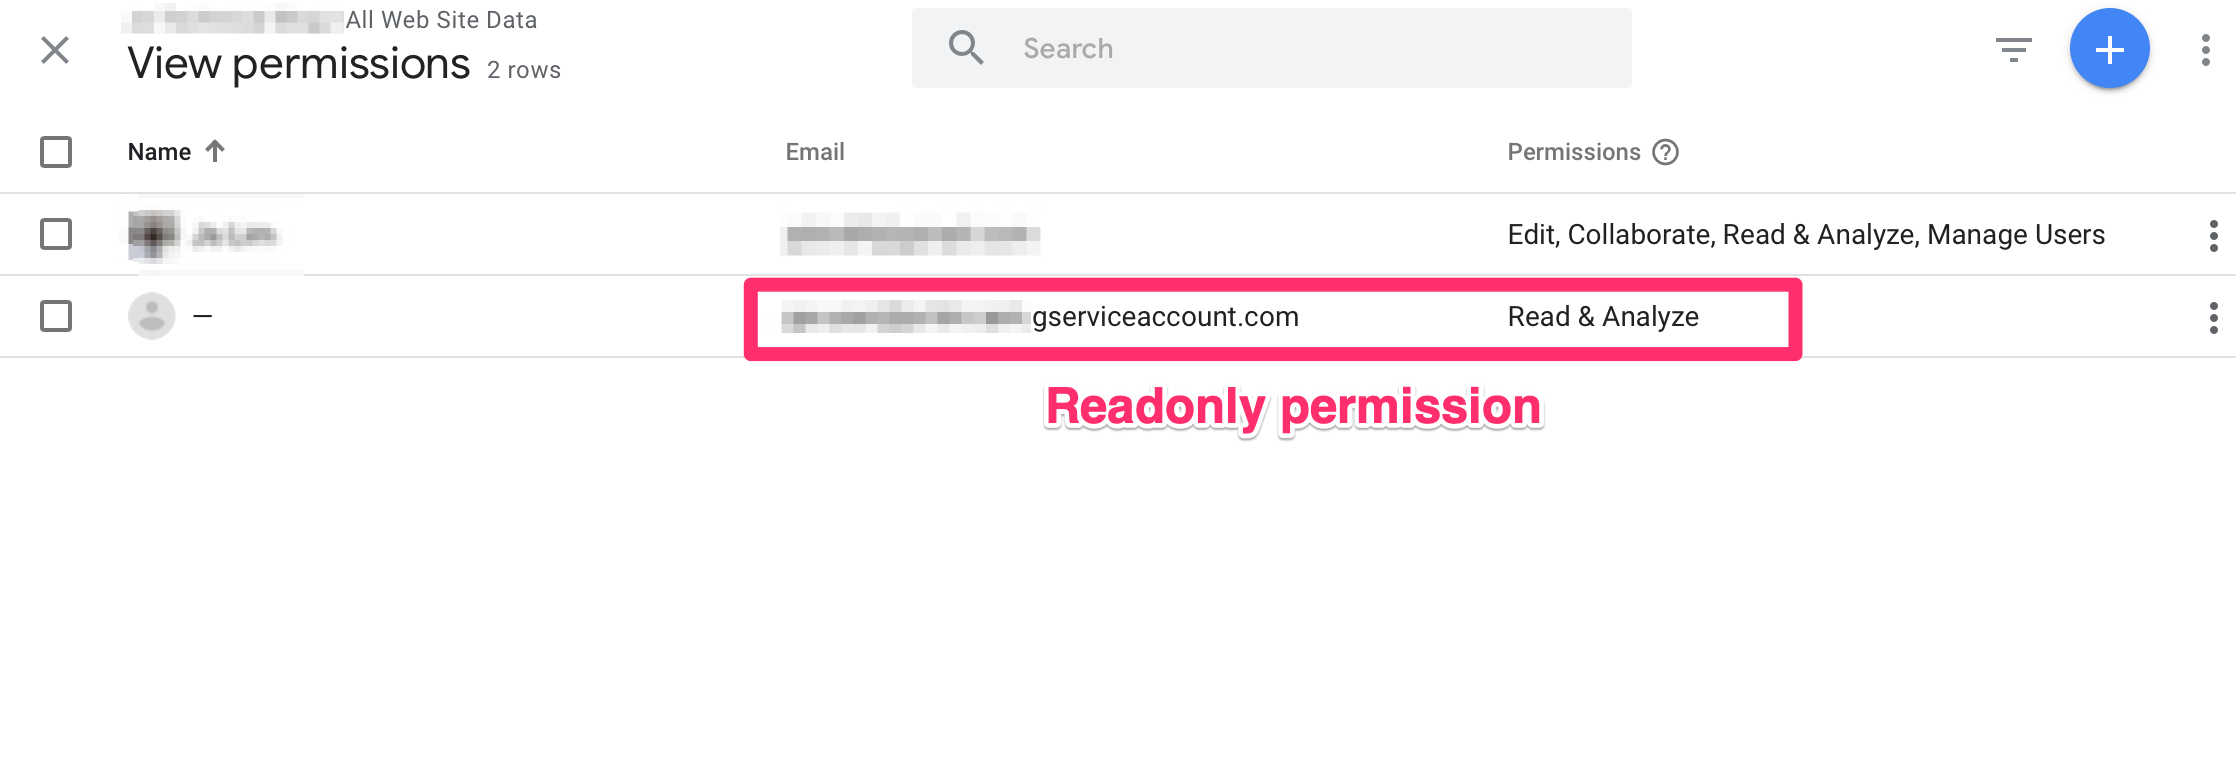
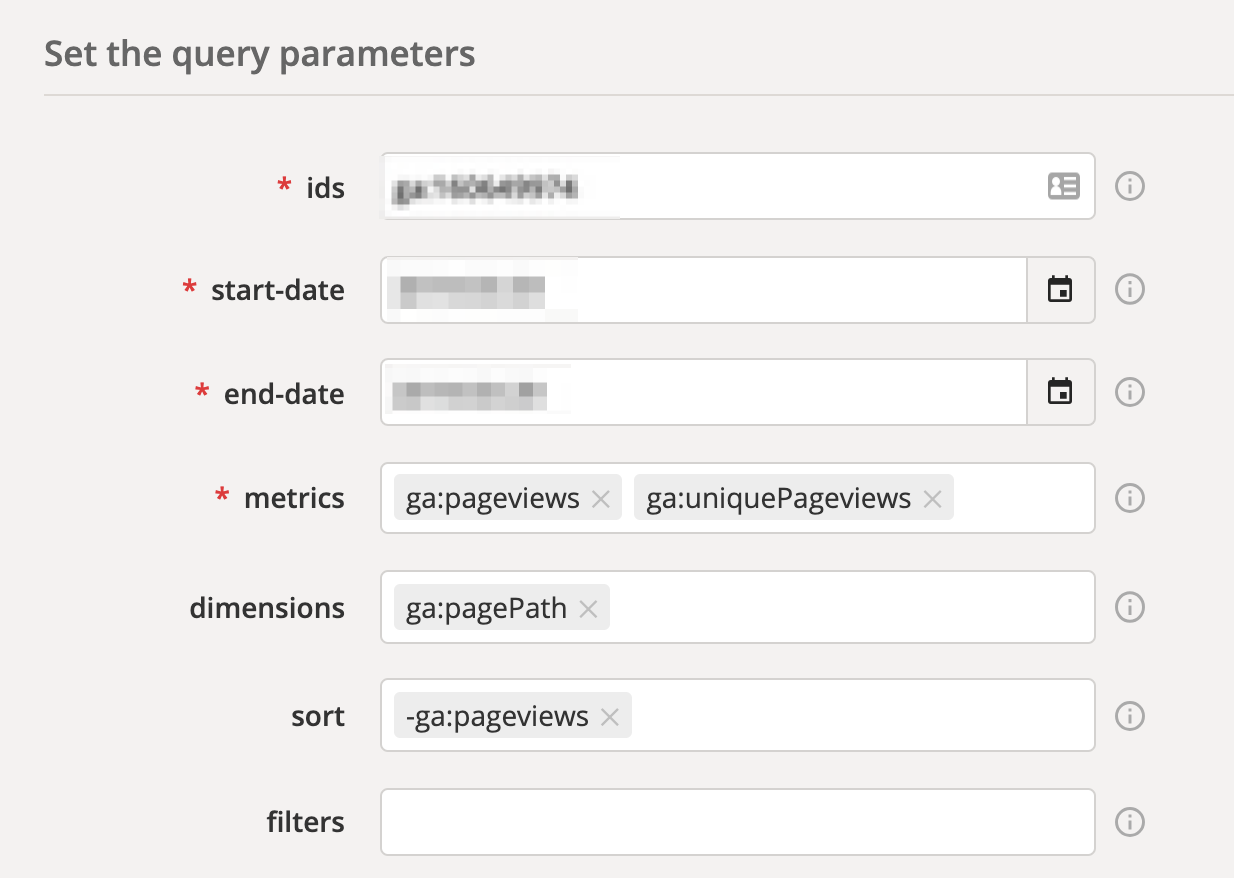
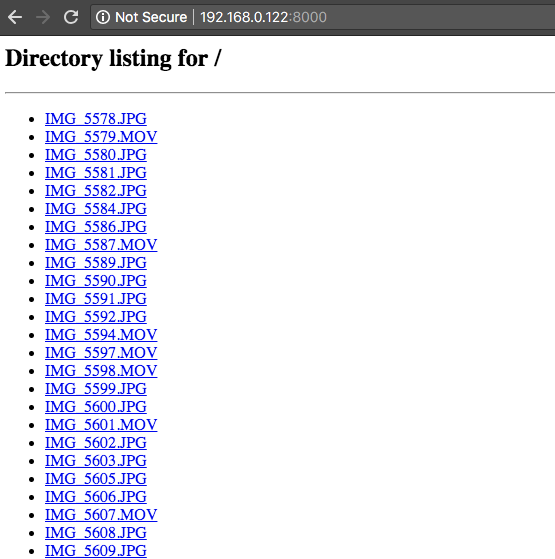

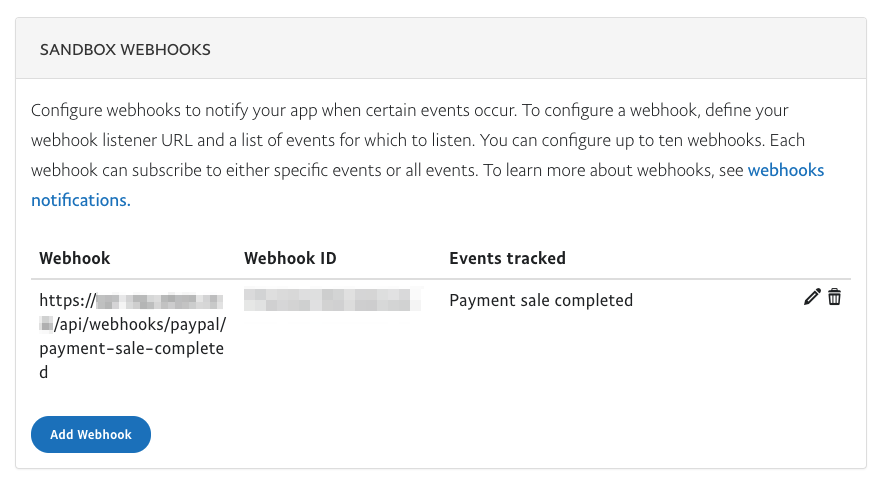
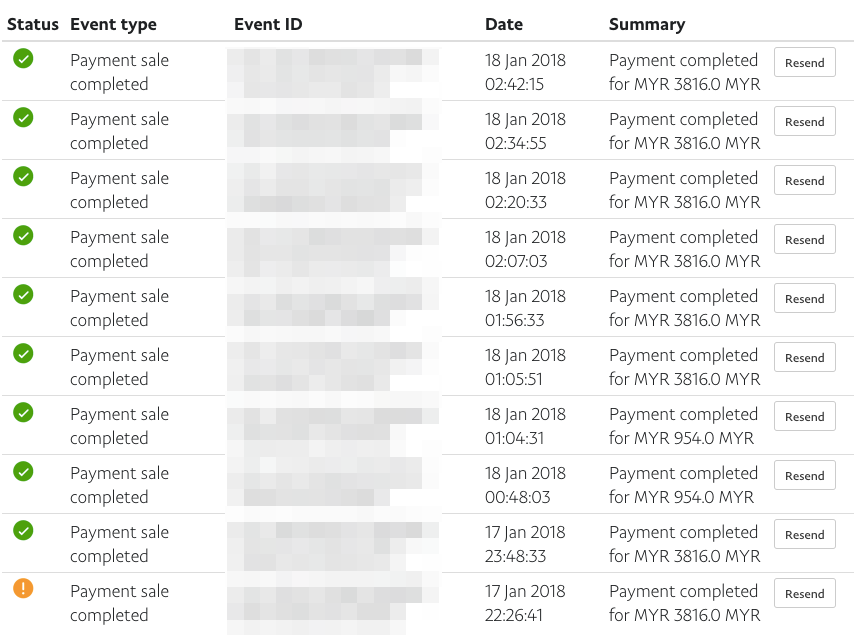
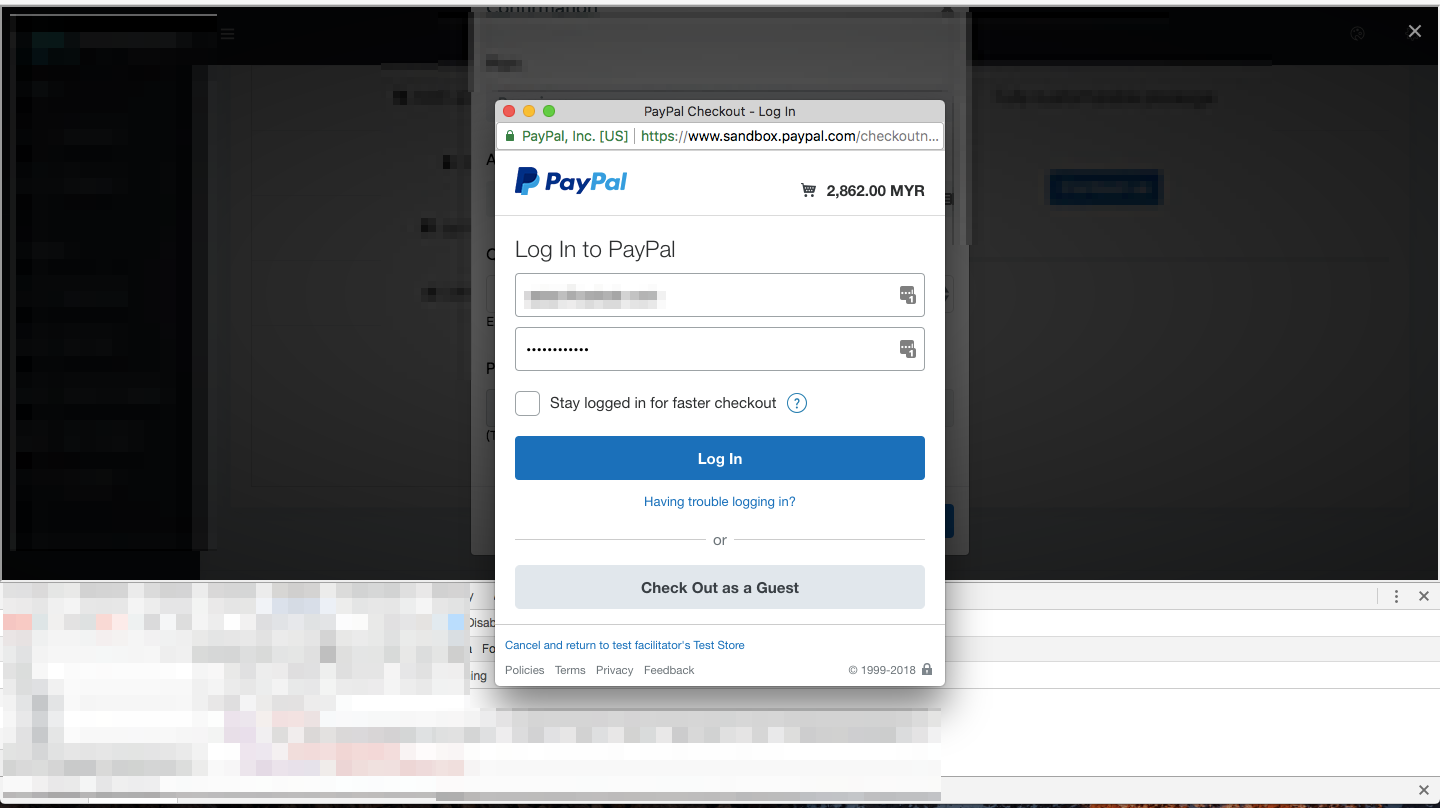
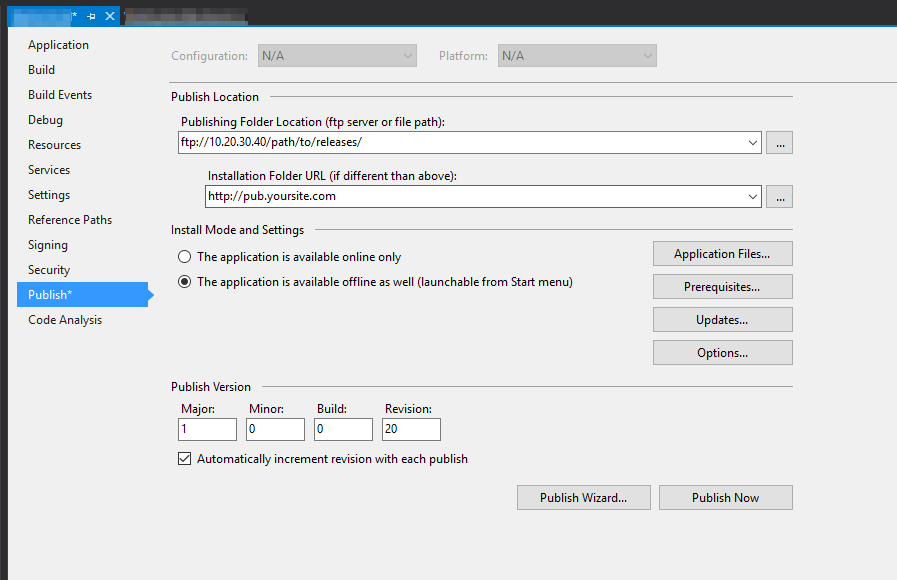

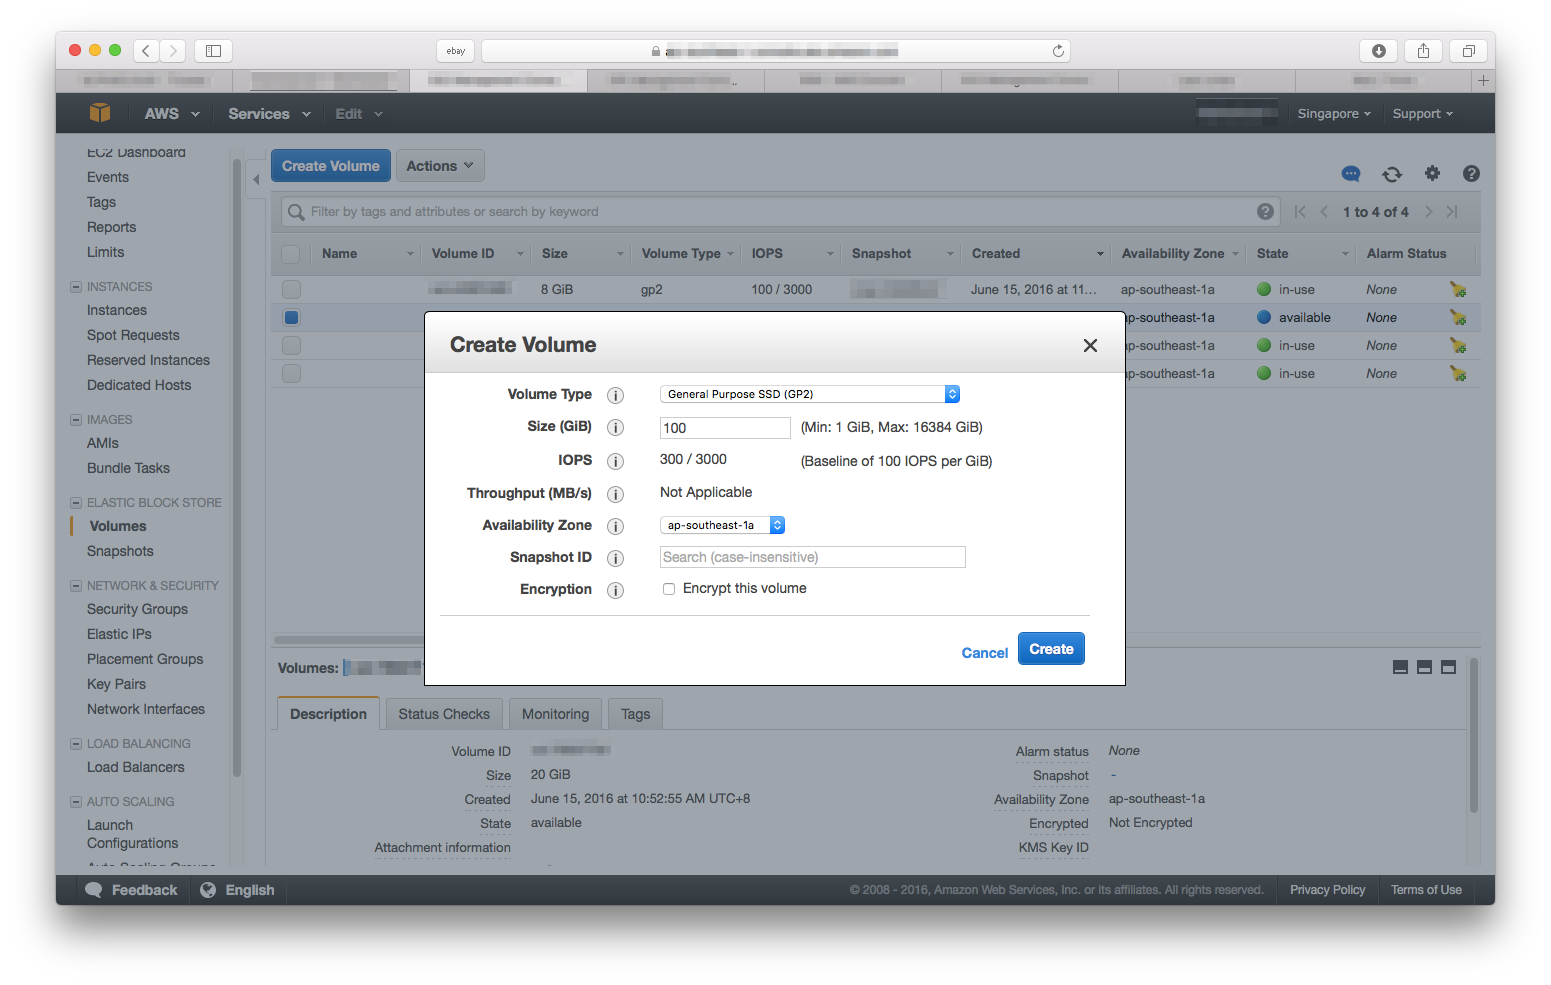
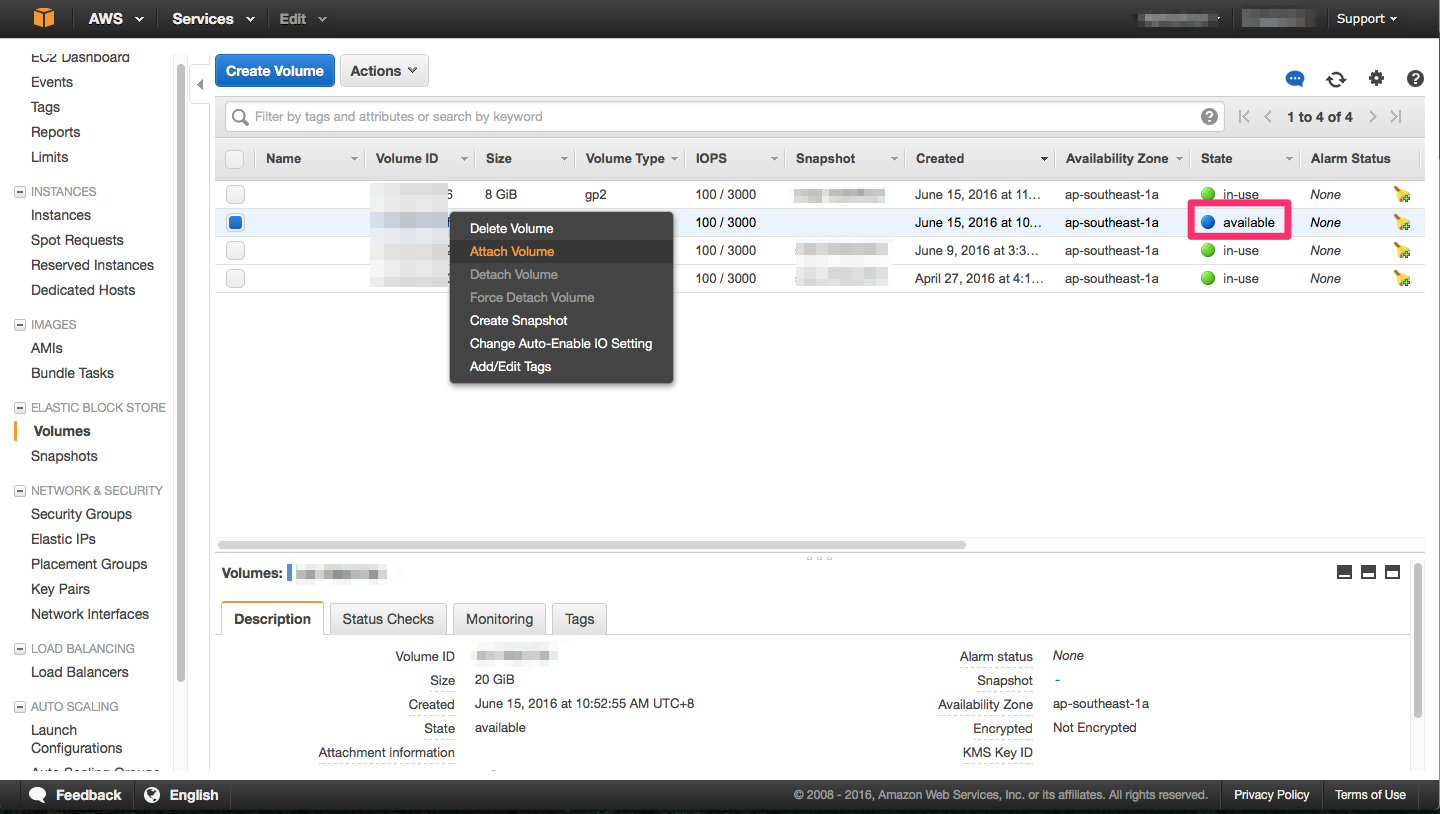
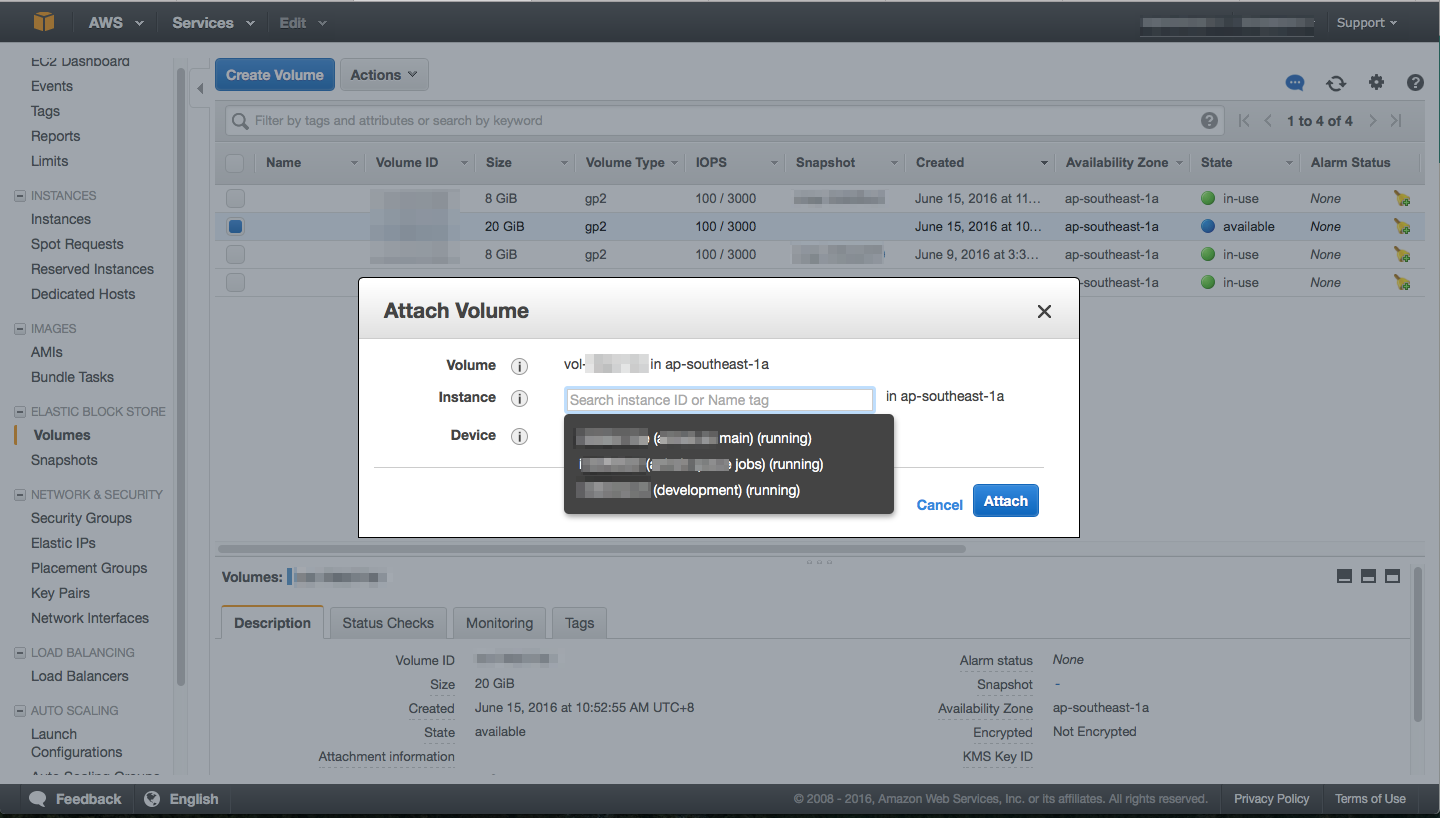
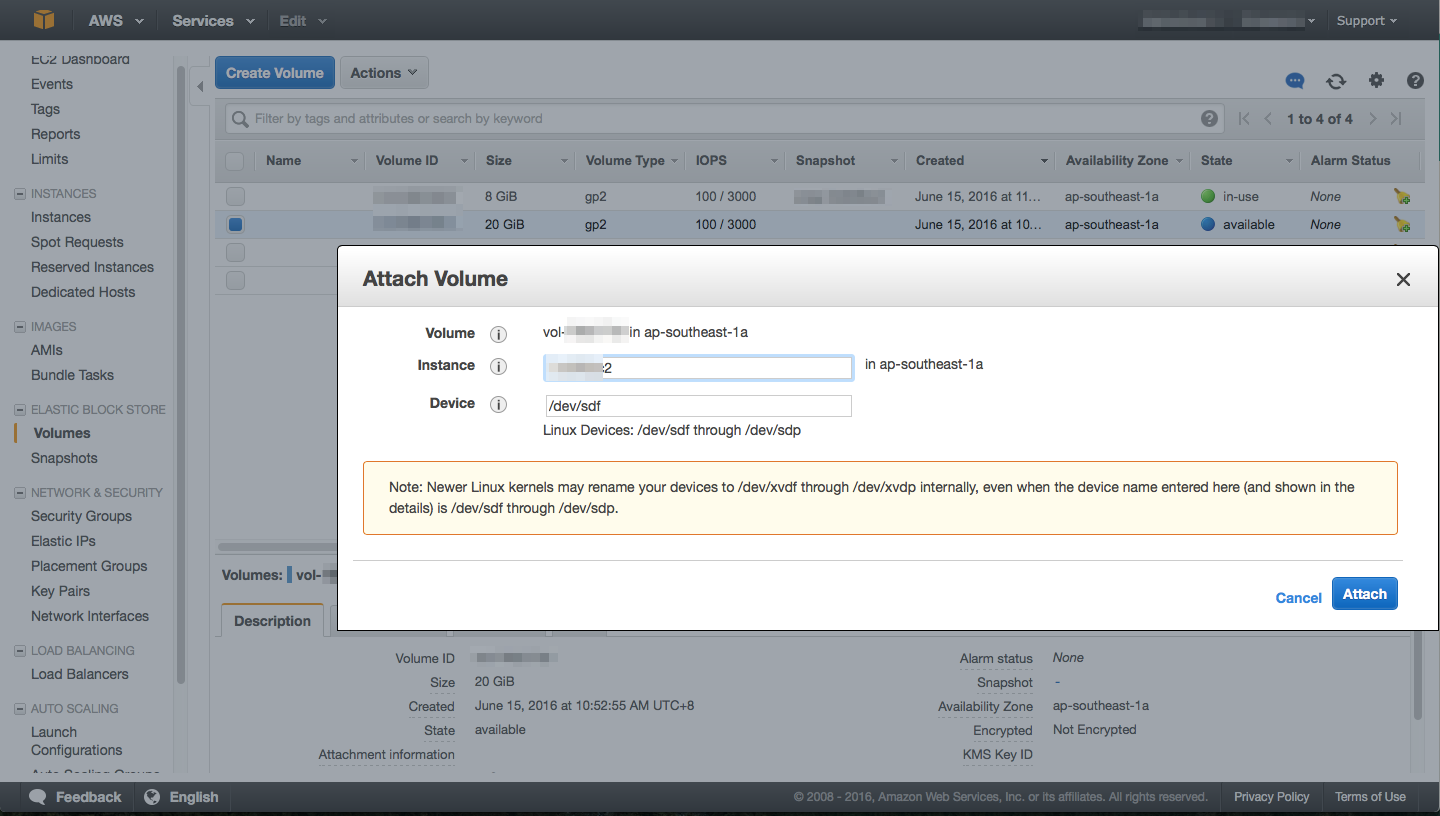
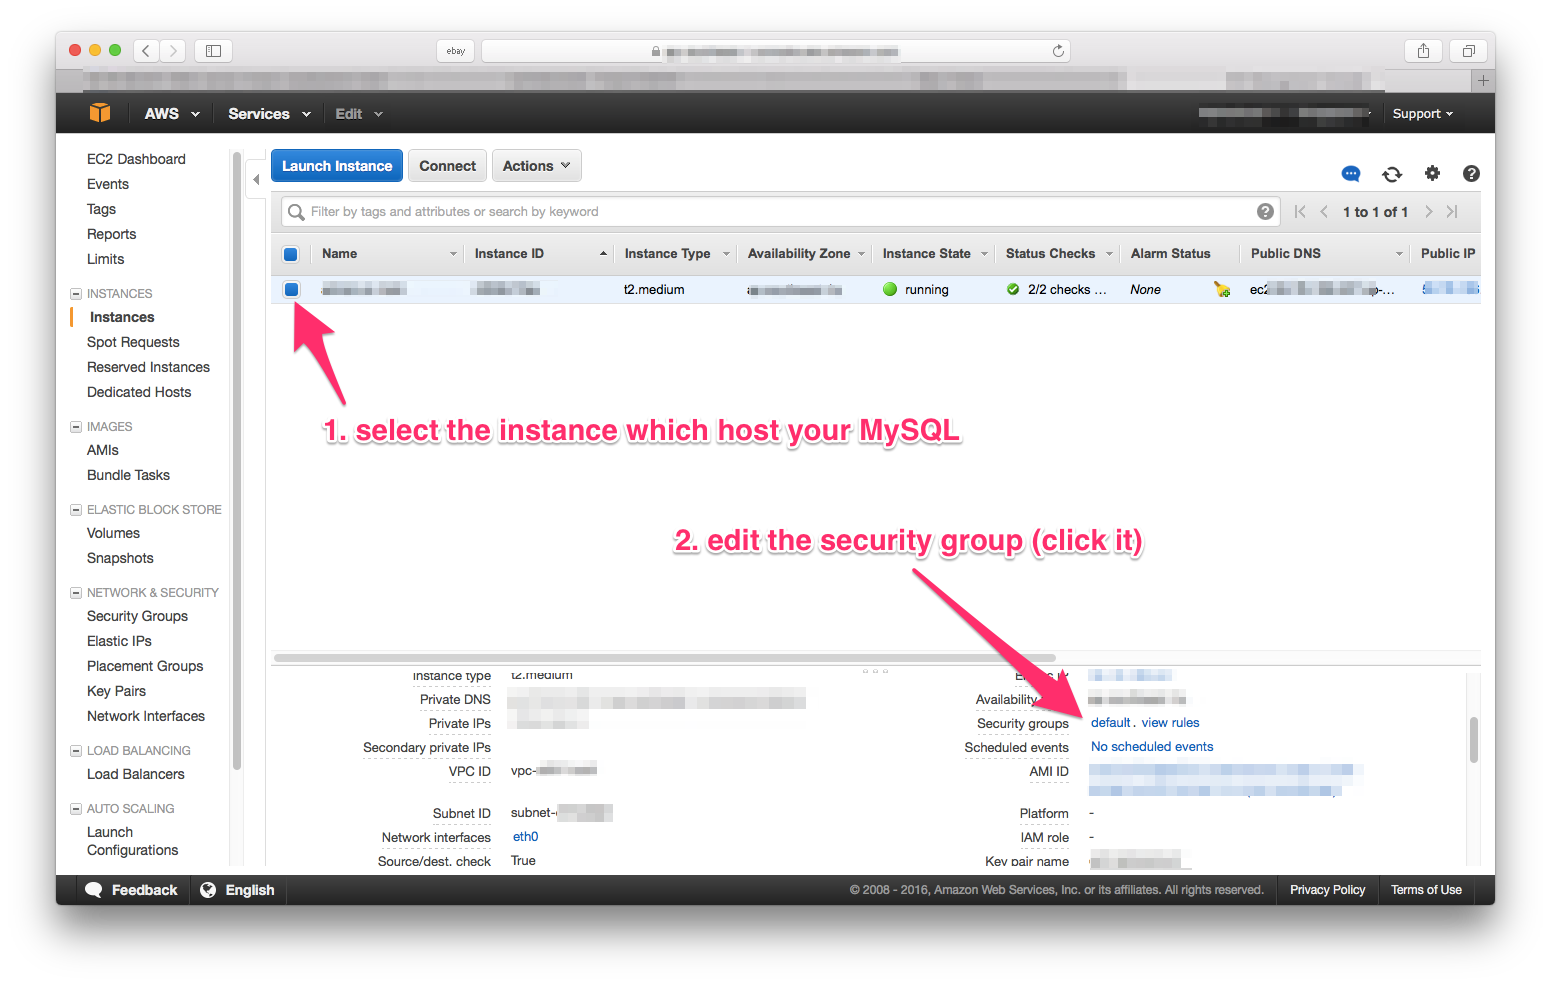
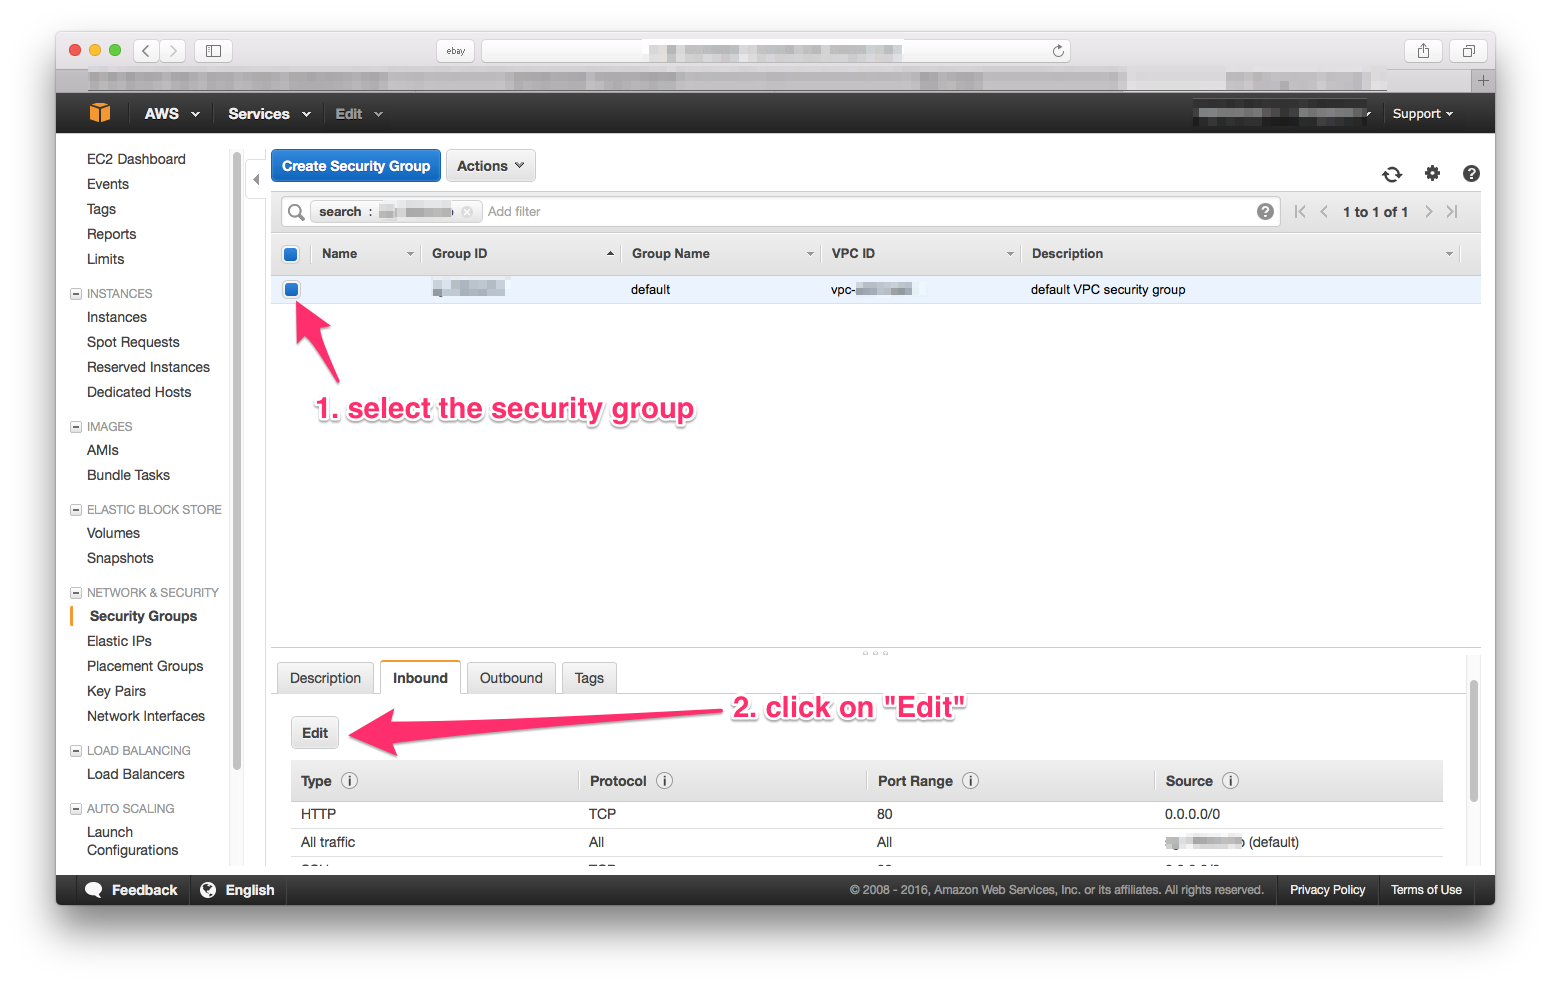
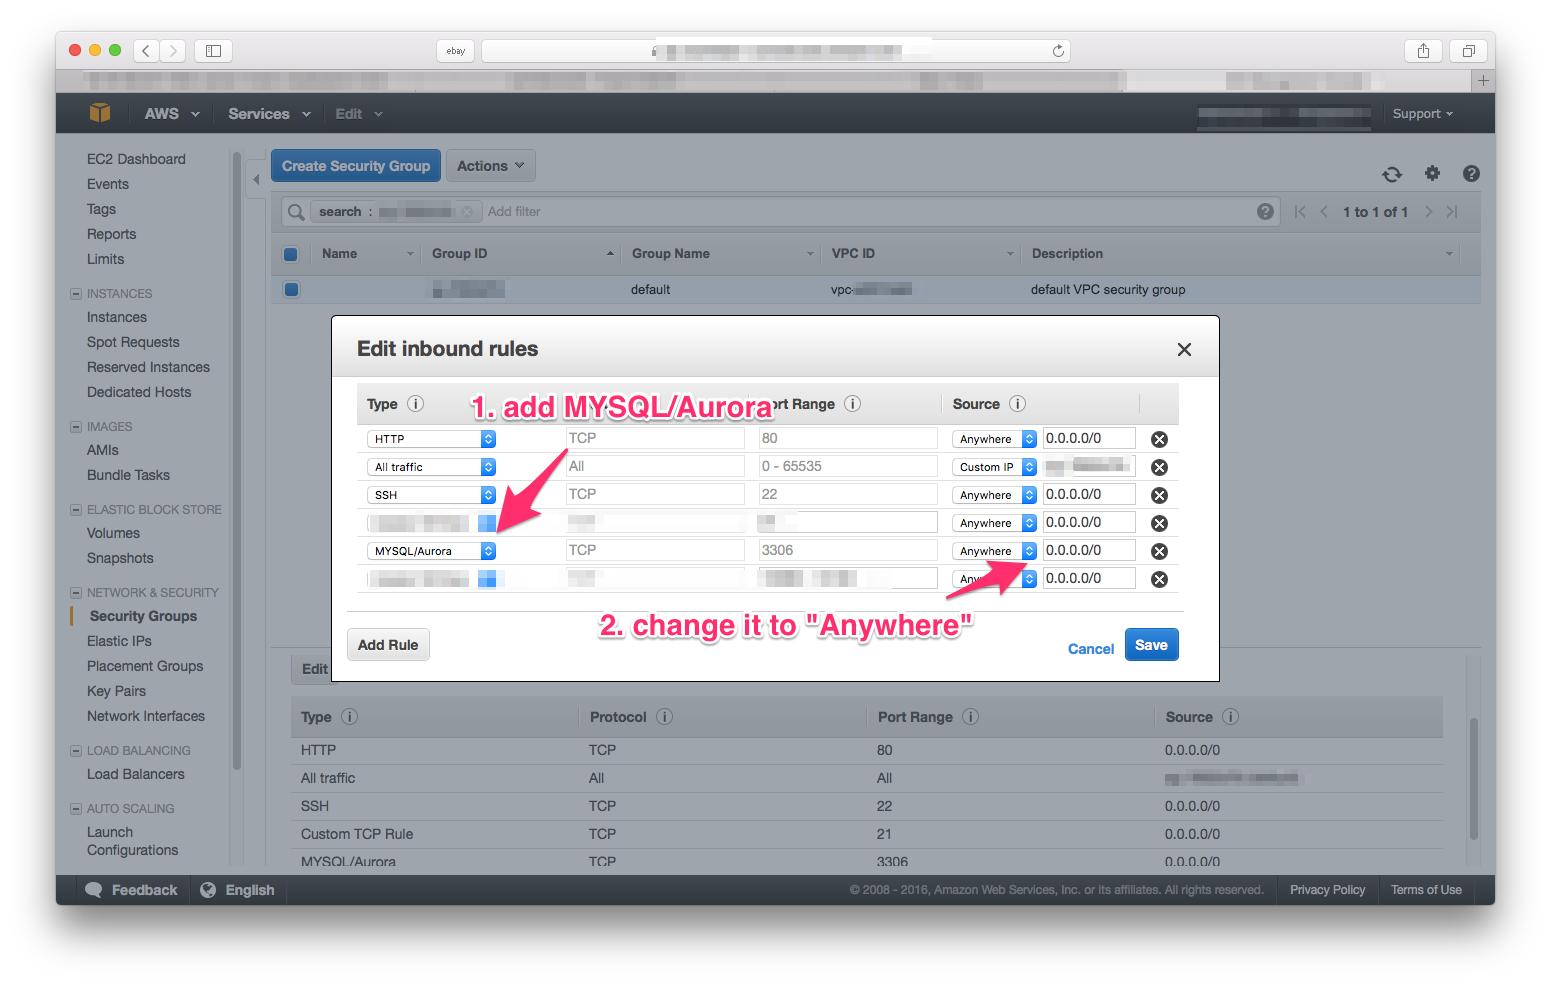
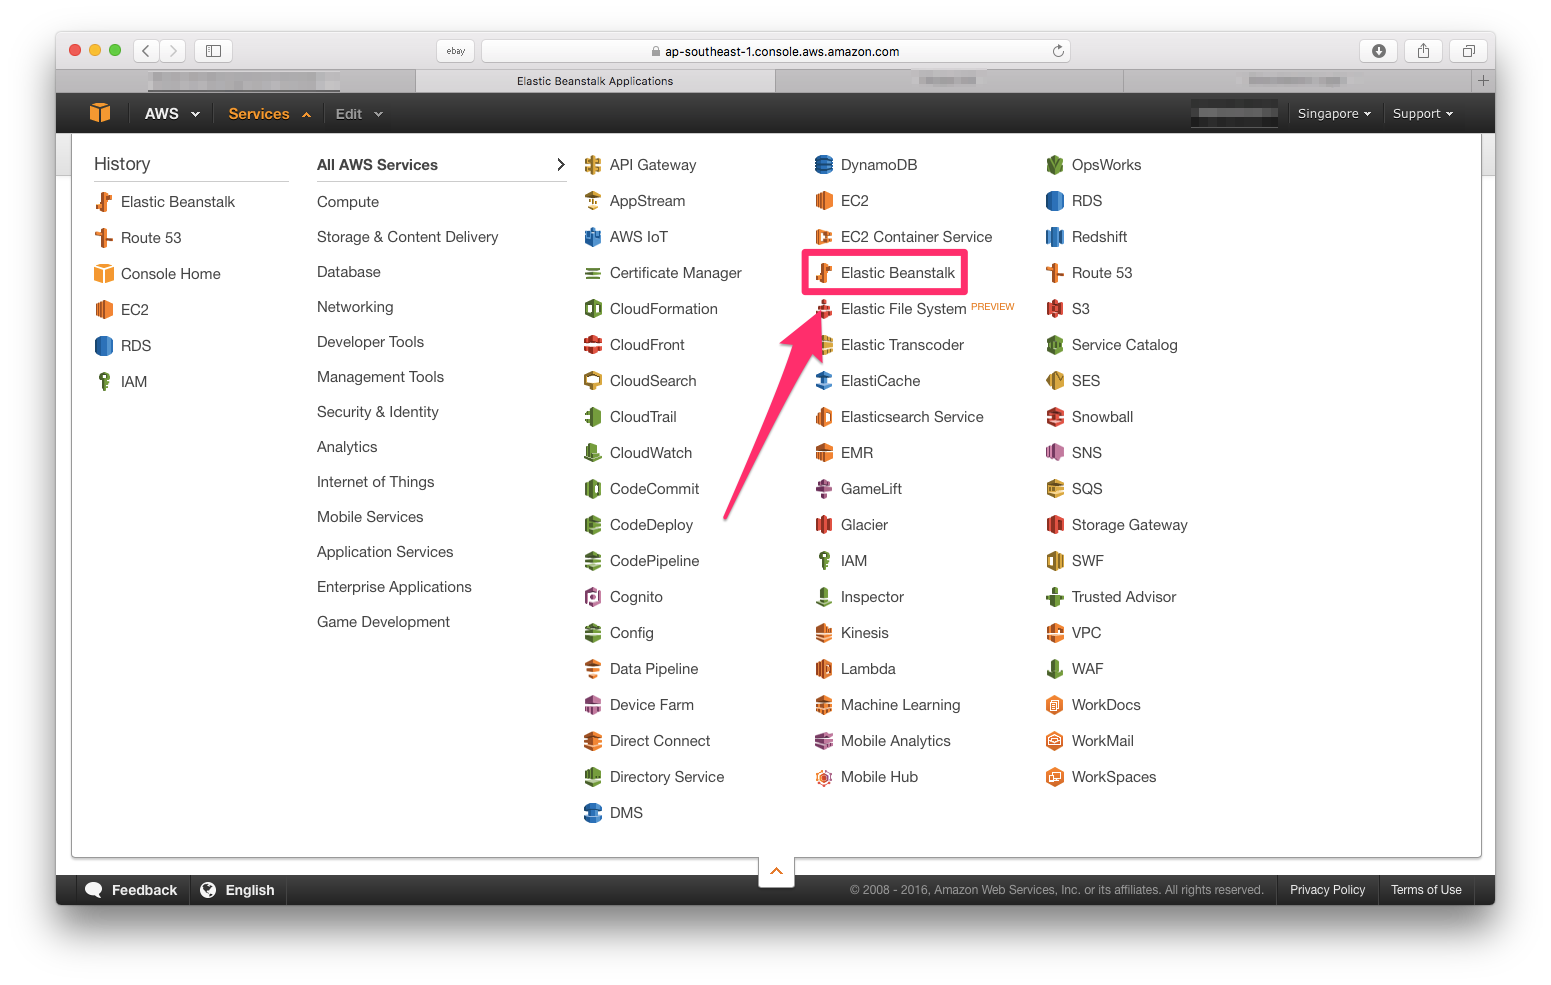
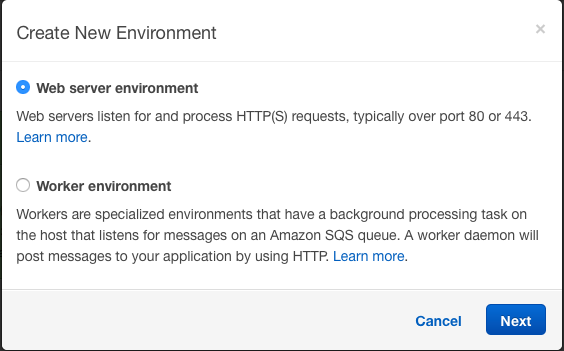
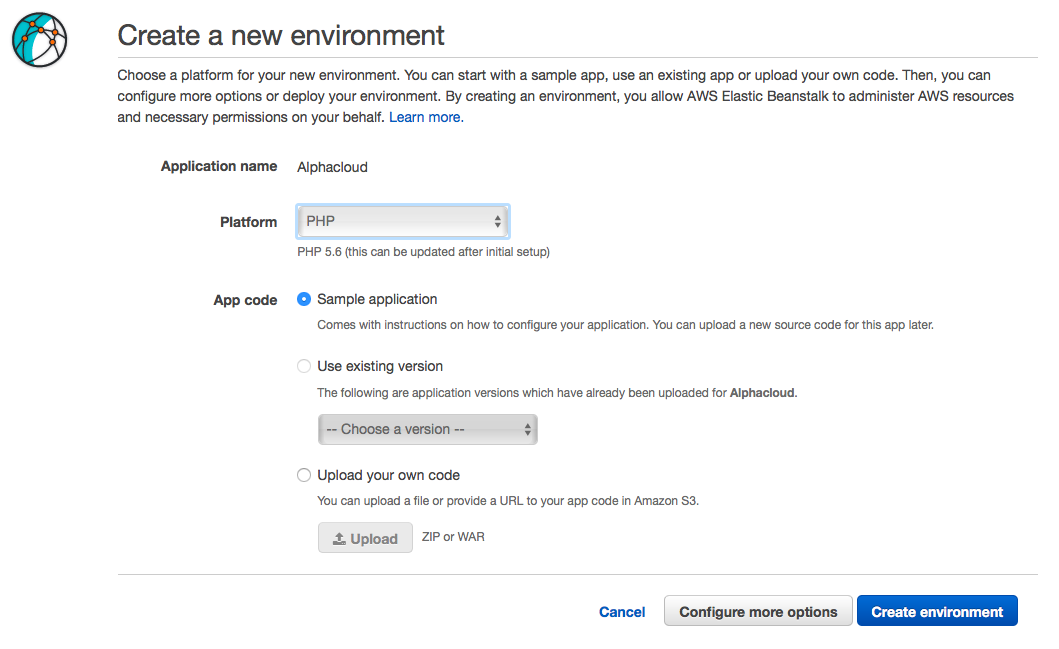
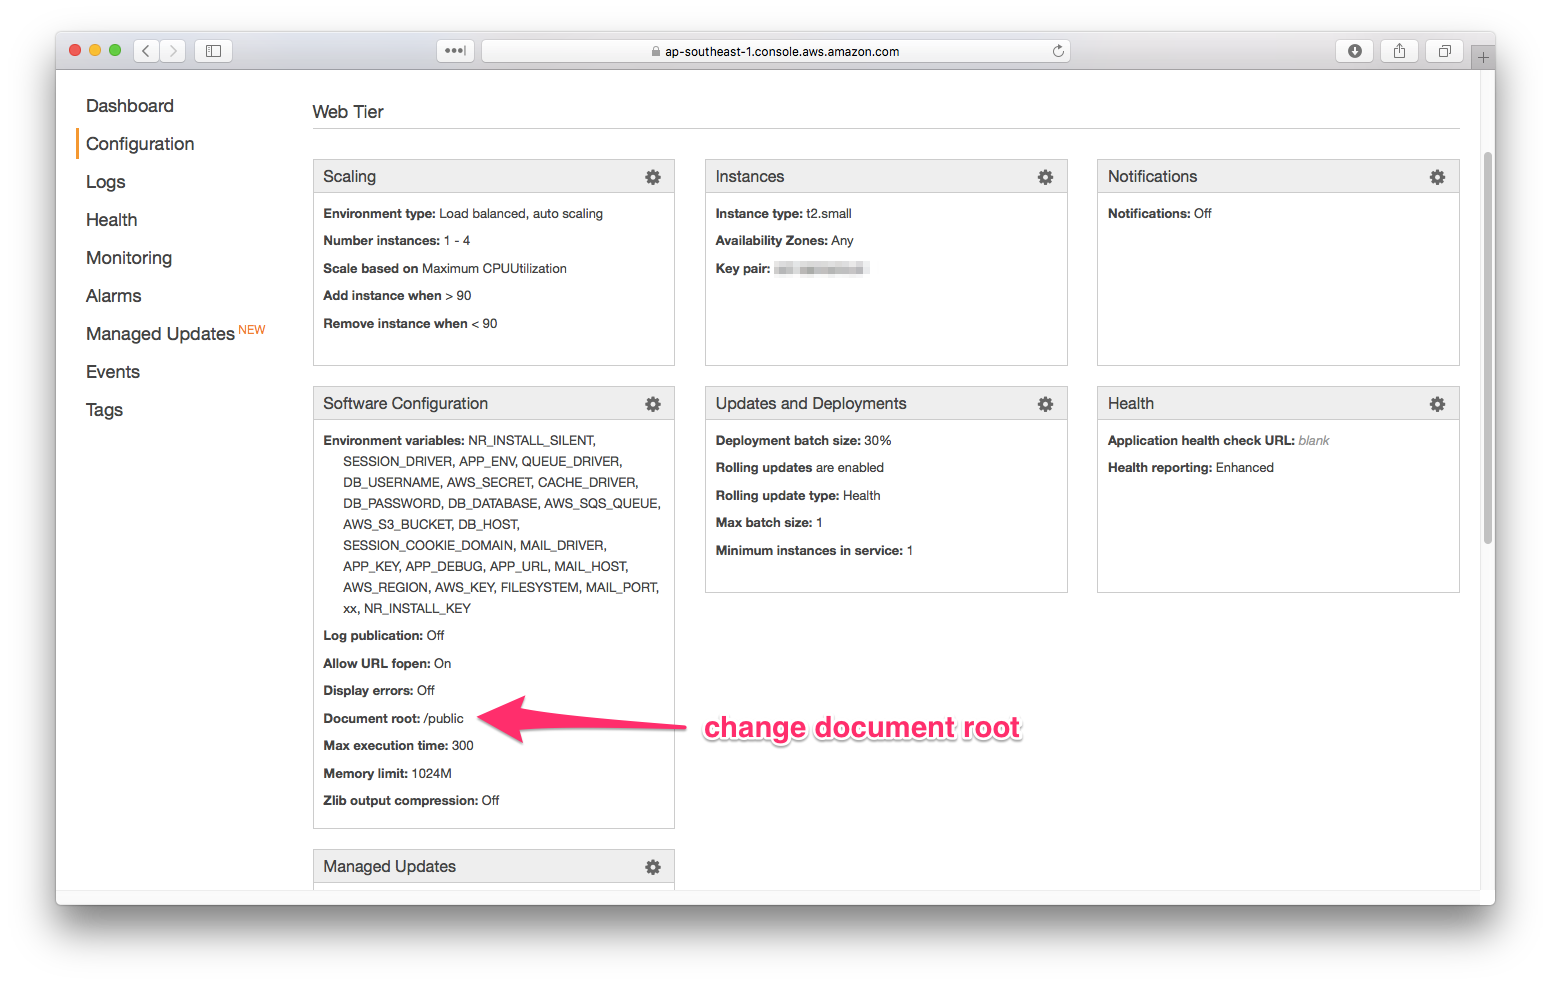
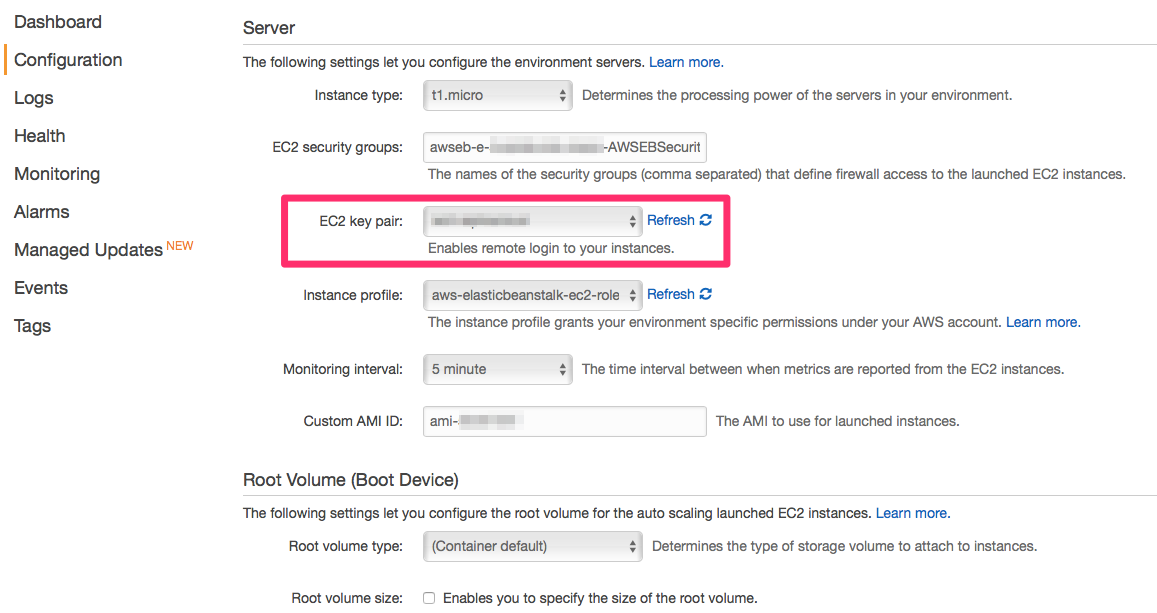
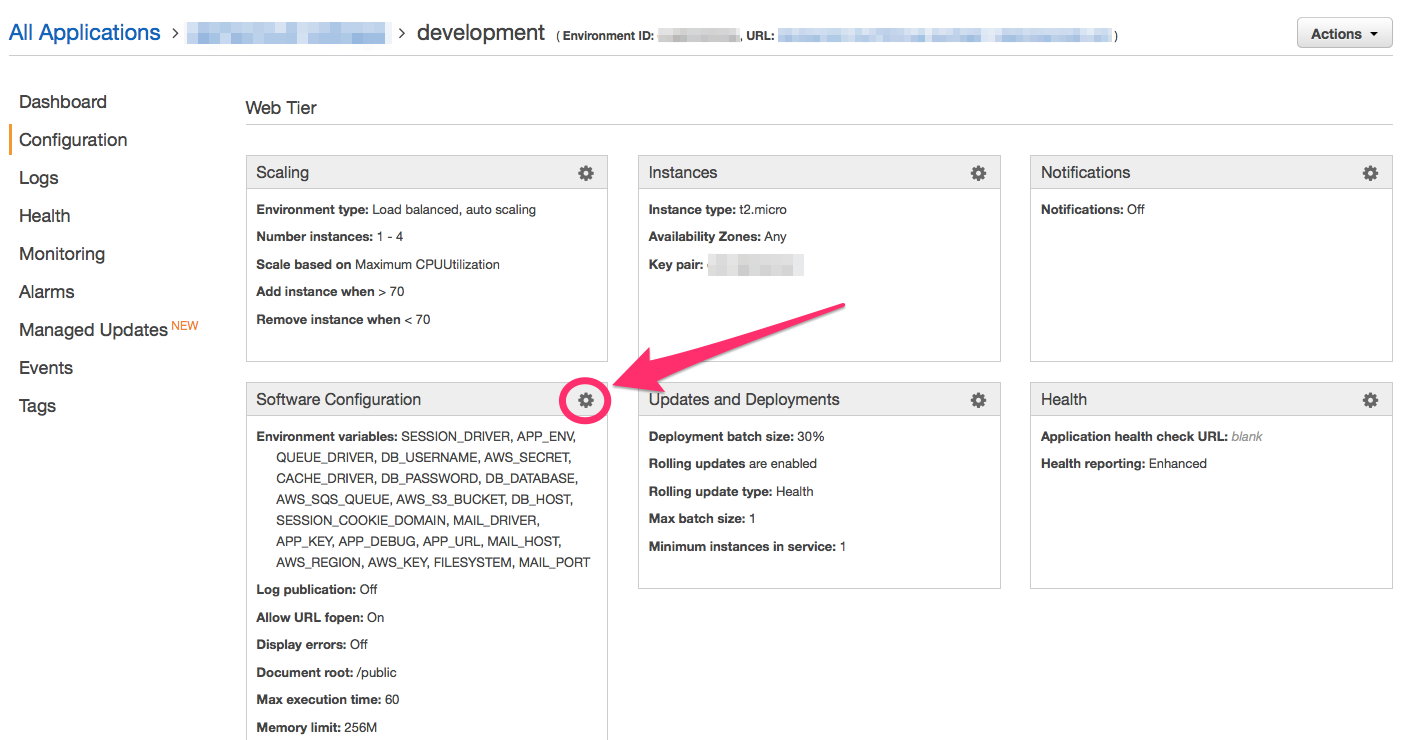
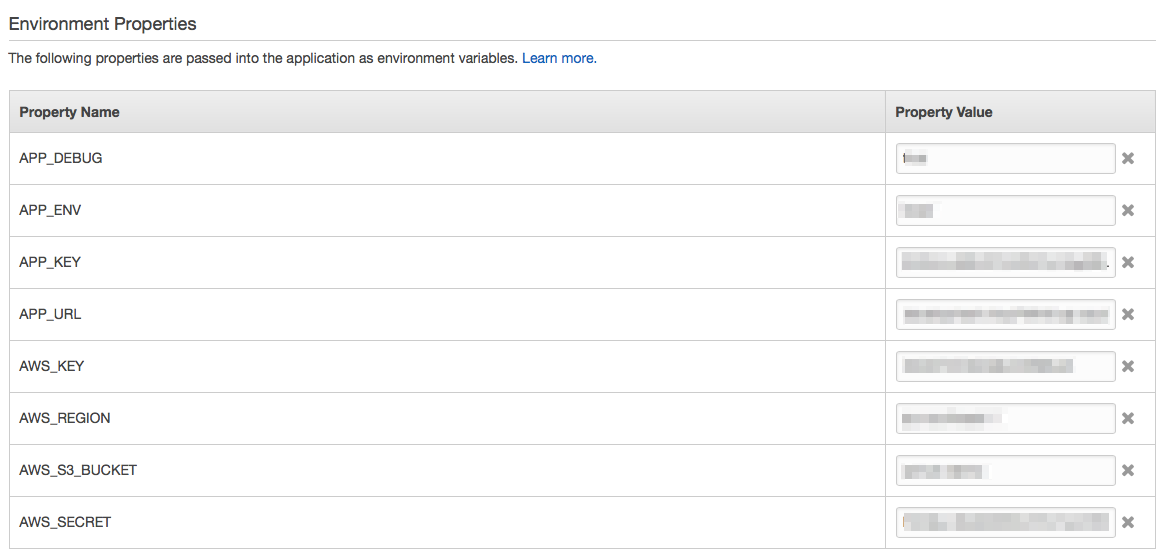
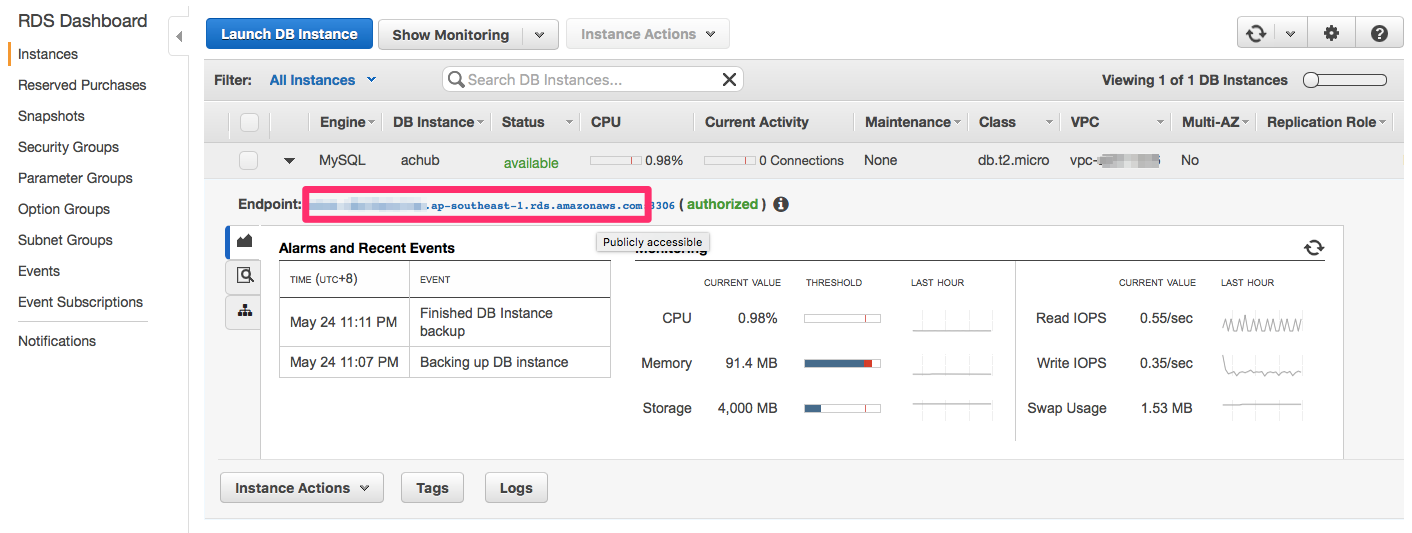
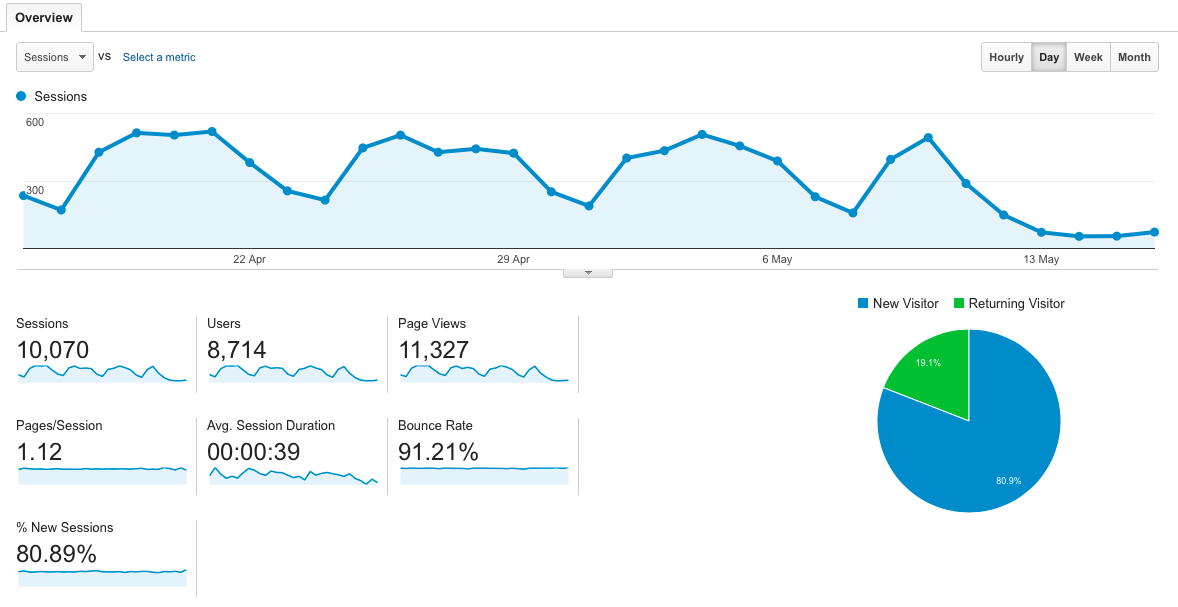
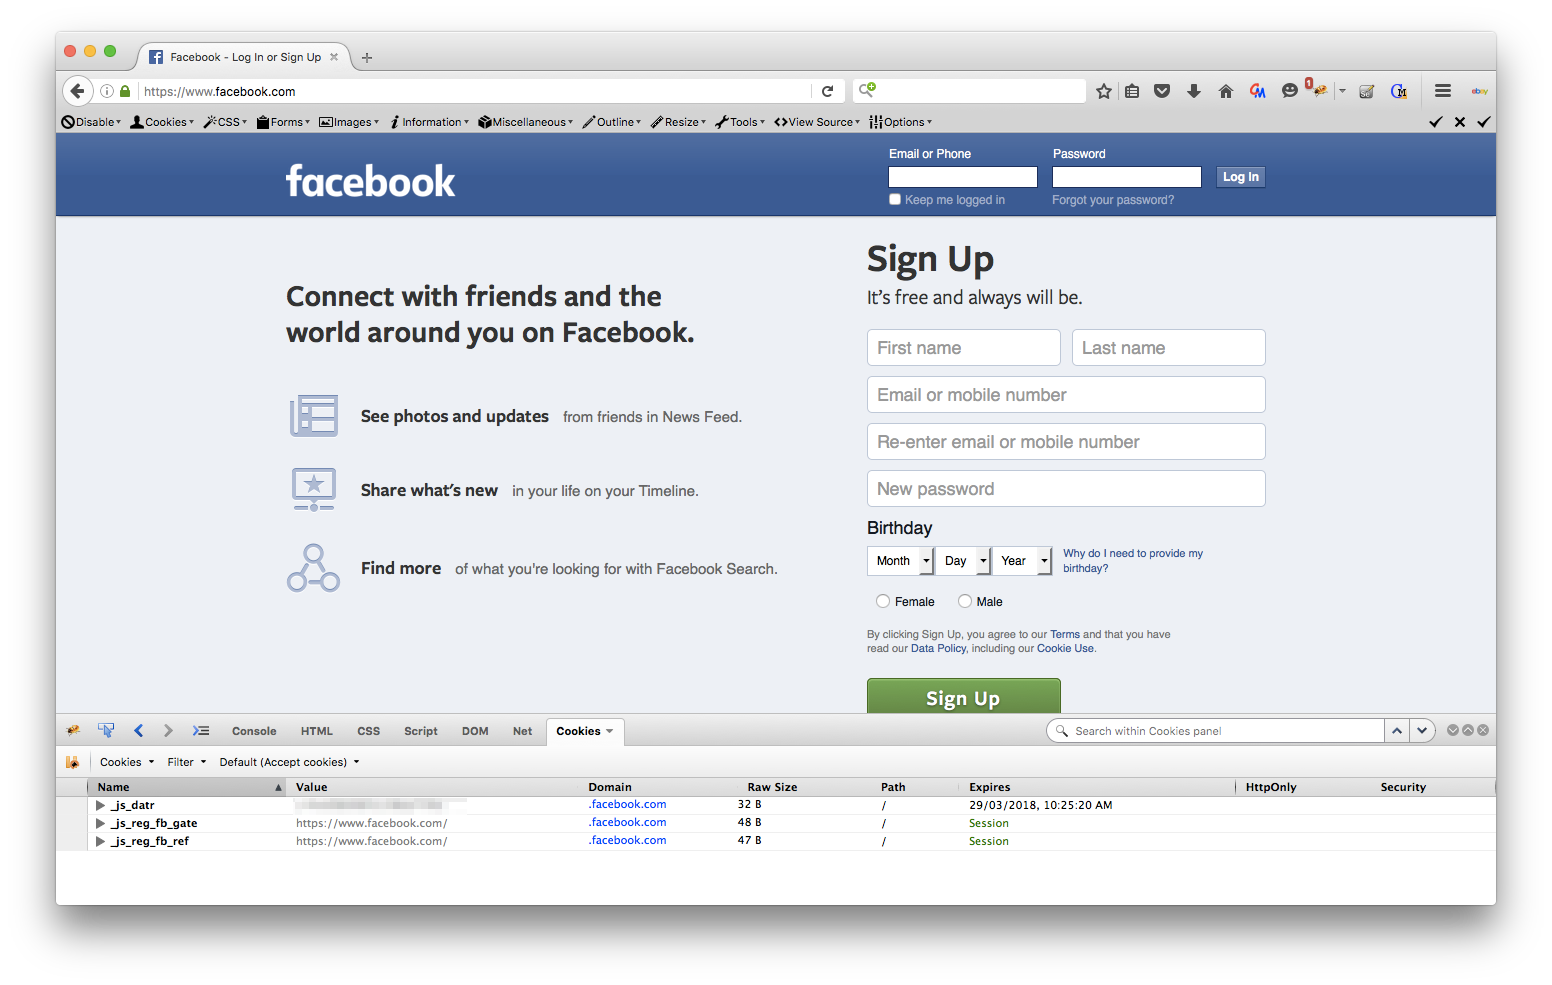

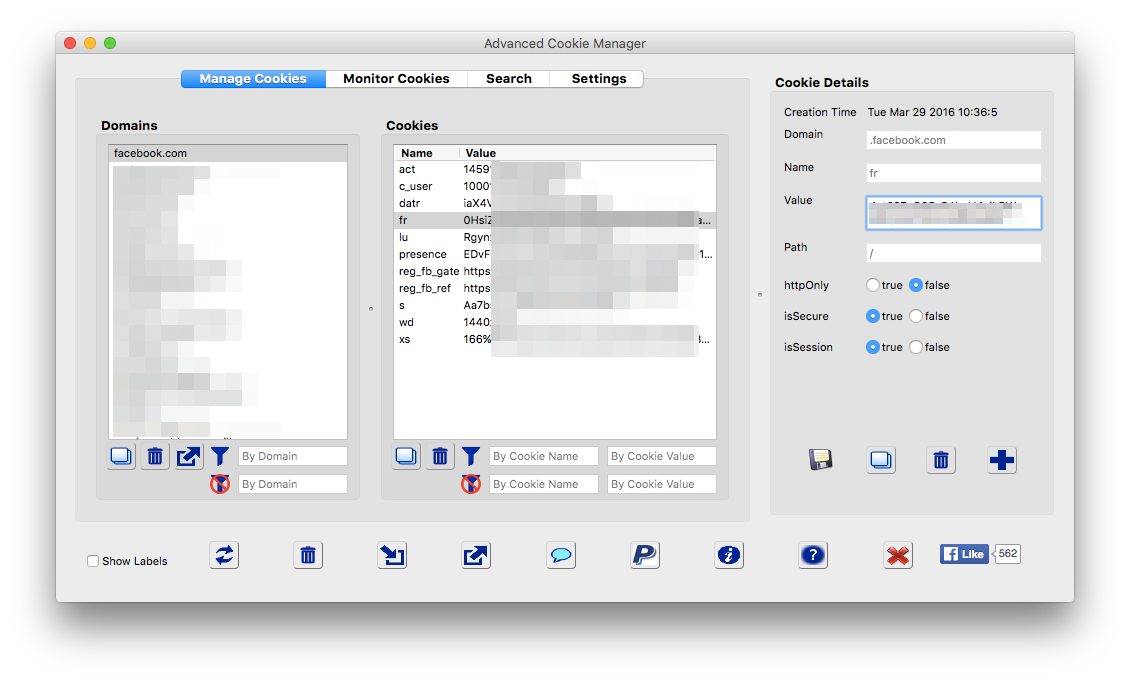
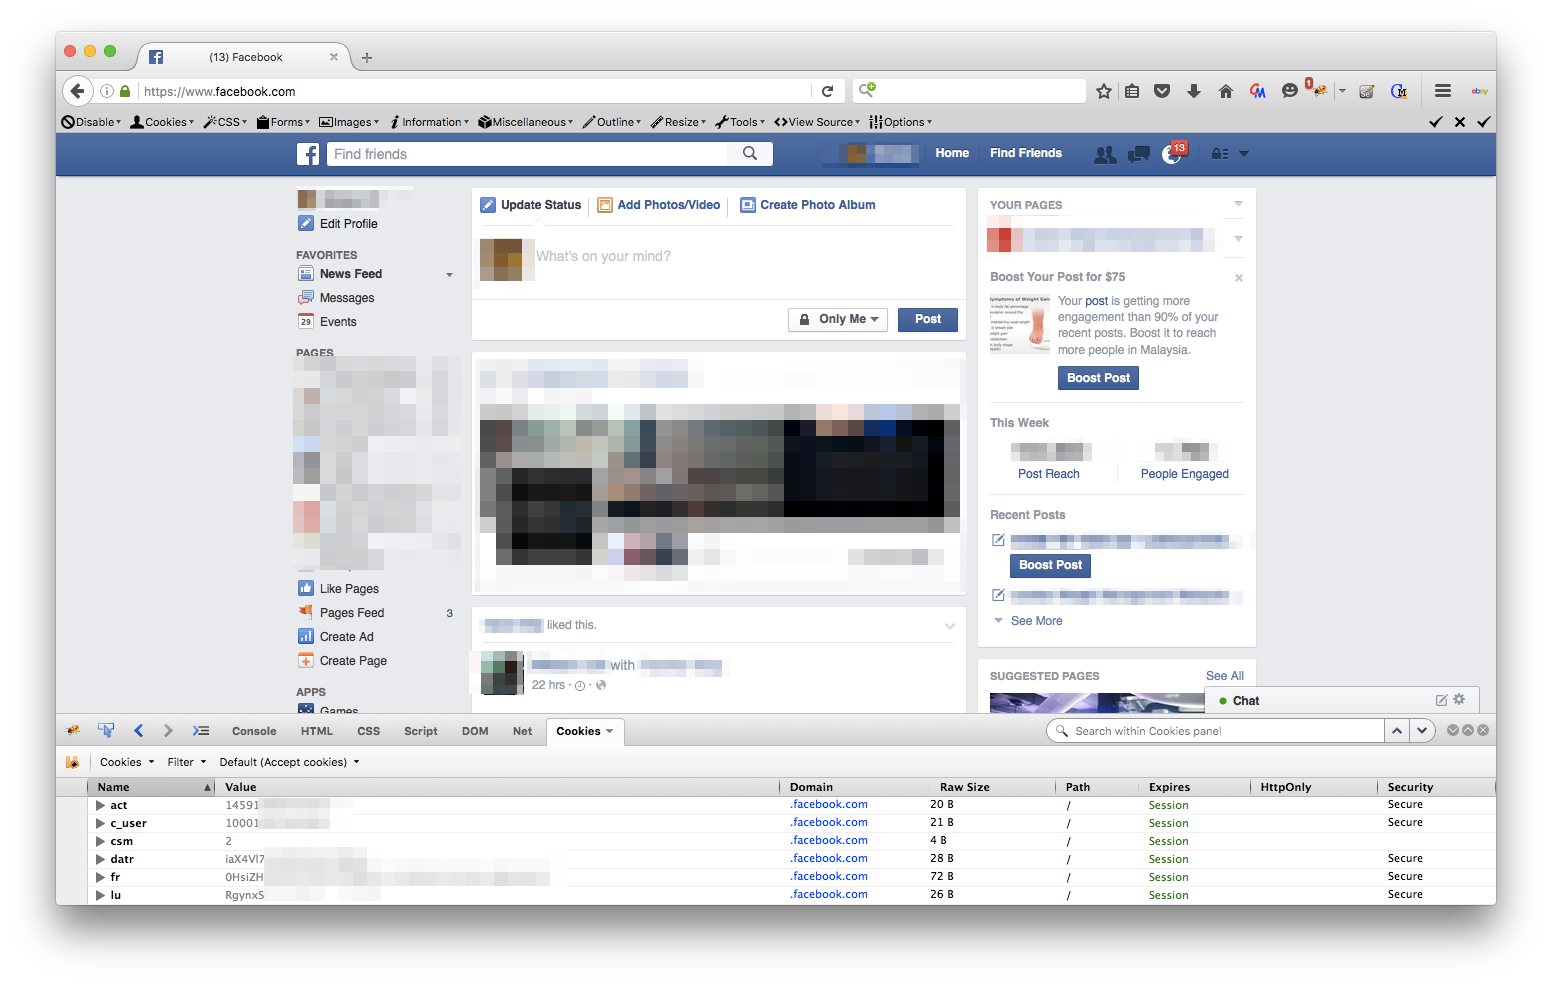
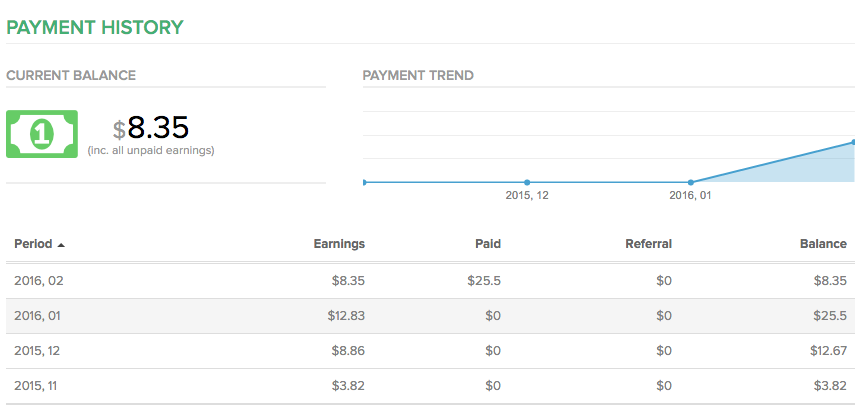
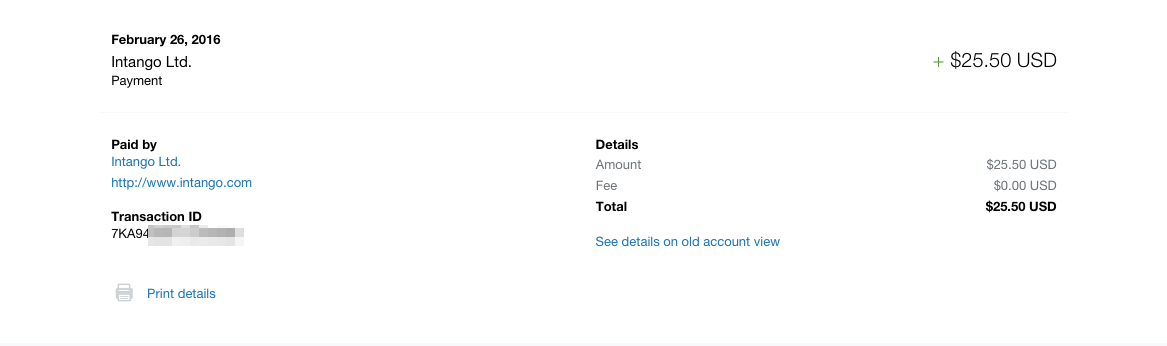

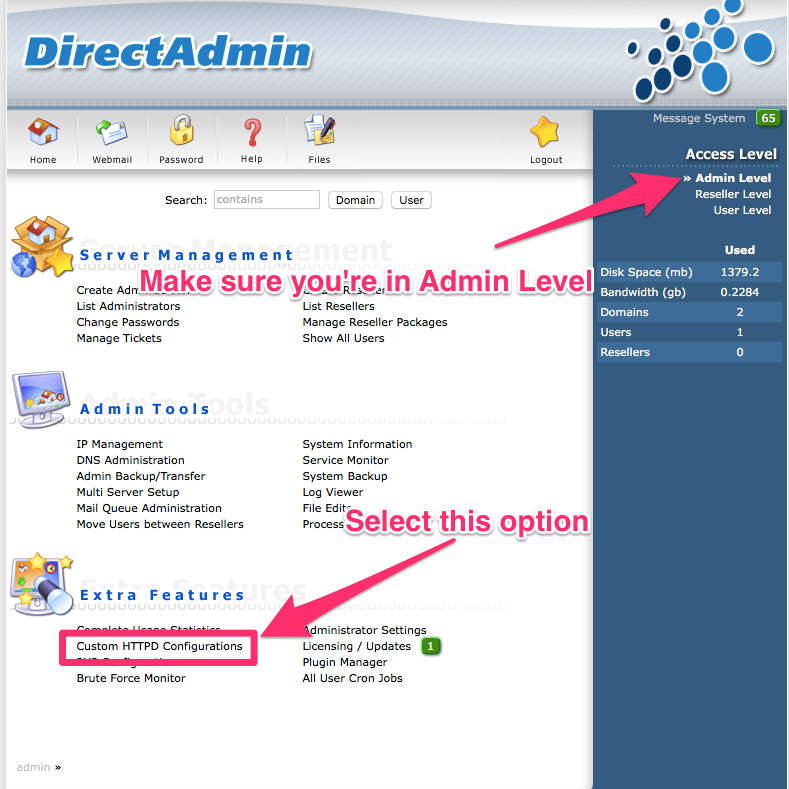
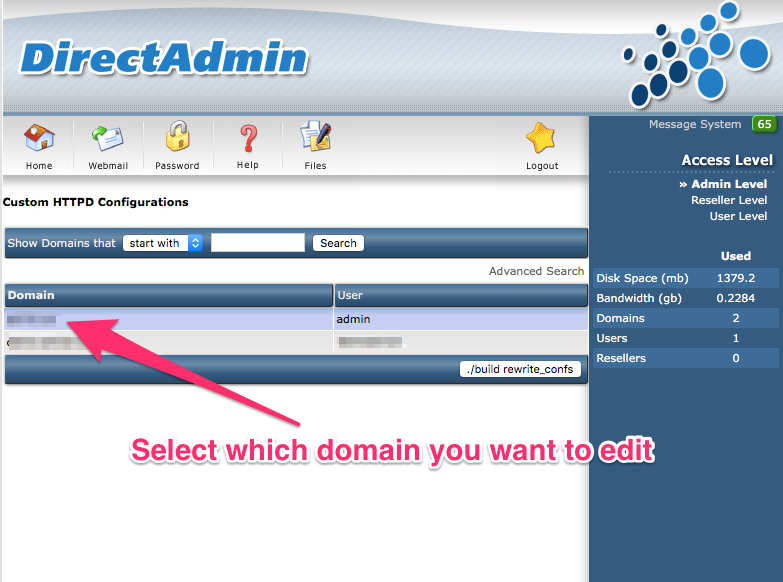
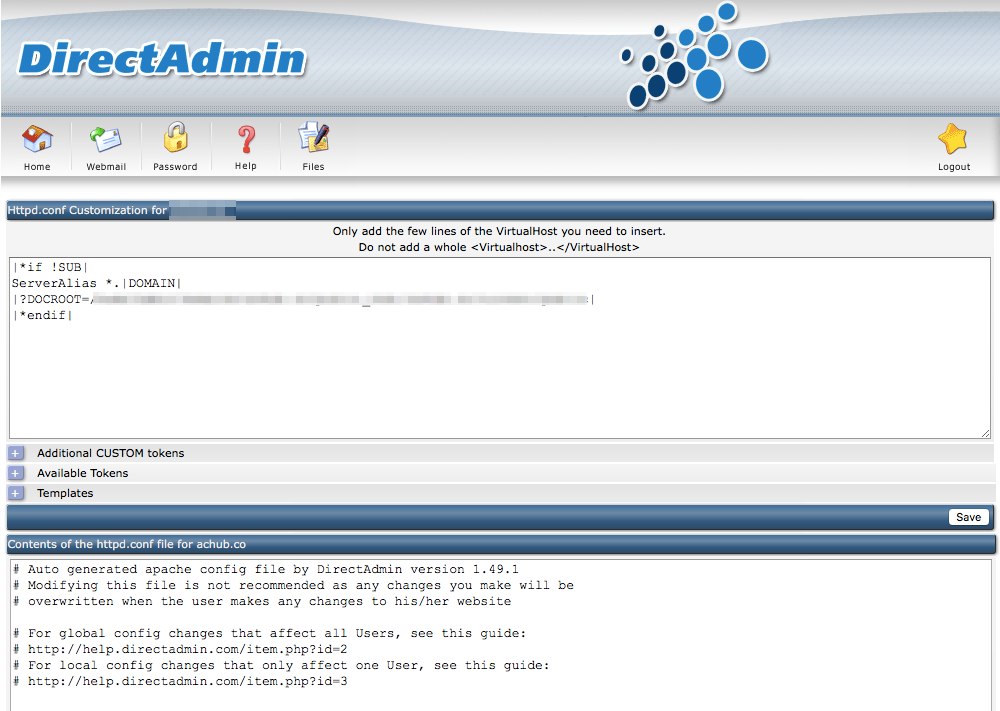


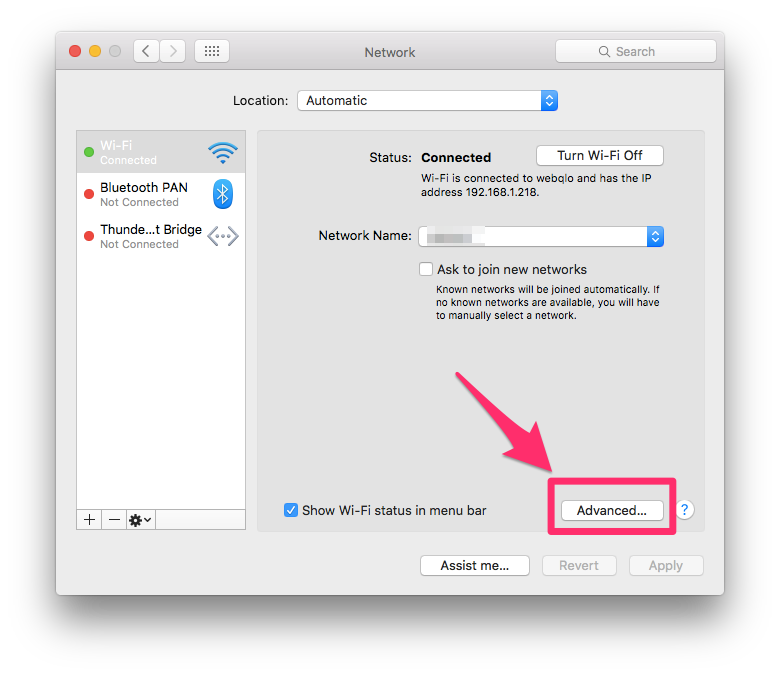
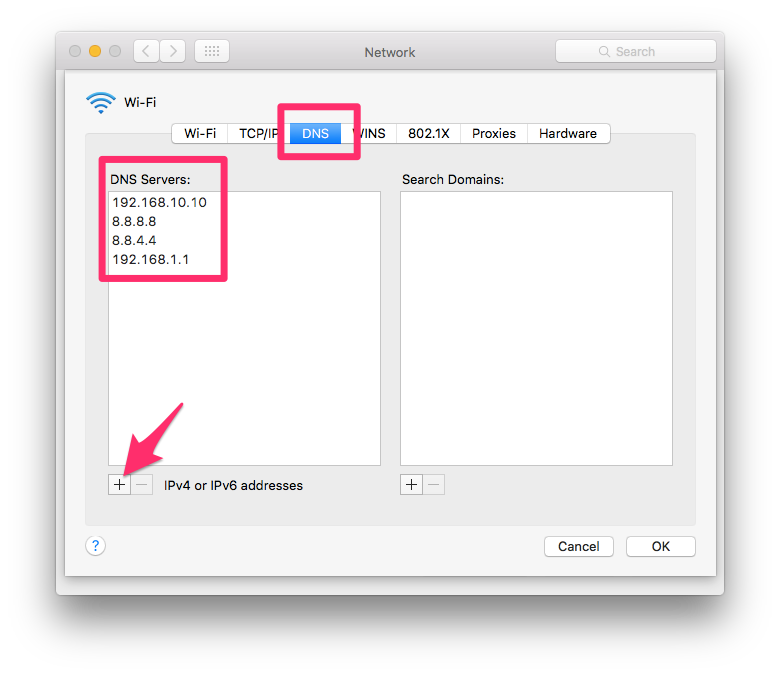

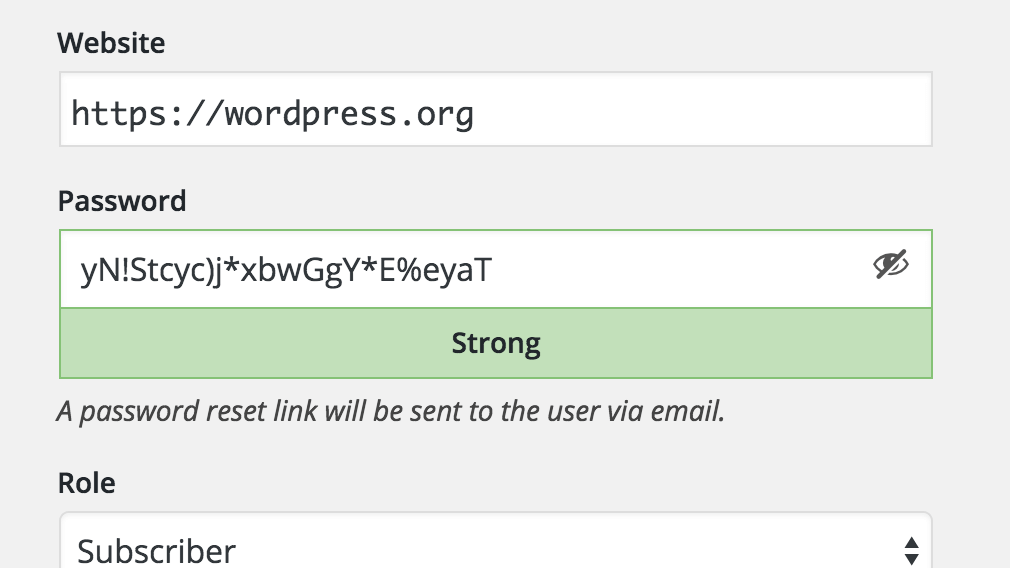


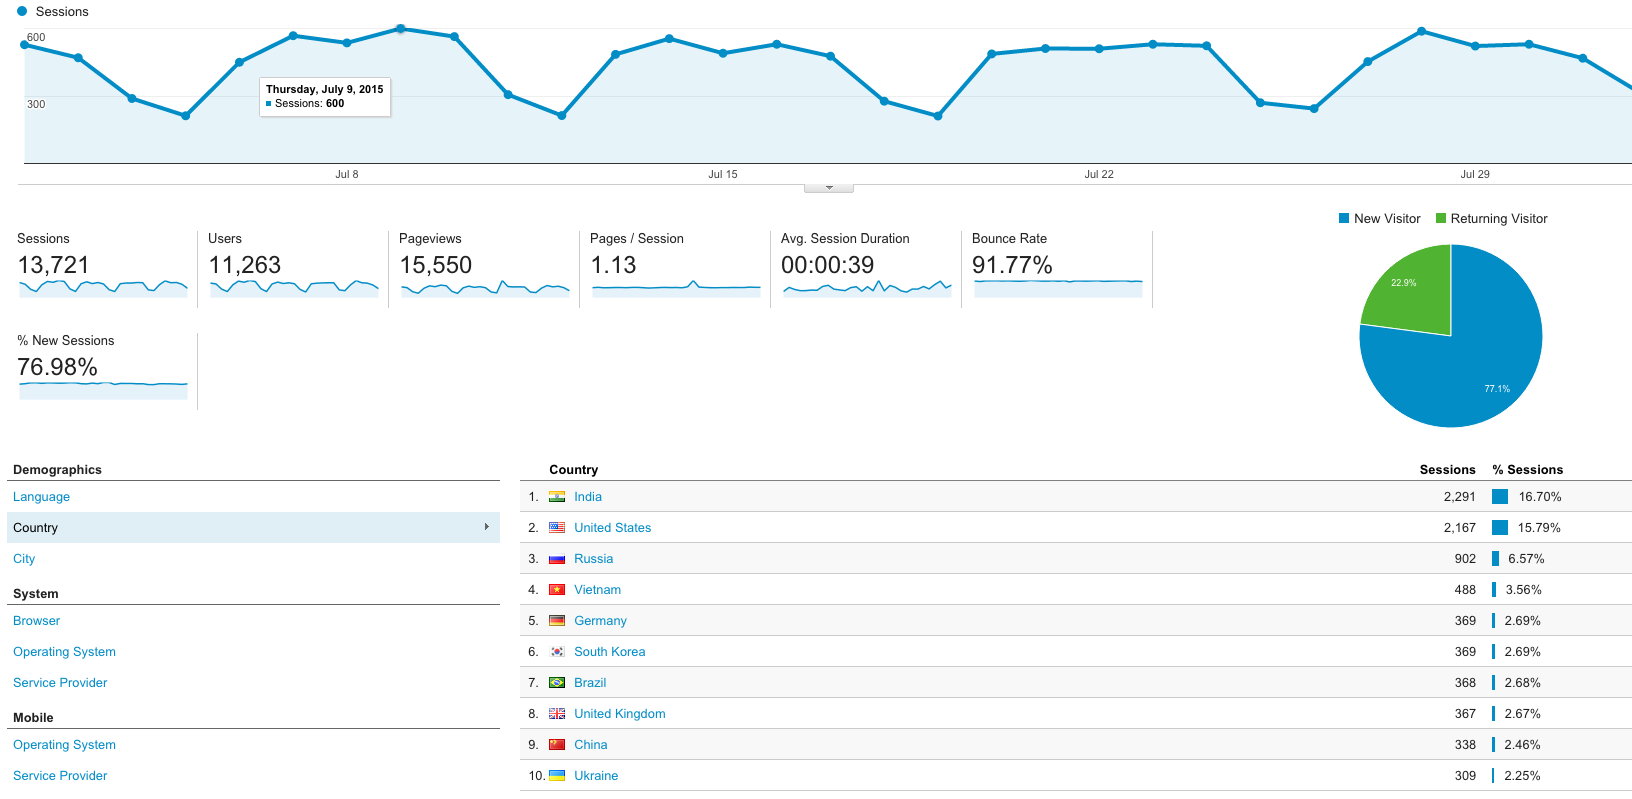

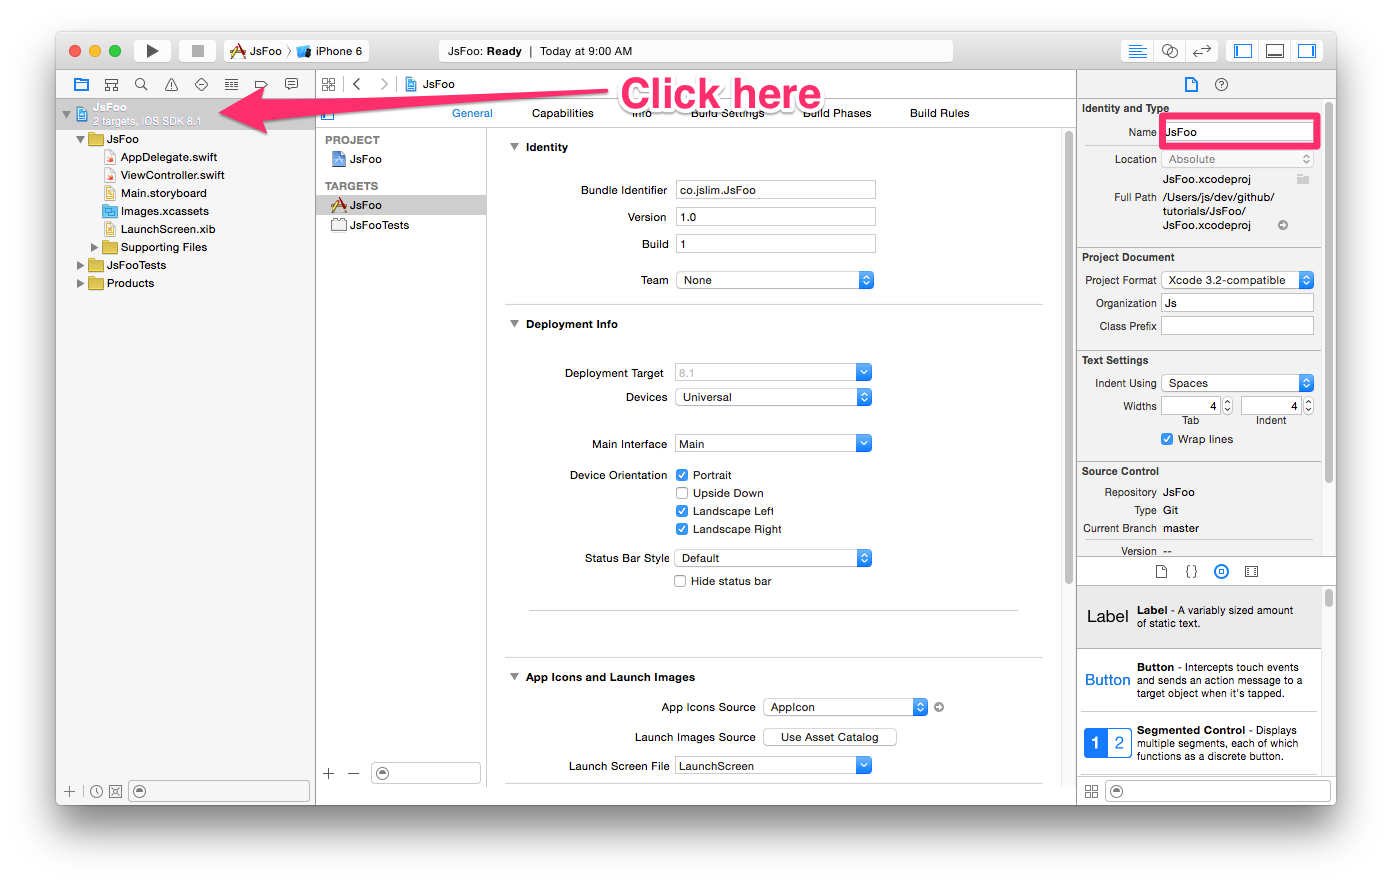
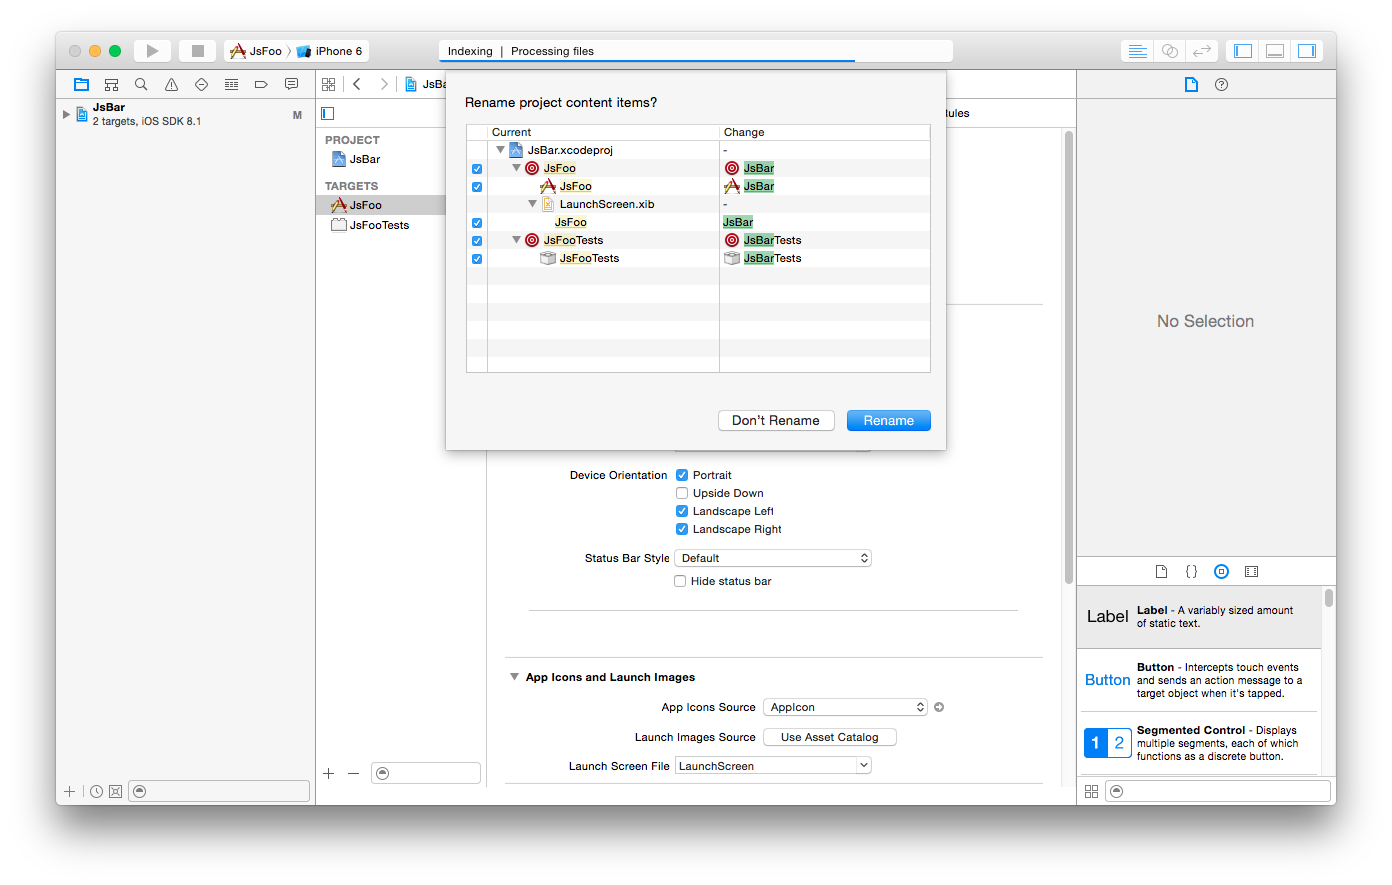
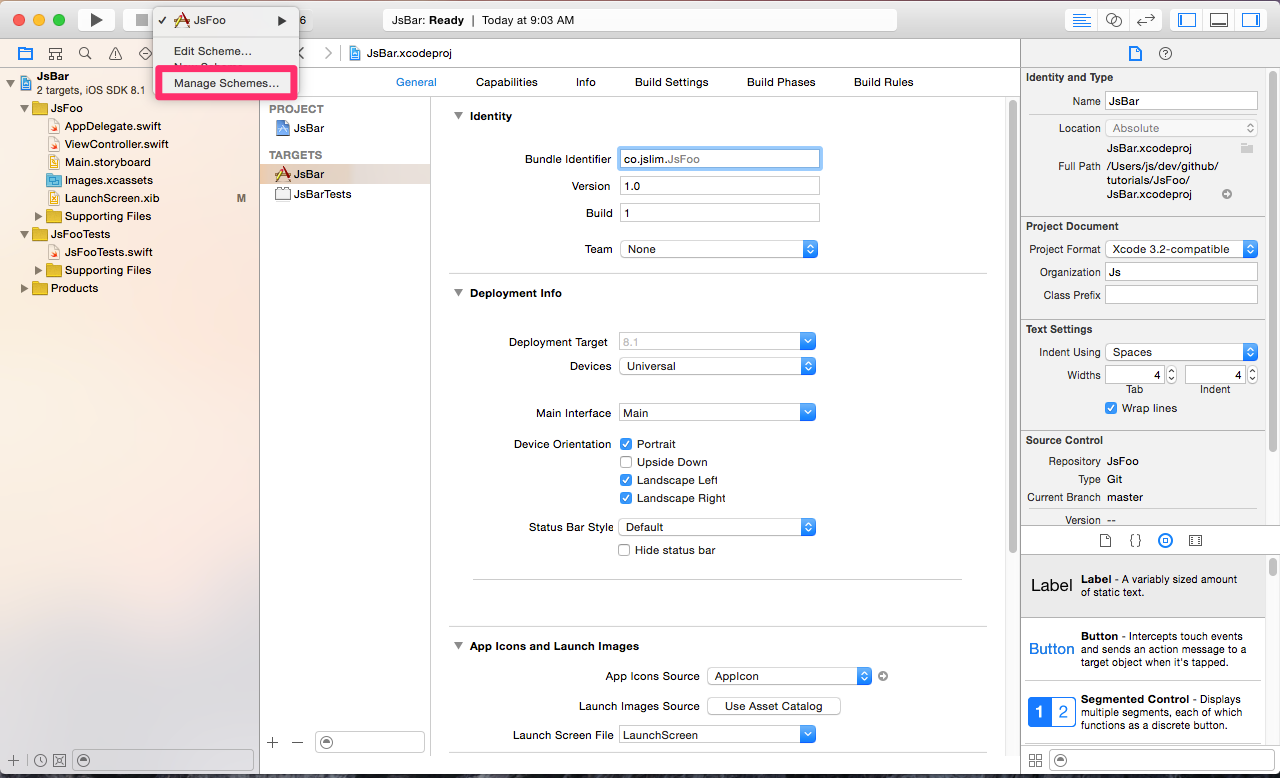
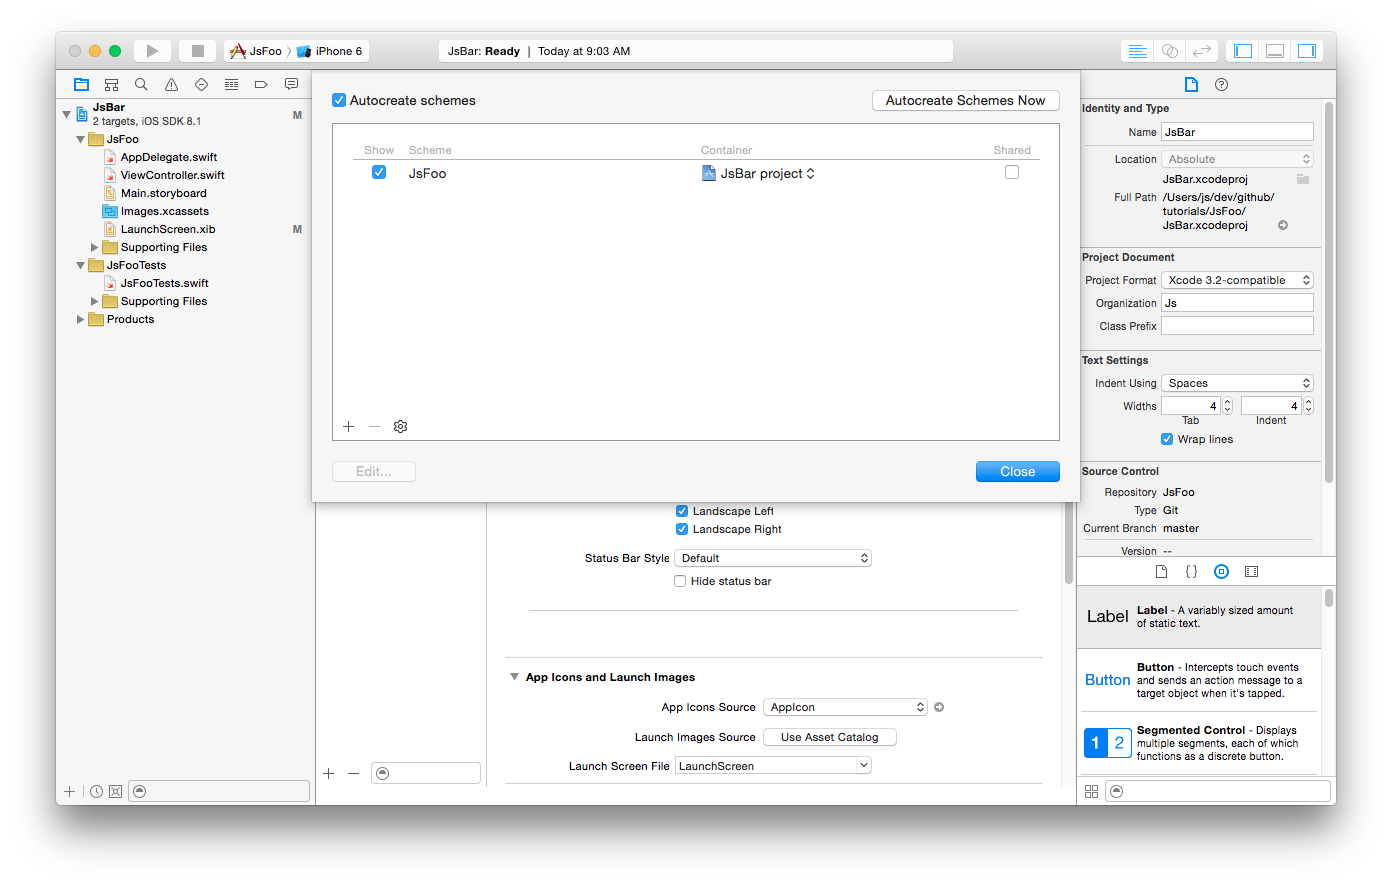
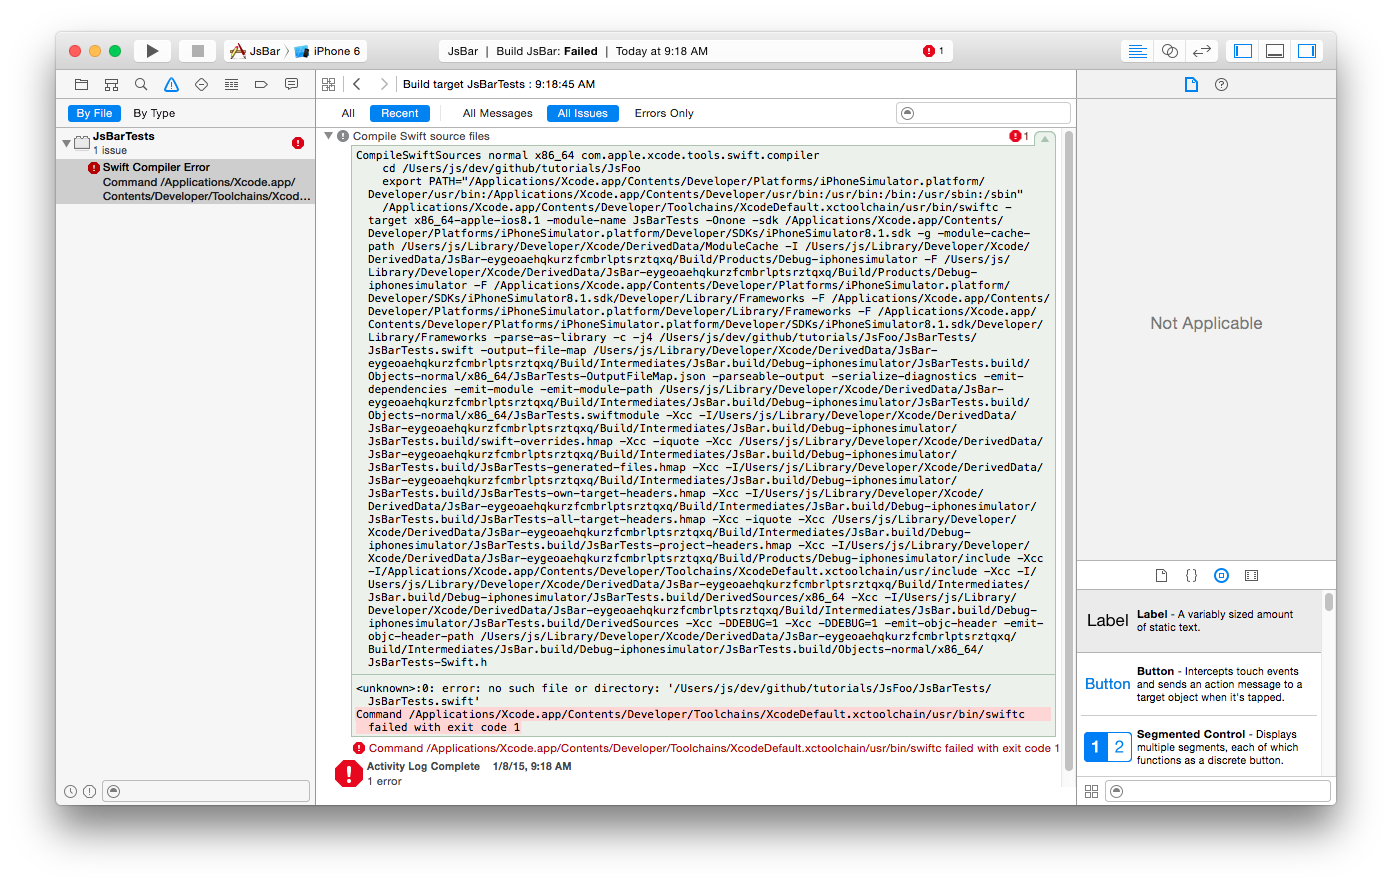


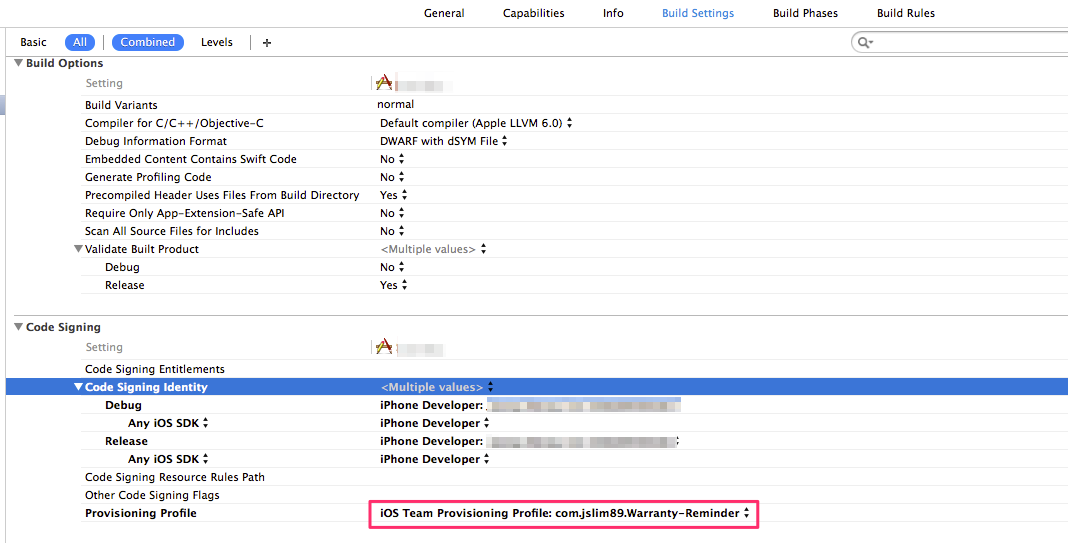
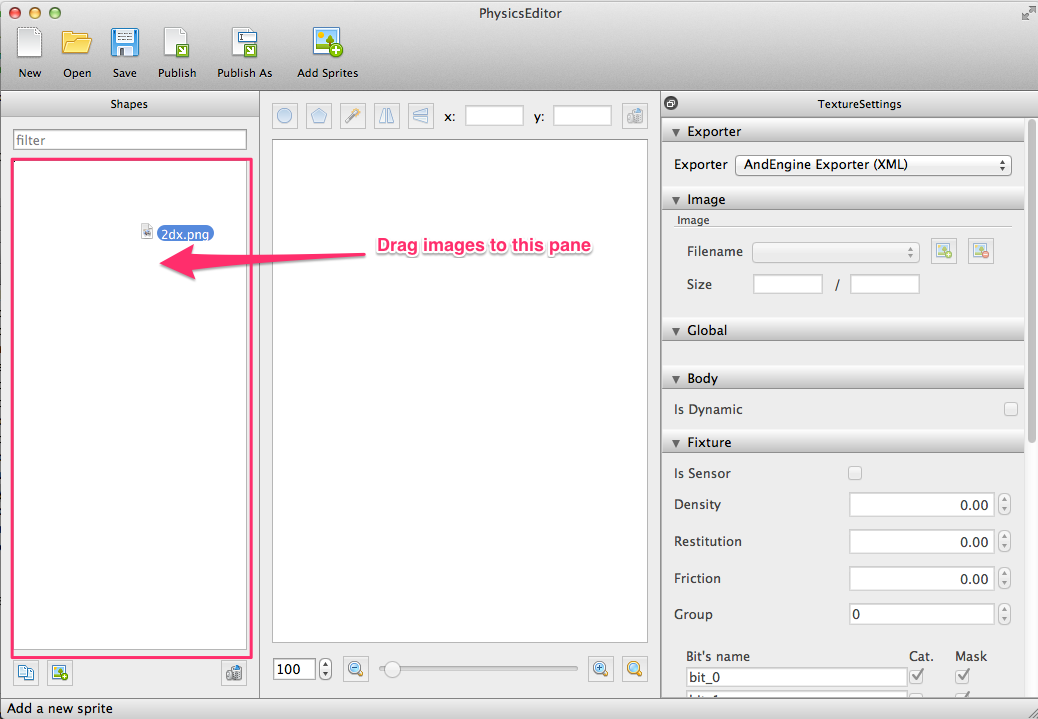
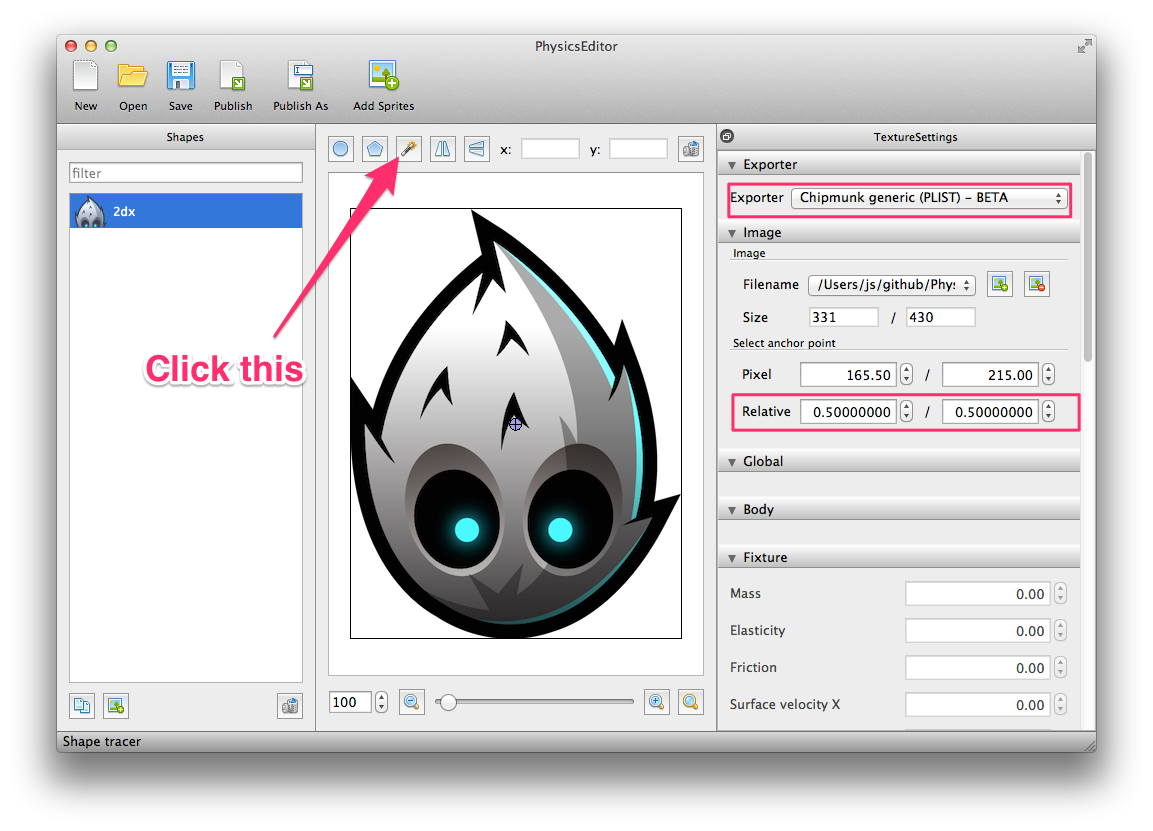

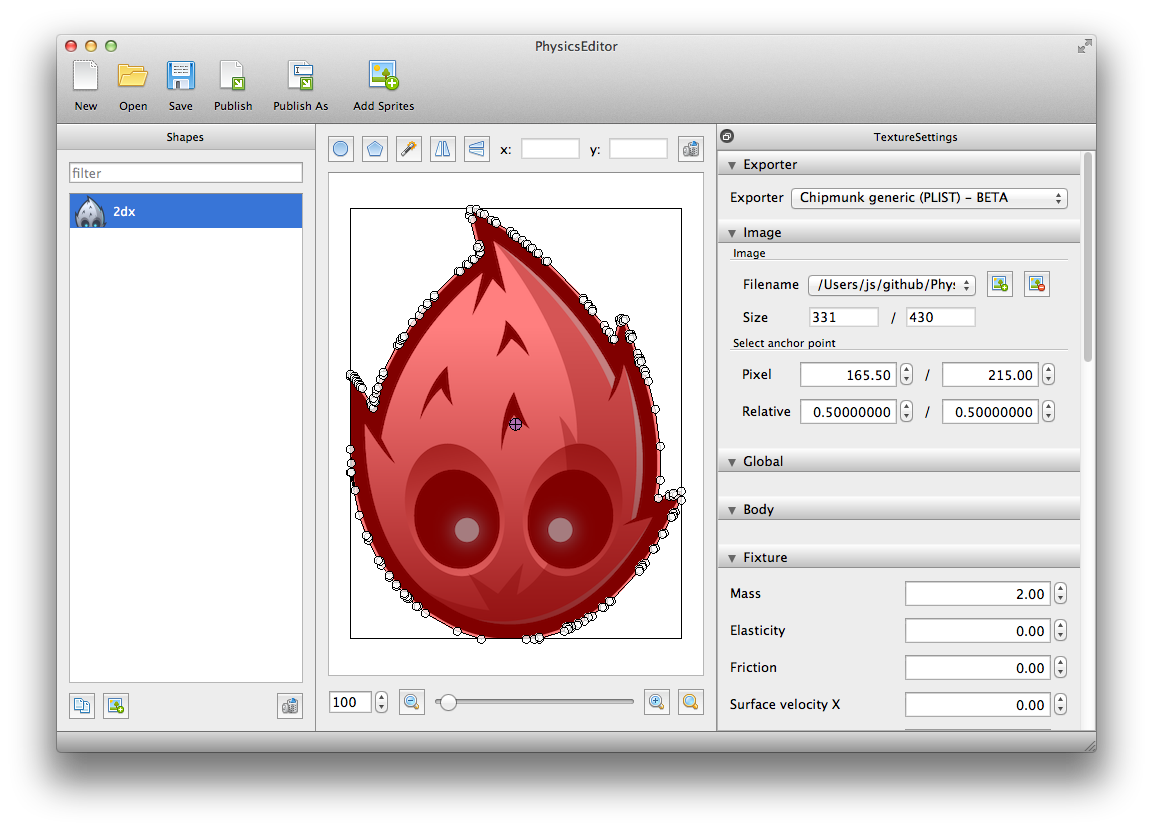
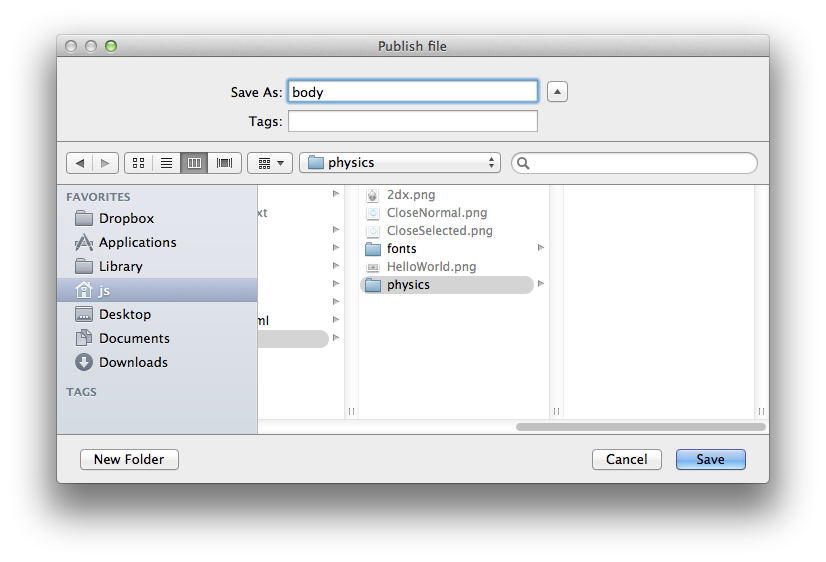
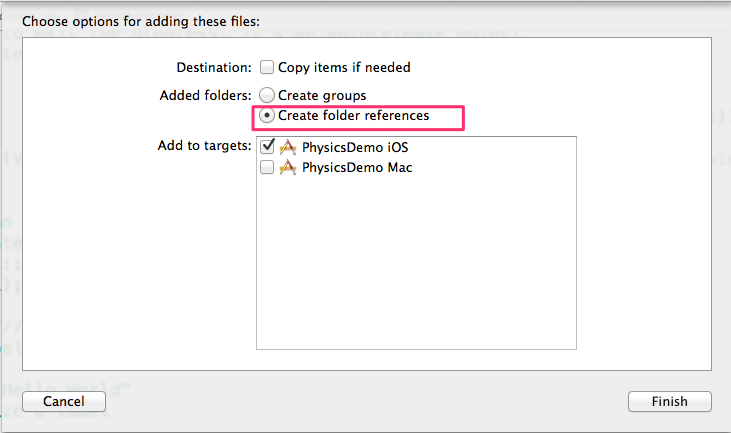
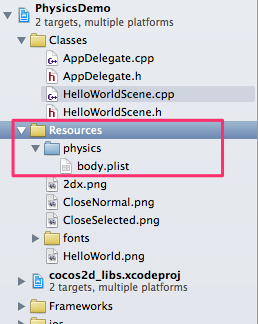
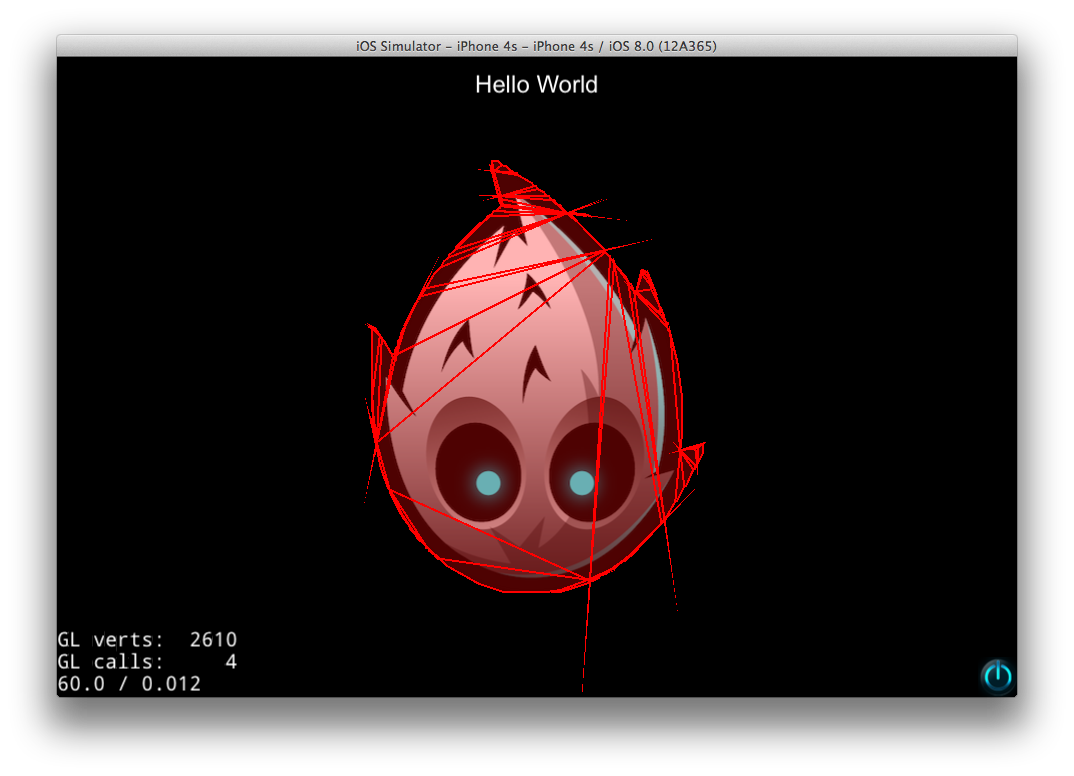
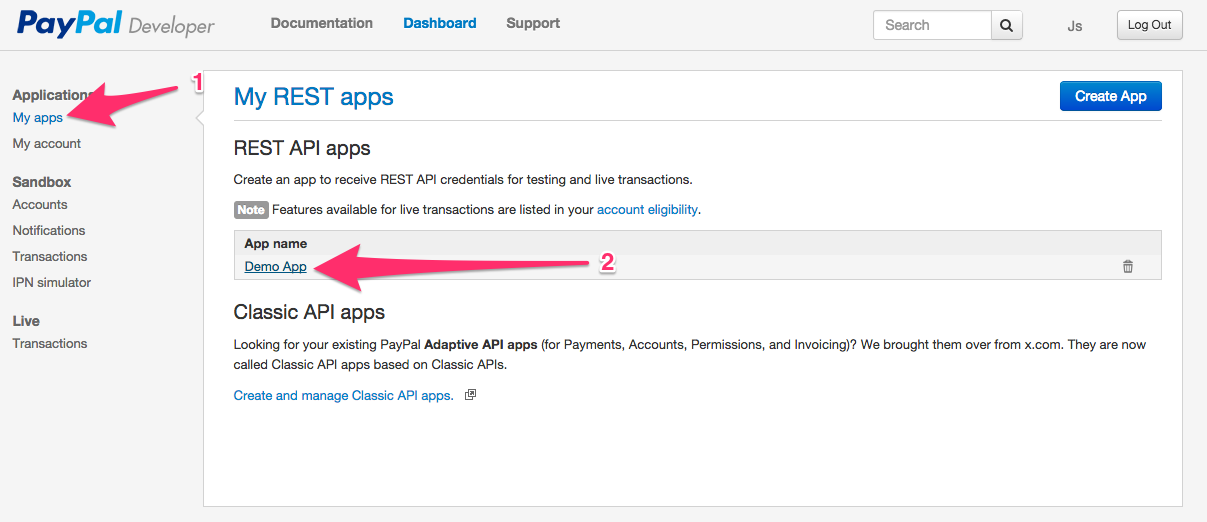
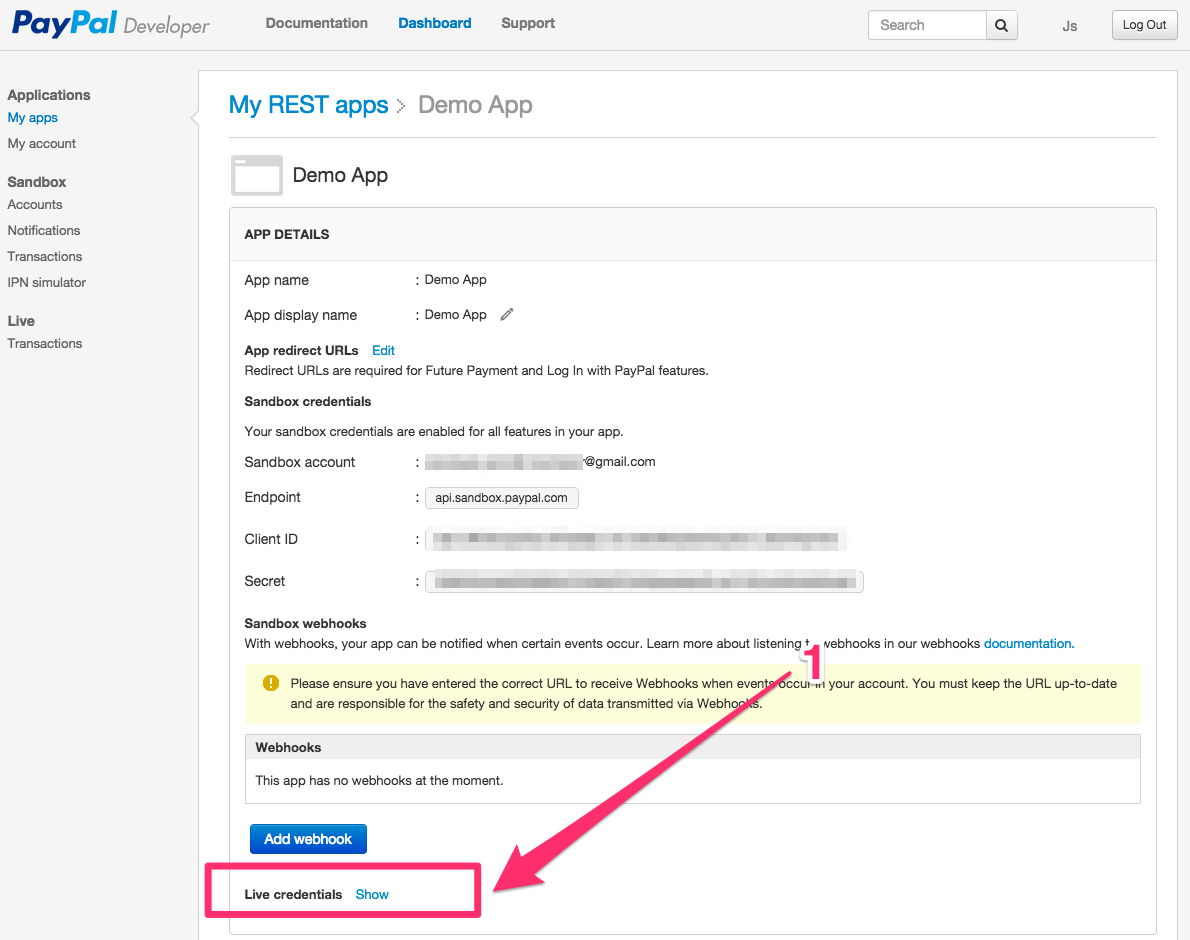
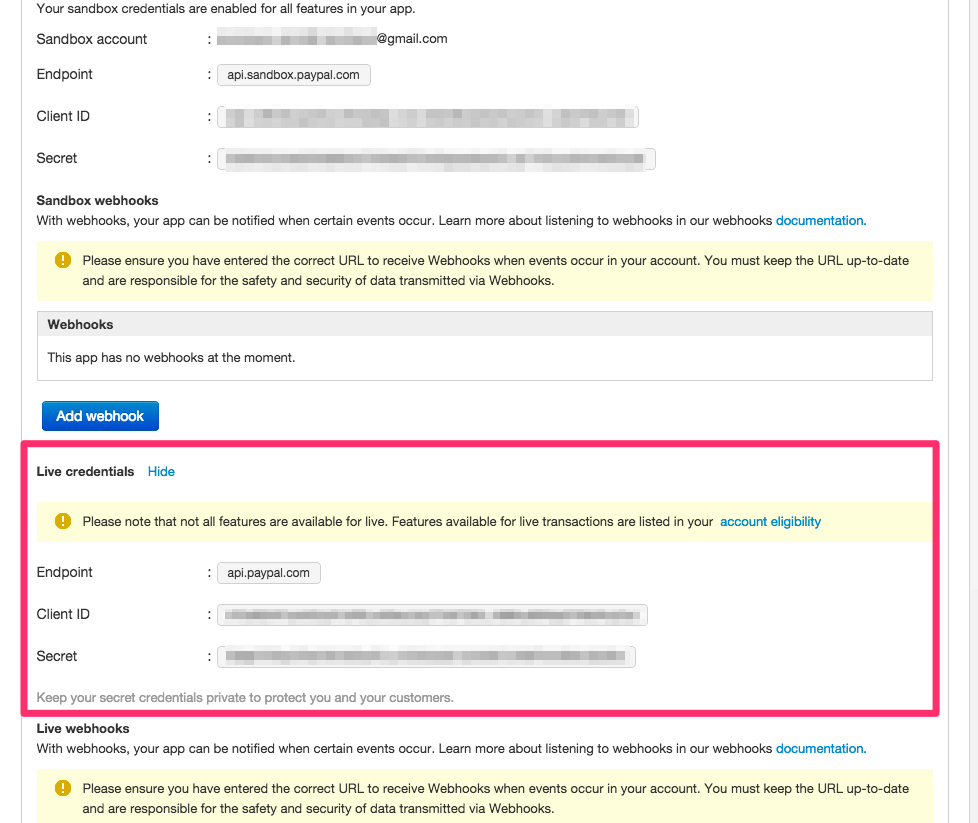


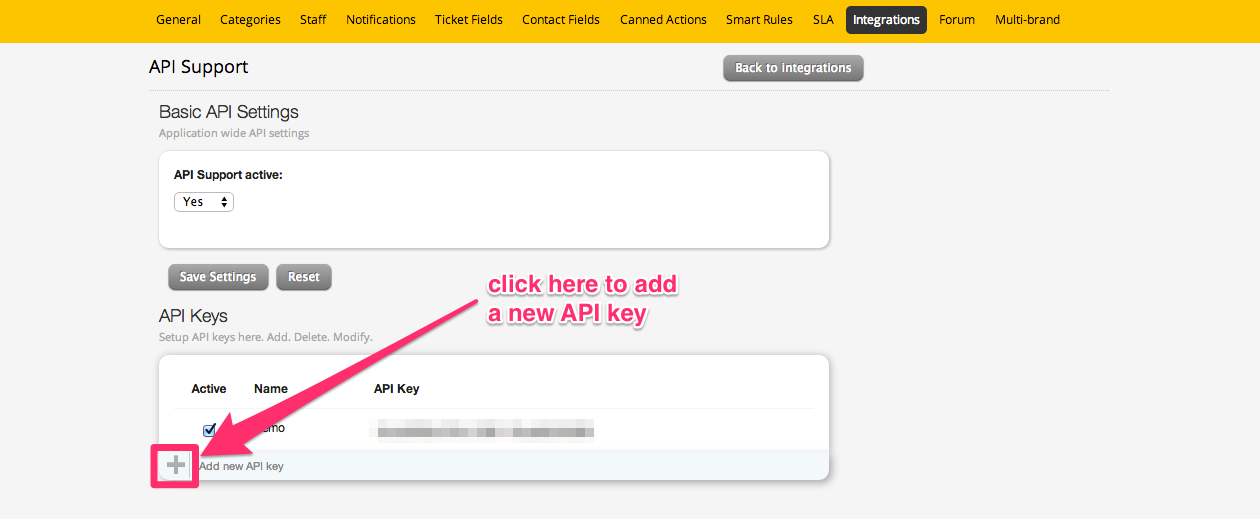
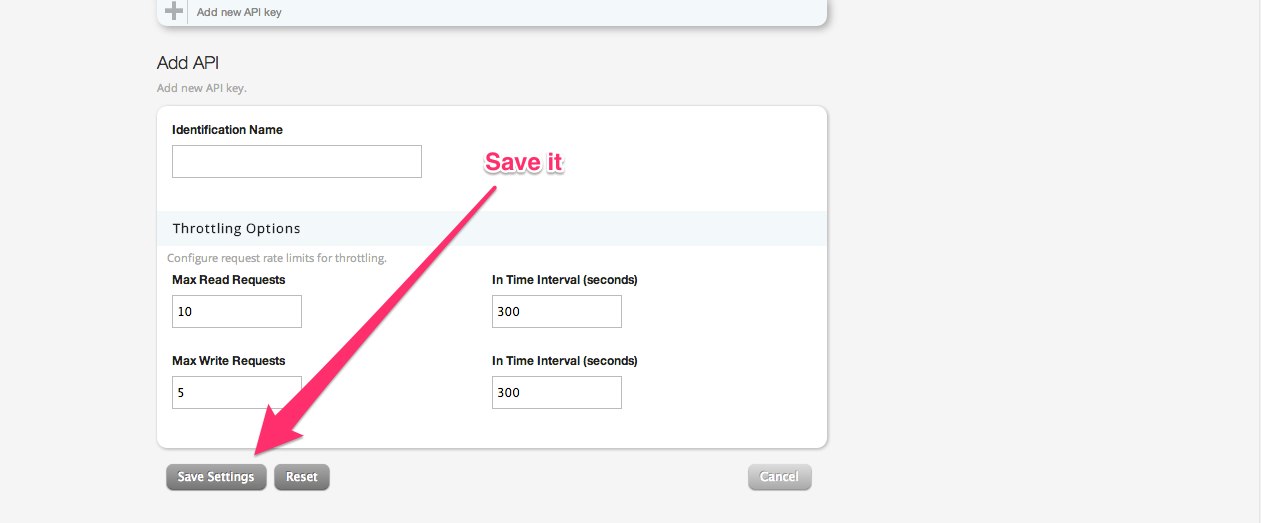
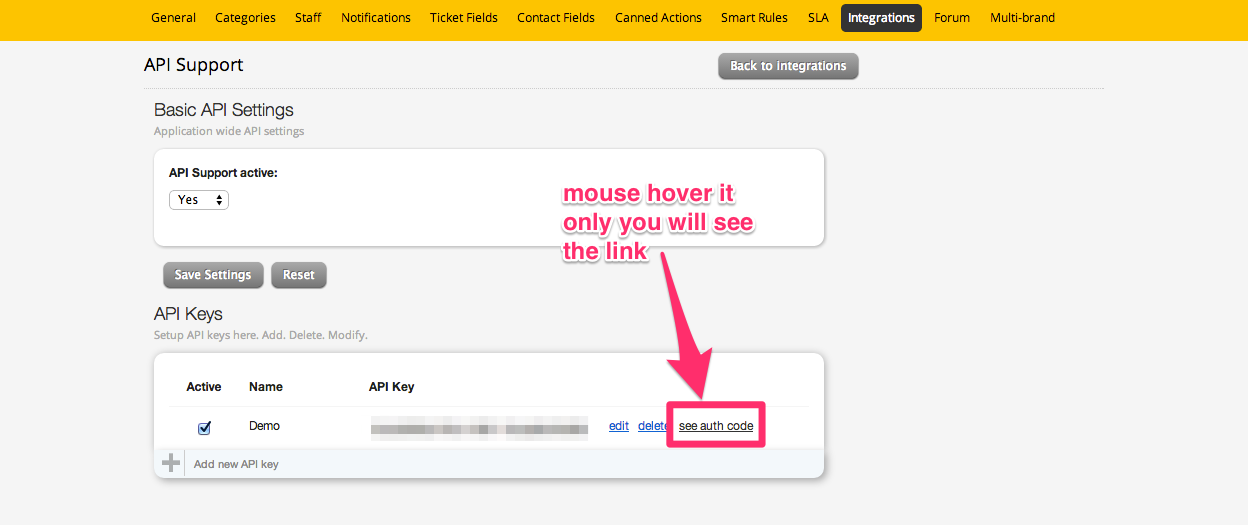
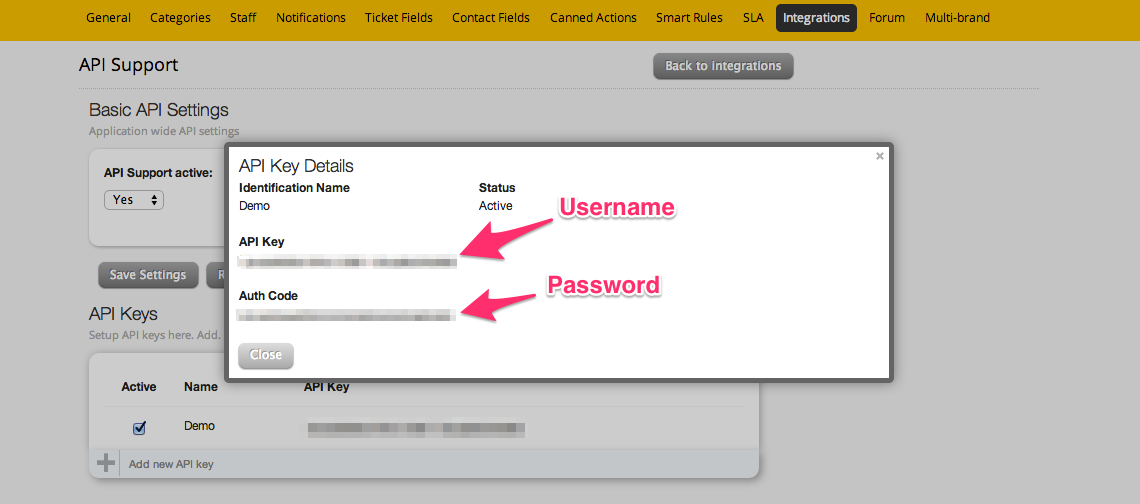
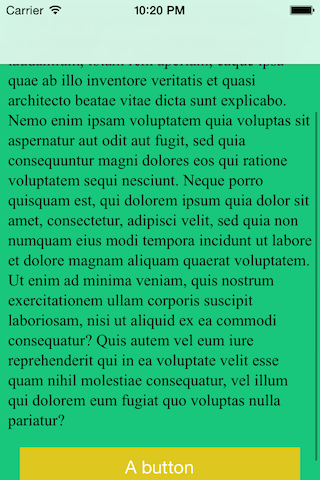
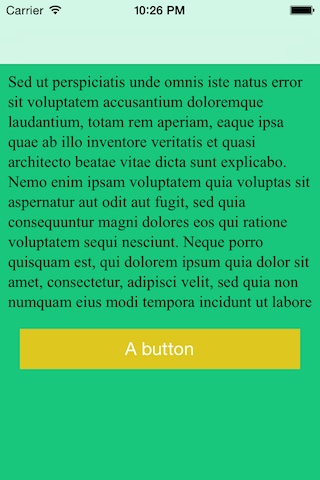


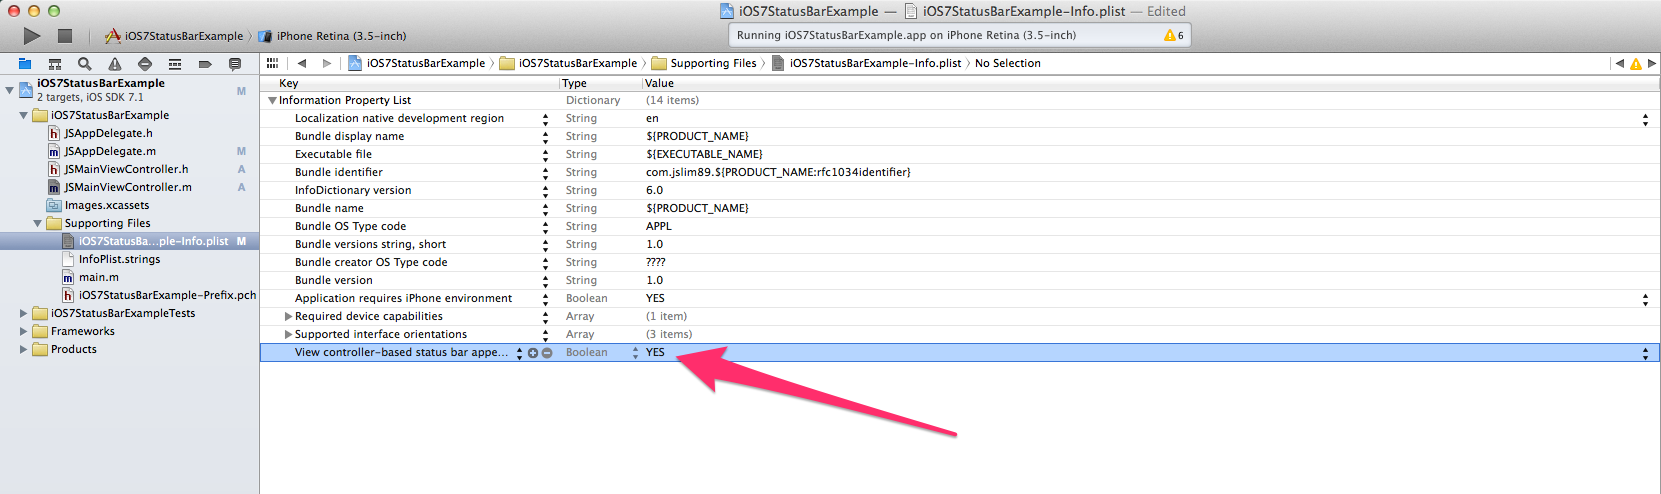
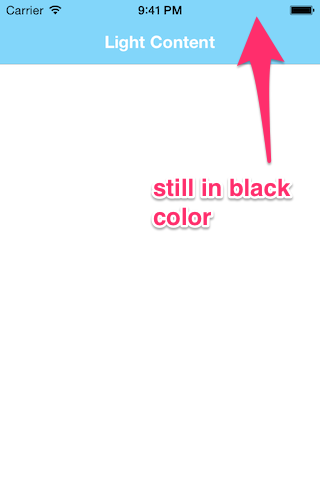


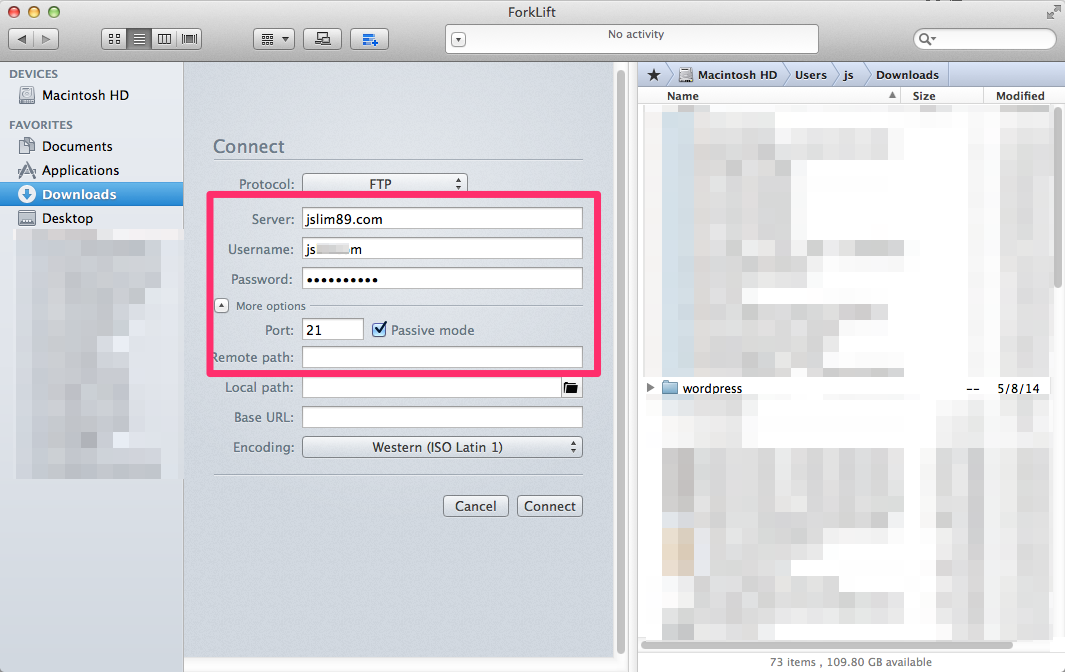
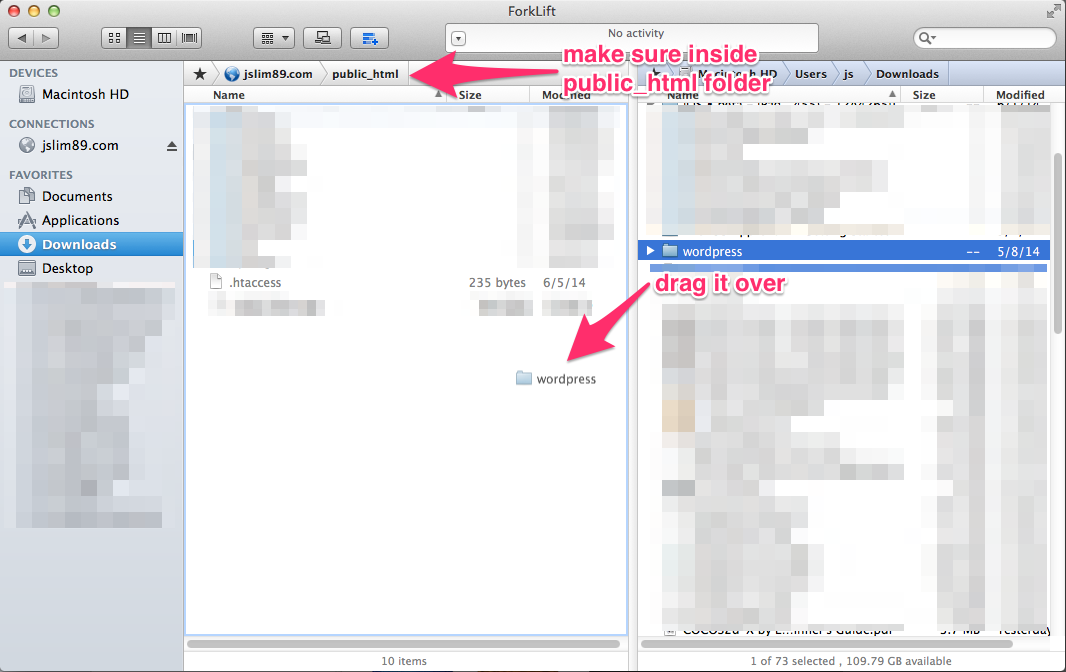
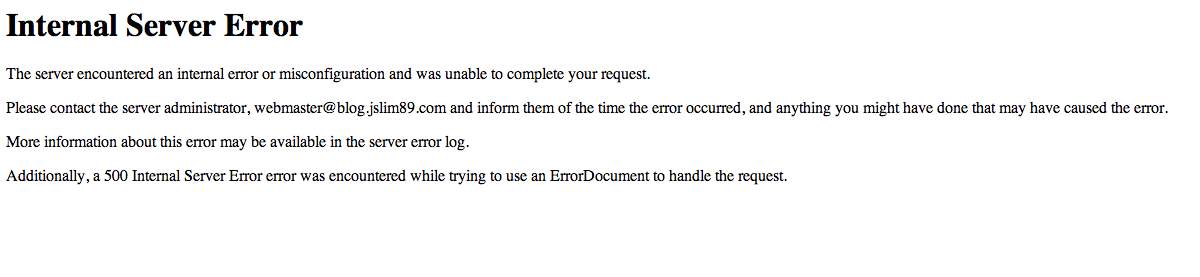

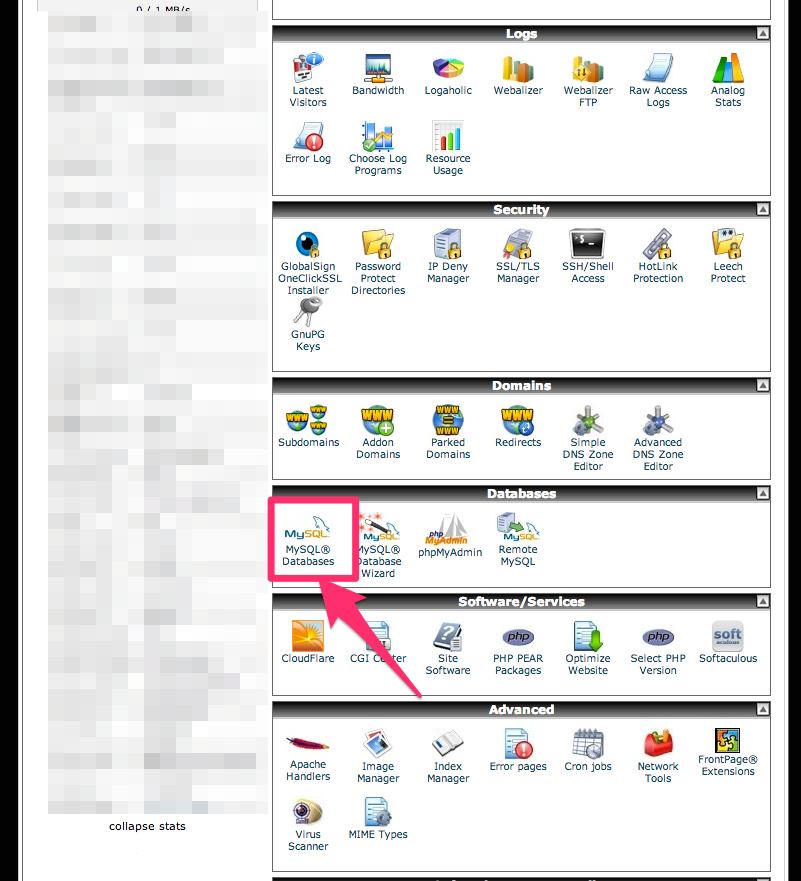
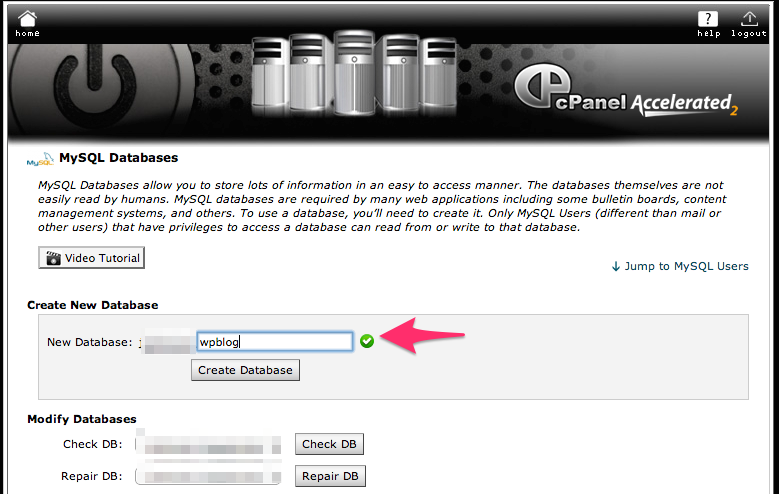
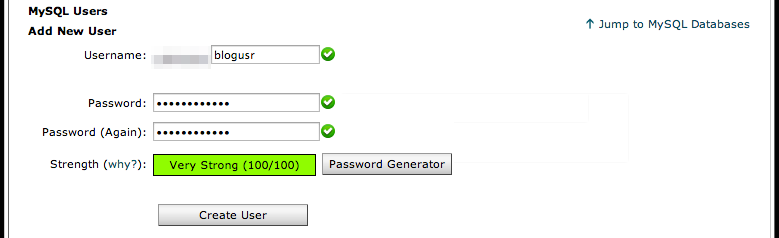

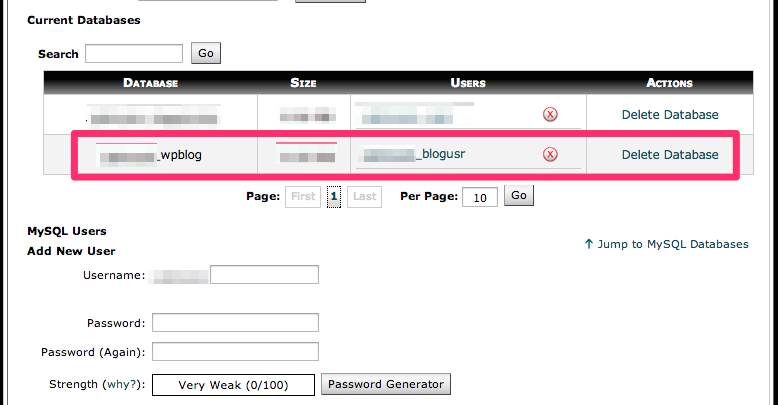

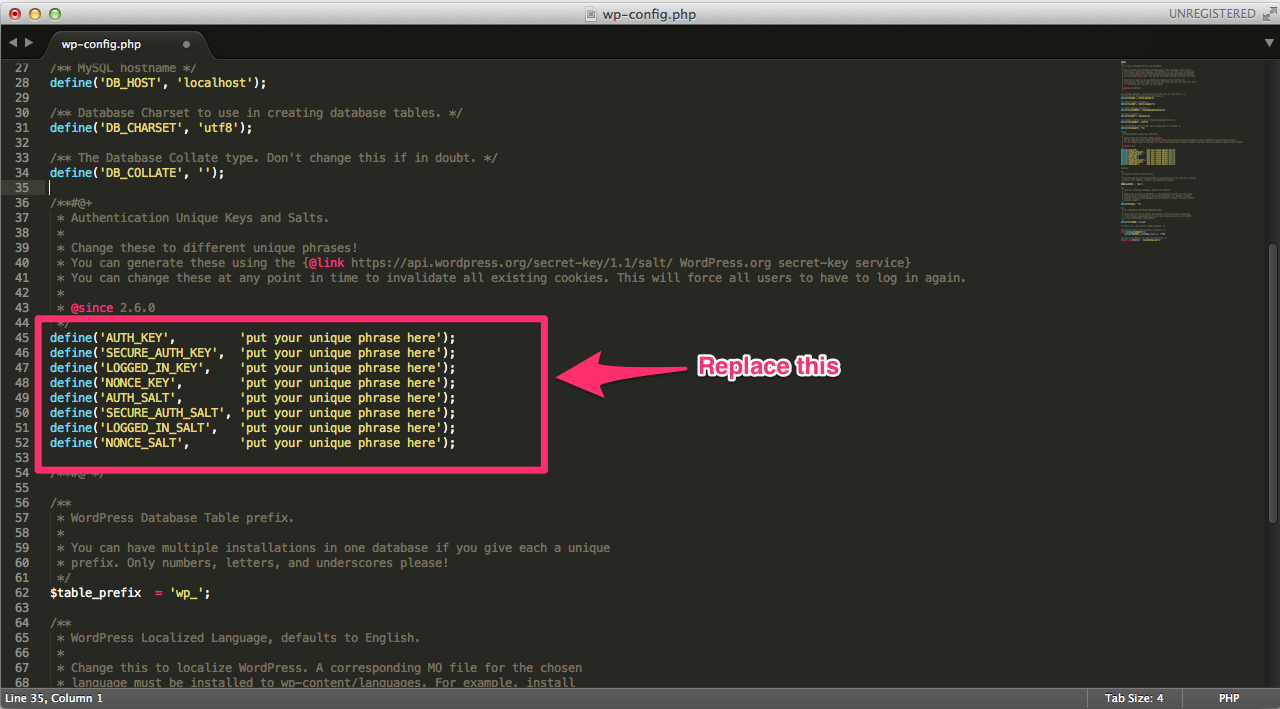


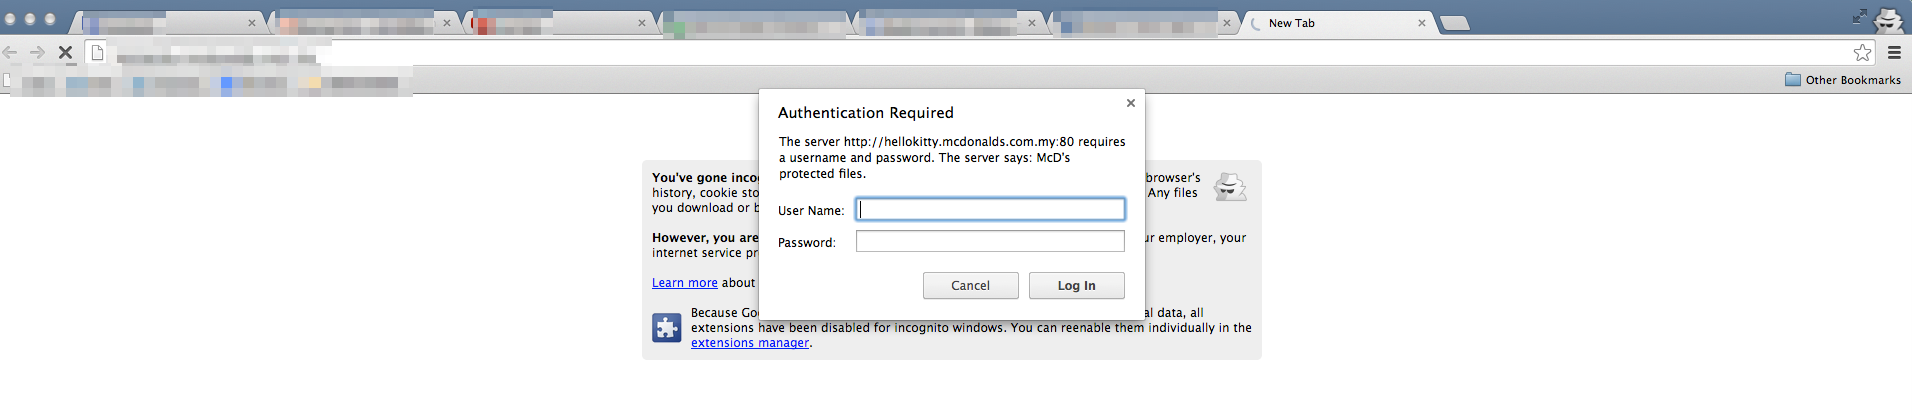


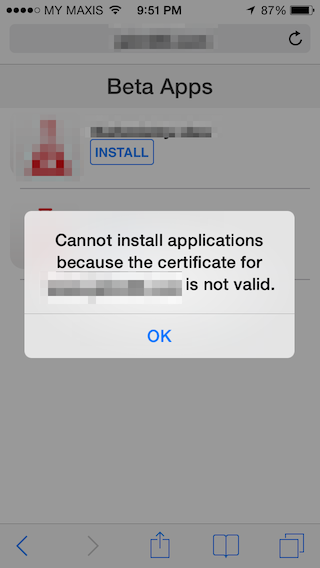
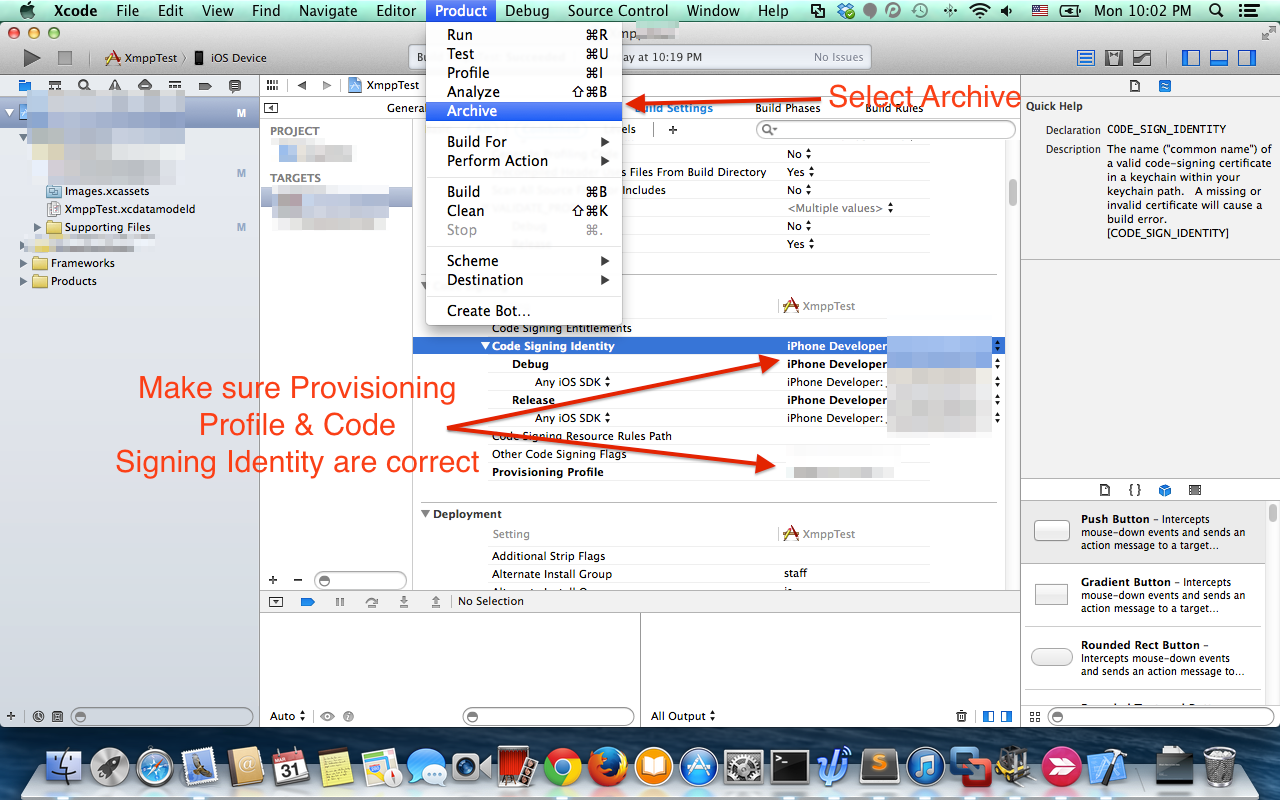
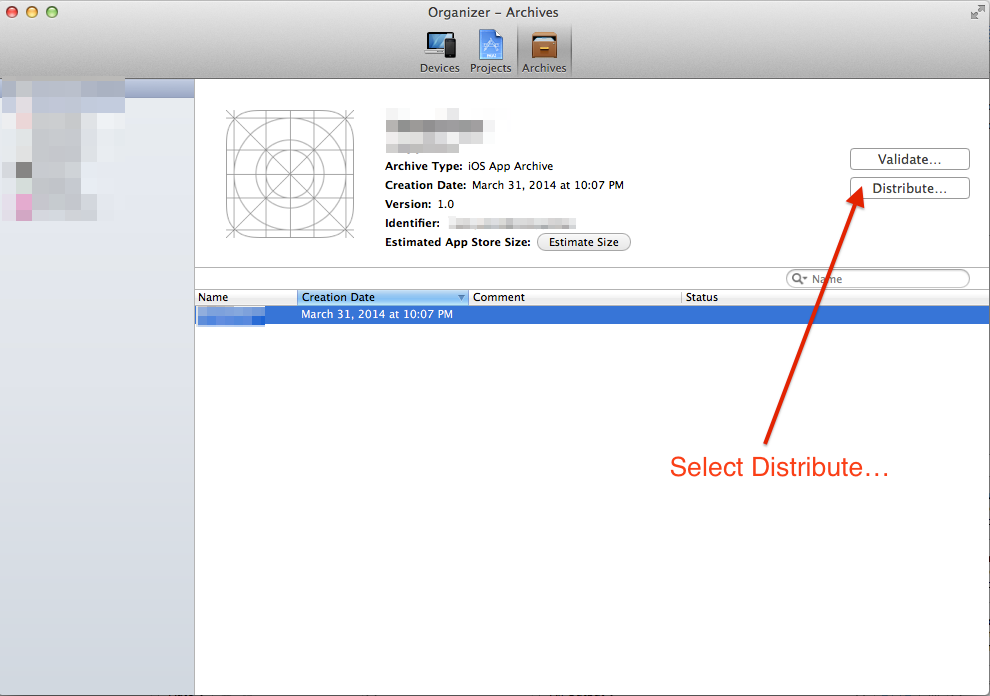
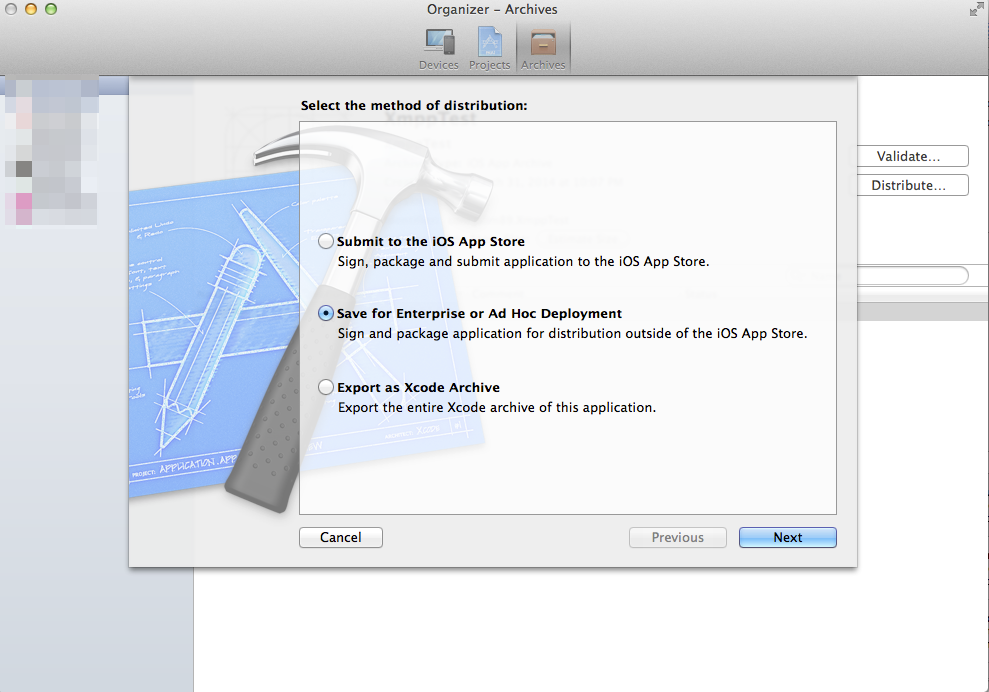
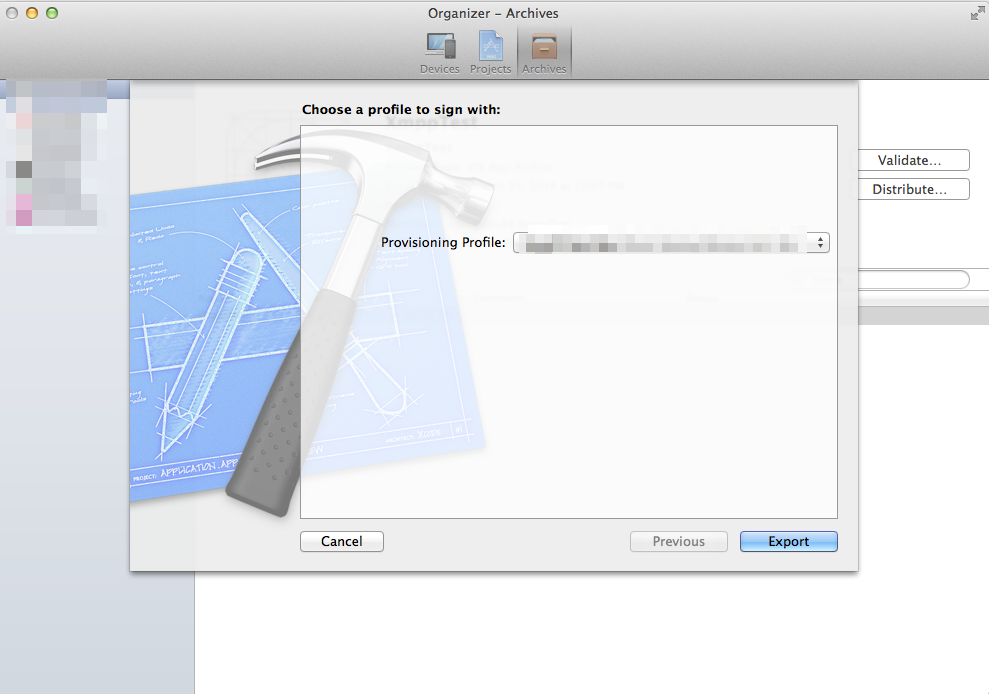
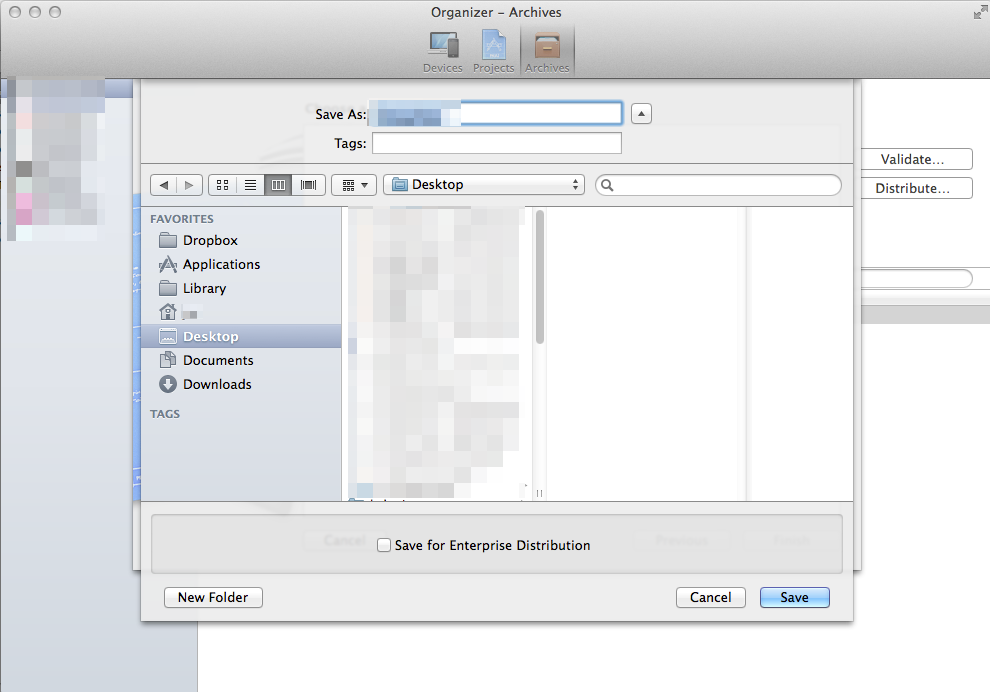
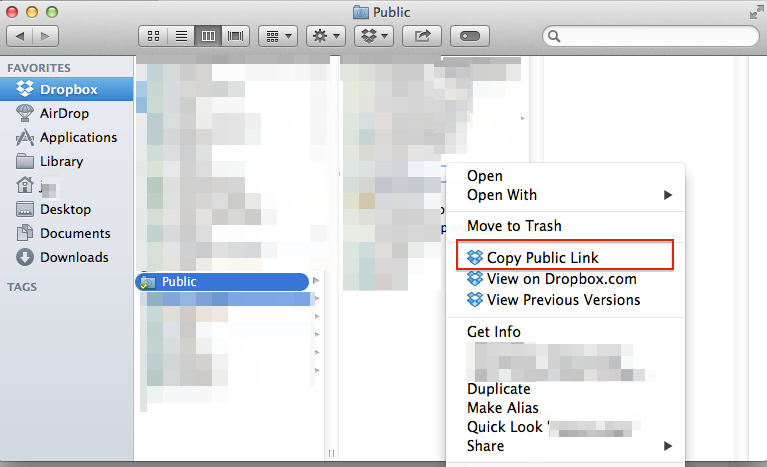


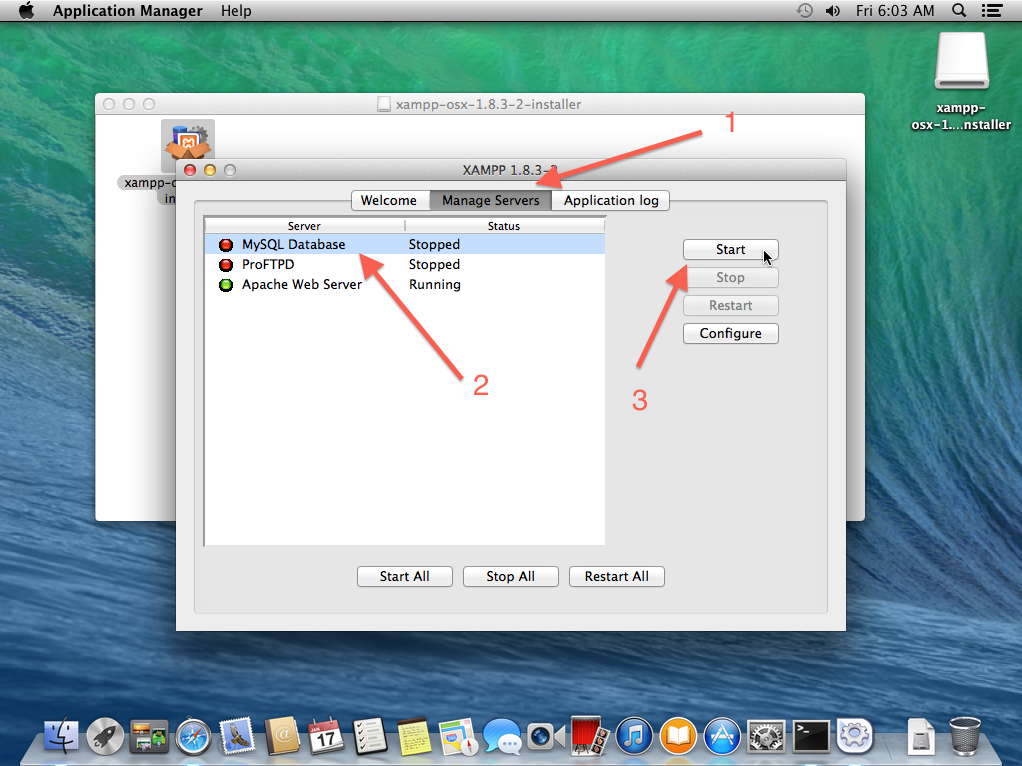
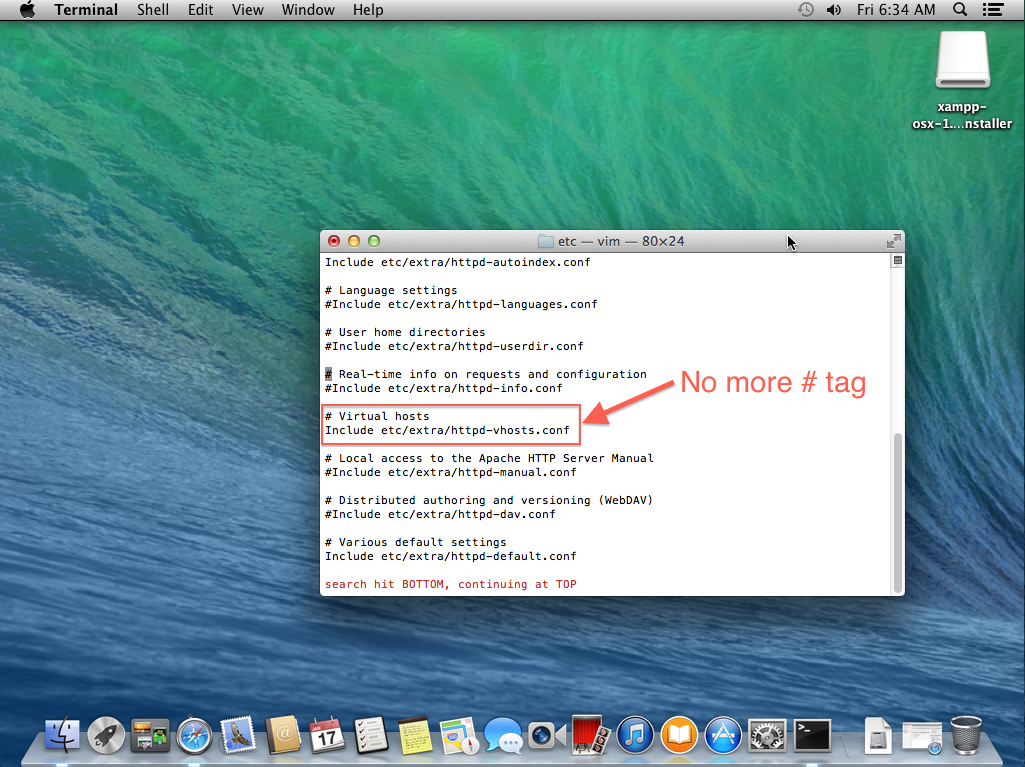
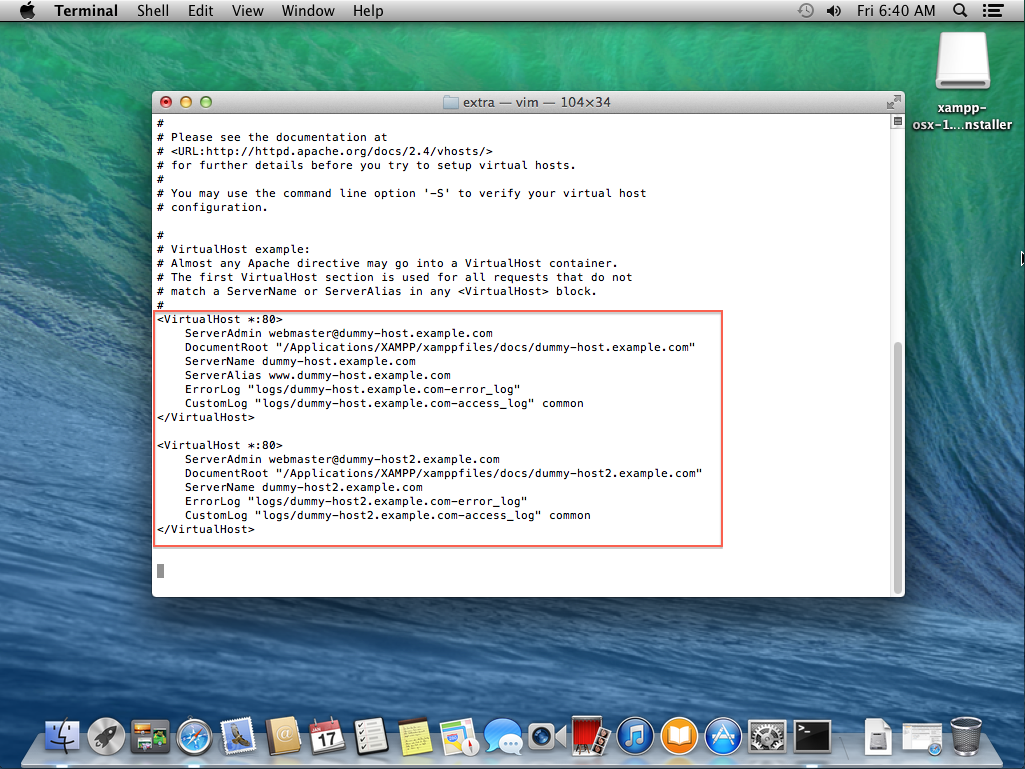
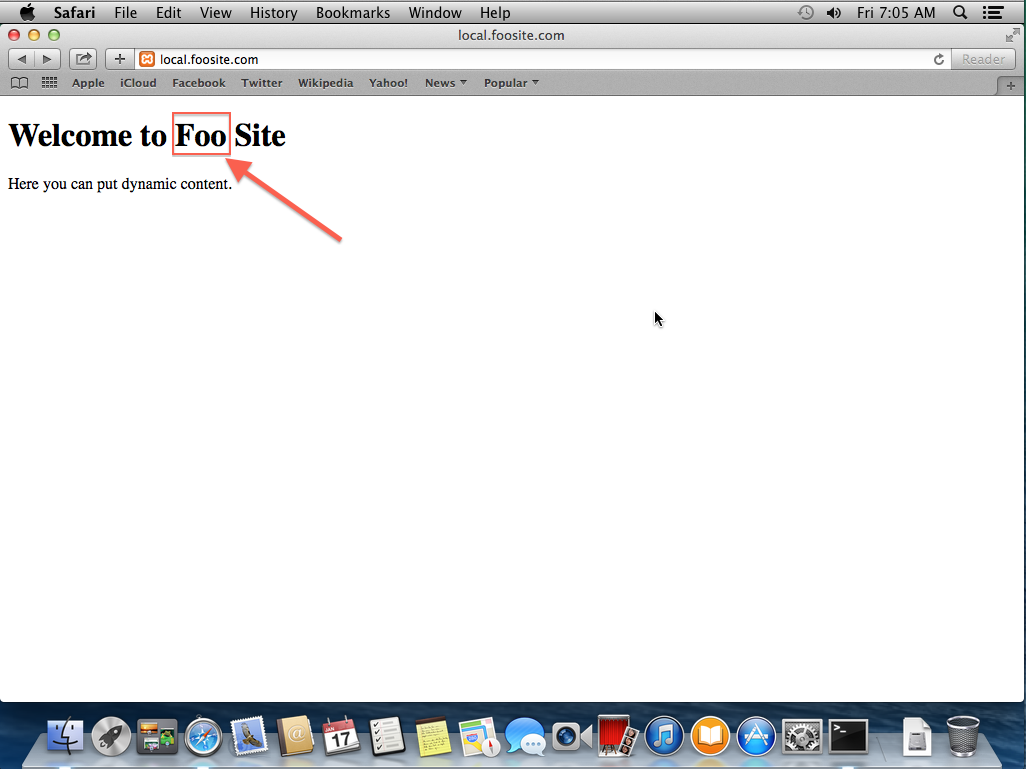
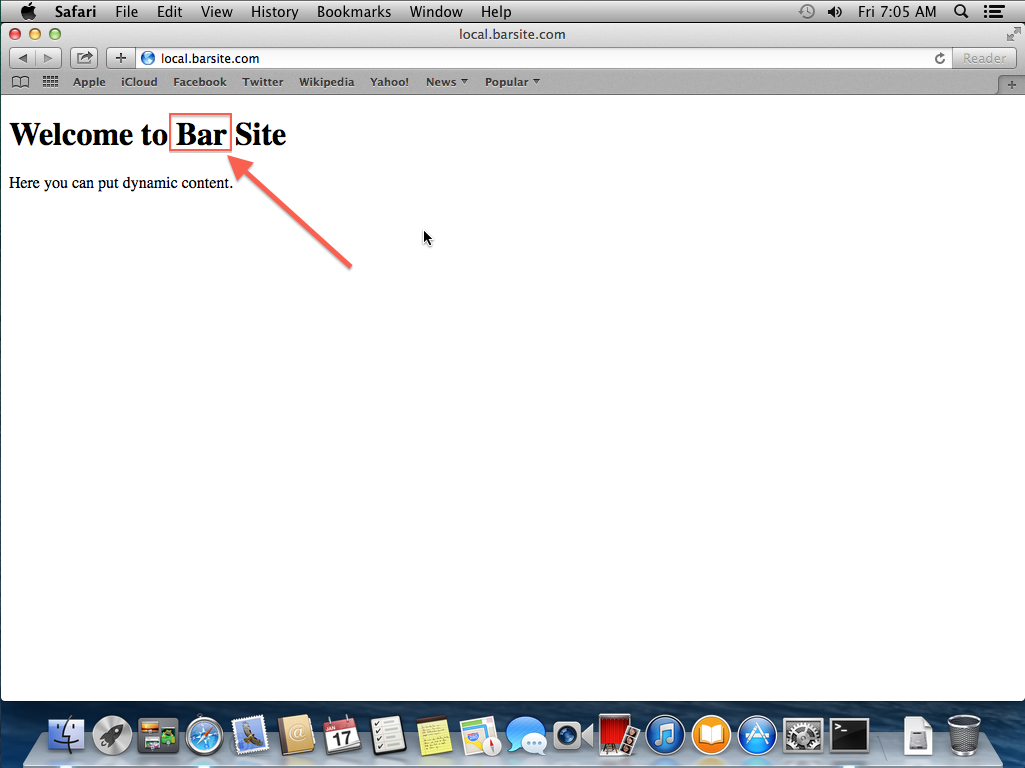
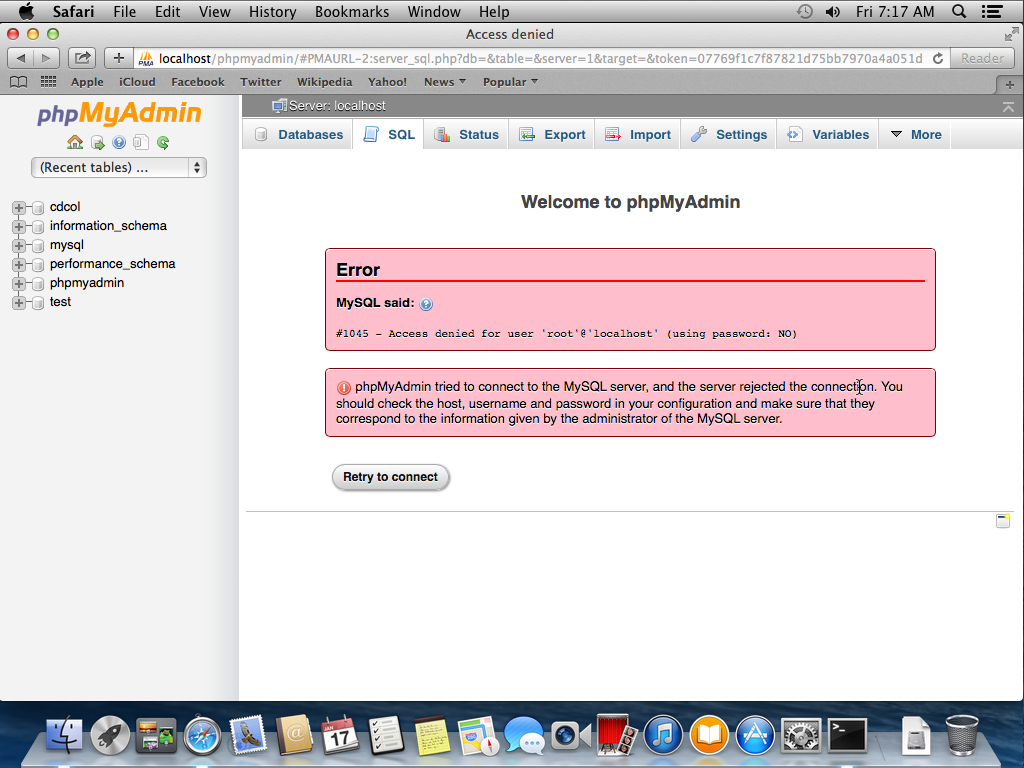
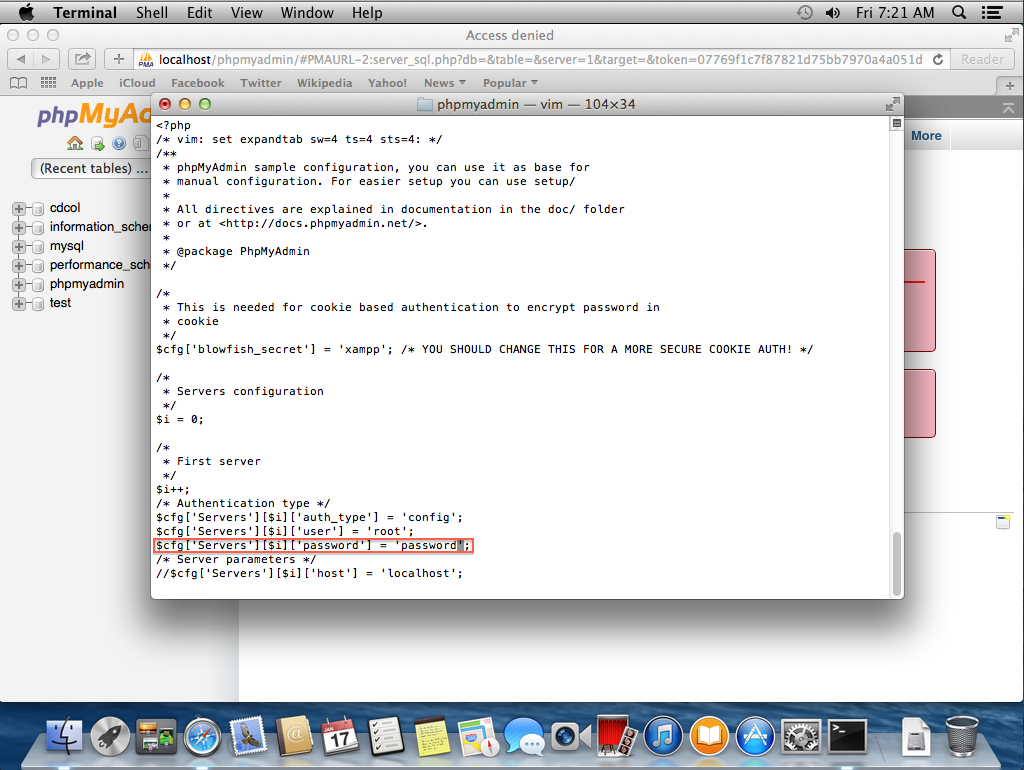

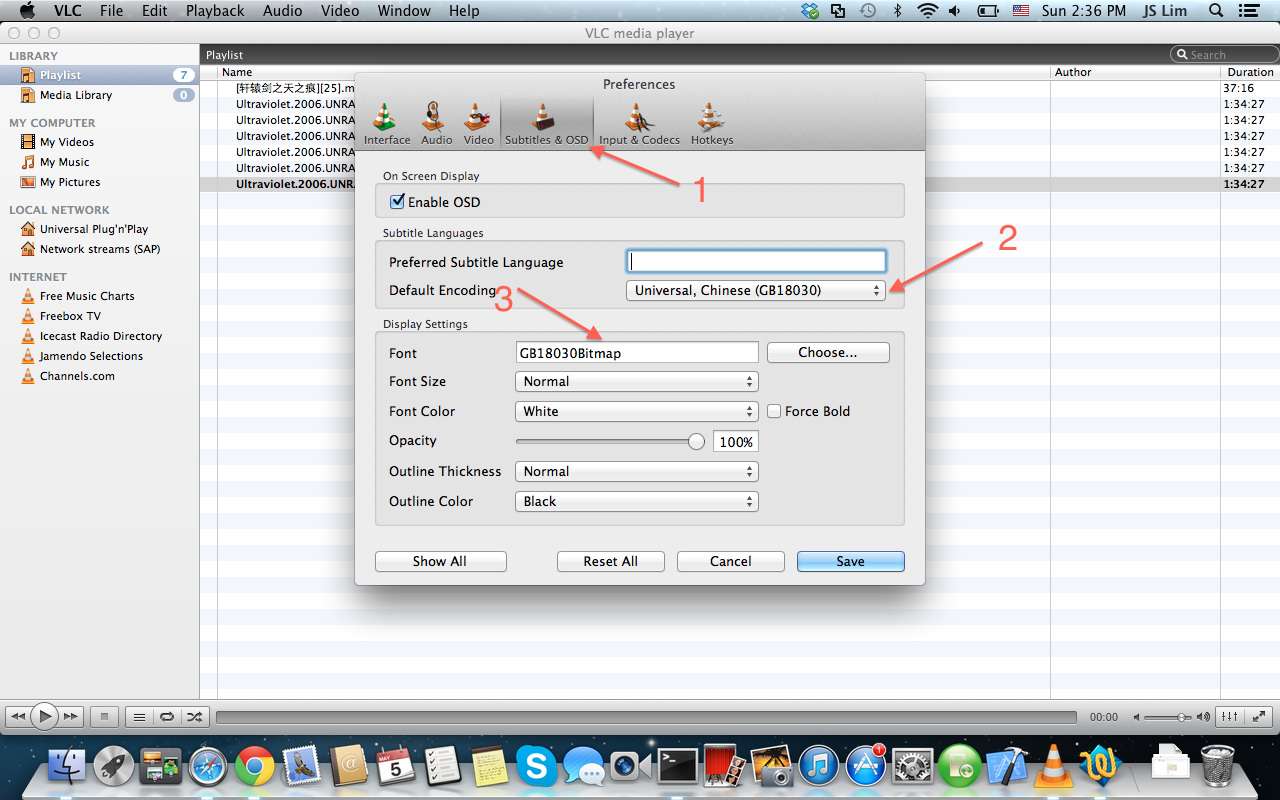

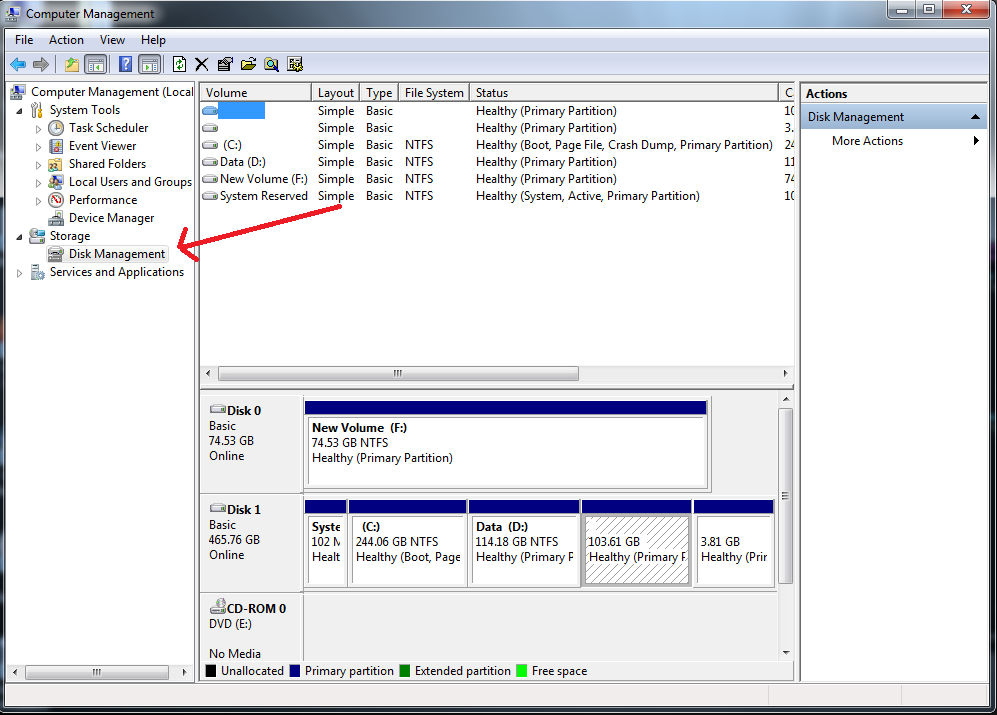
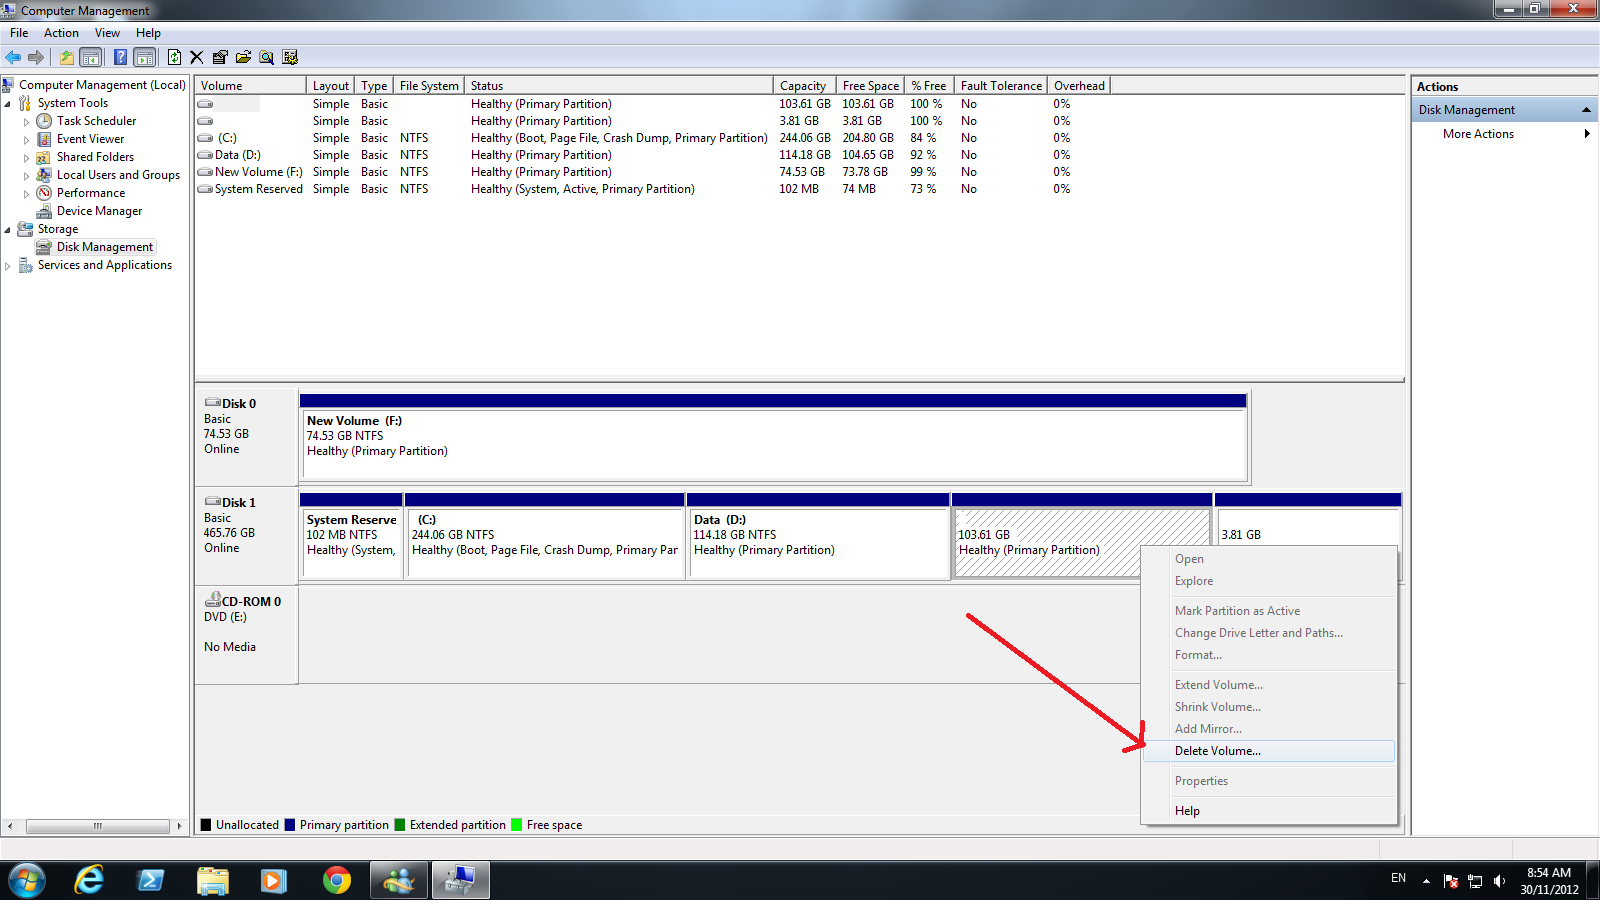
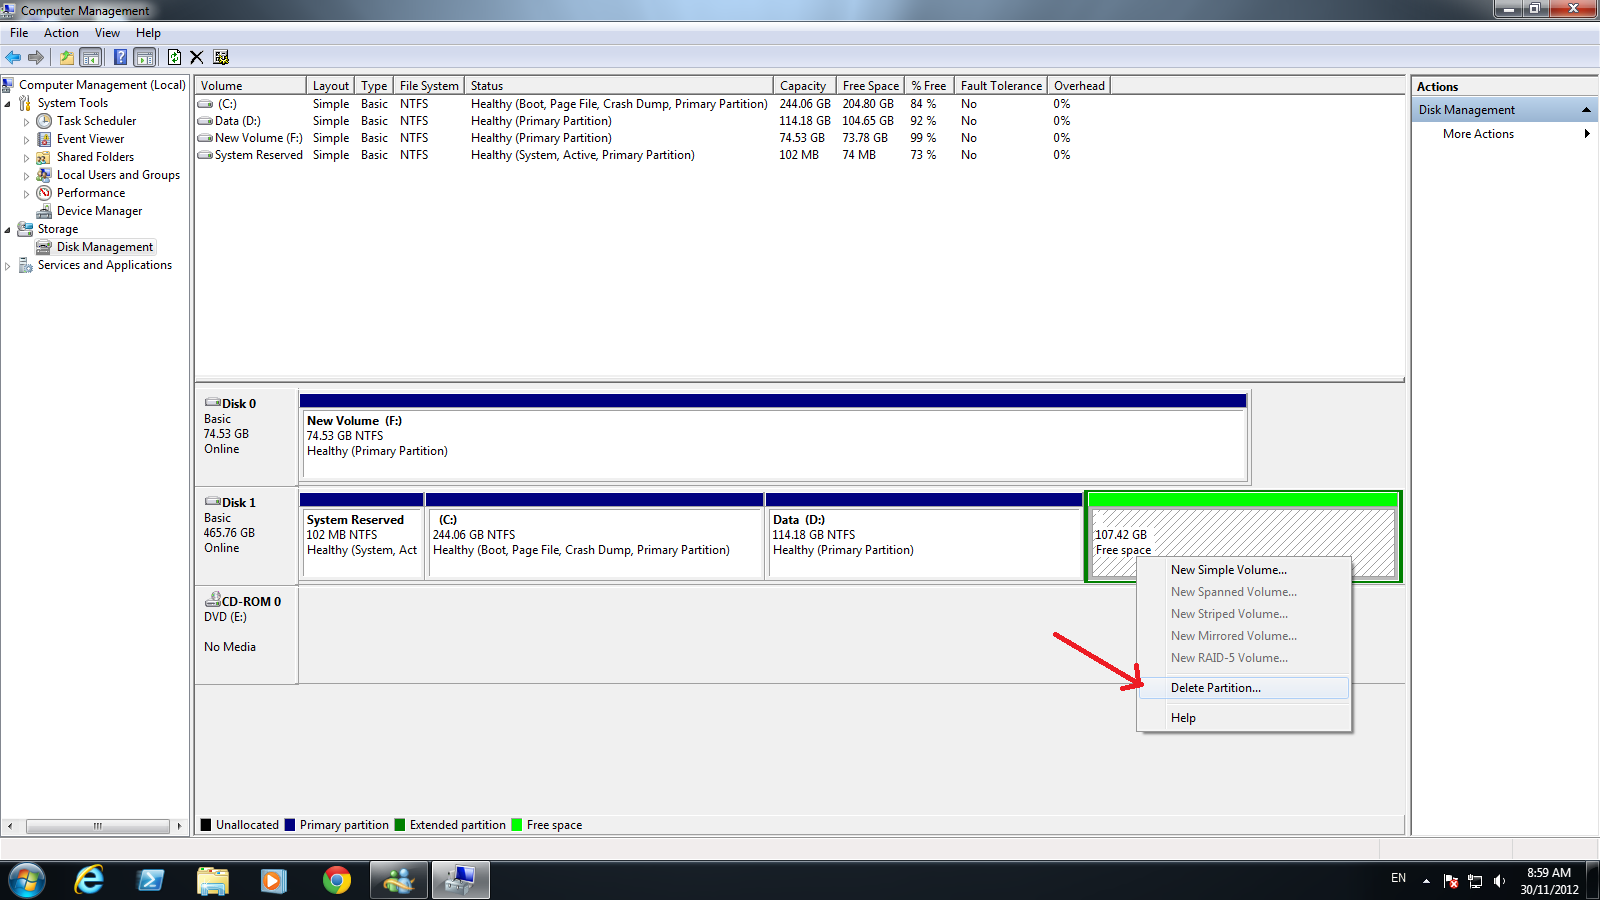
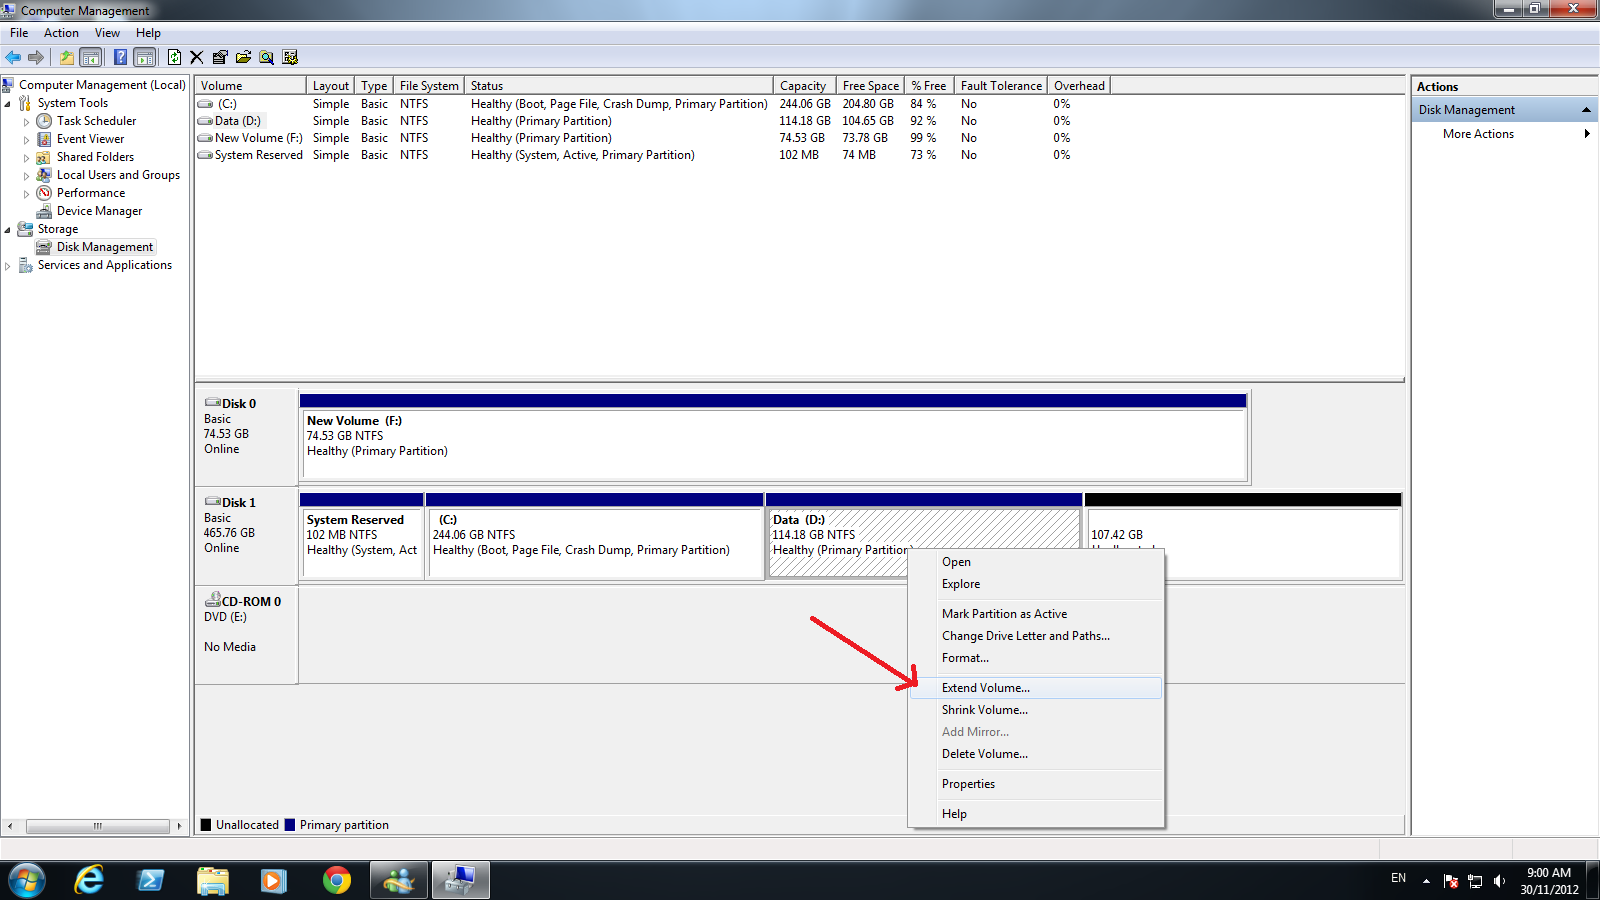
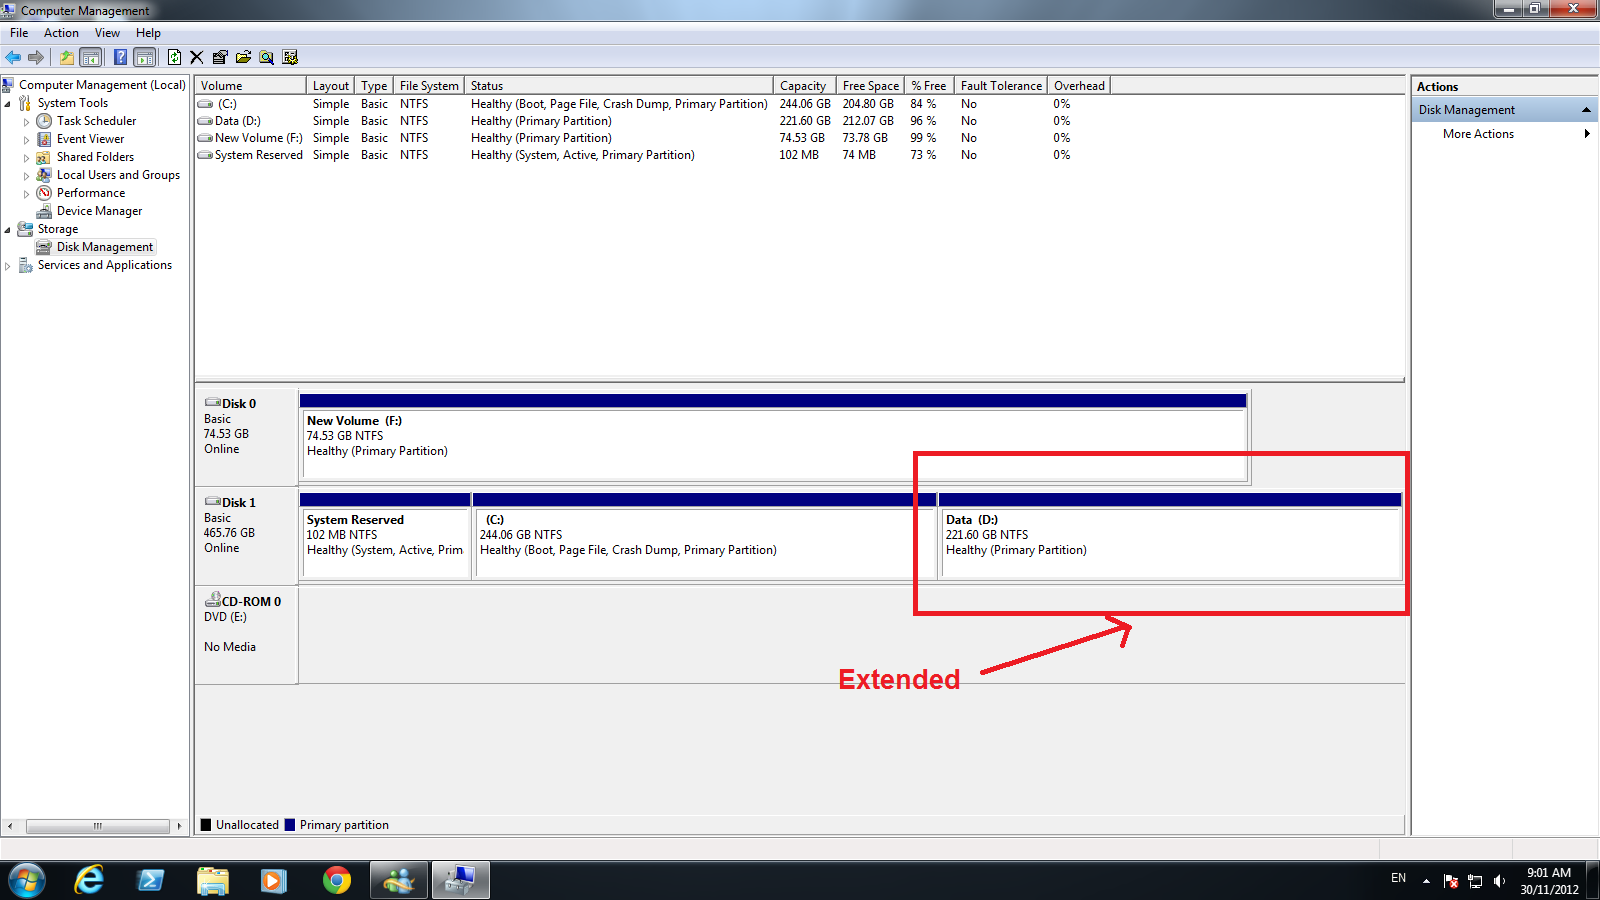

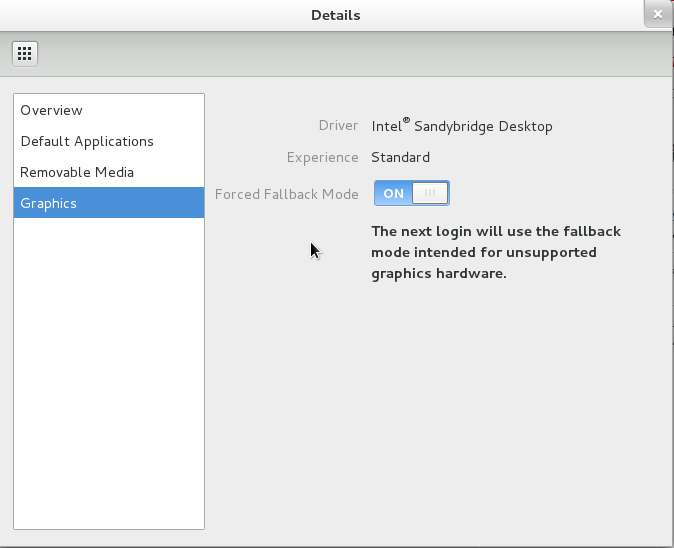